In our previous tutorial on Bash, we have seen how you can effectively create, run and write simple conditional statements in Bash.
You have discovered many concepts of Bash such as exit statuses and how they can indicate a script success or a script failure.
Moreover, you have discovered shell built-ins (such as type or source) and how they differ from Bash variables.
Finally, you have learnt how you can declare and assign values to Bash values easily.
In this tutorial, we are taking a sneak peek at advanced features of the Bash shell scripting.
You will have a greater understanding of for loops, while loops and case statements.
We will also have a close look at Bash special variables as well as declaring options for your Bash scripts using the getopts shell built-in.
What You Will Learn
If you follow this tutorial until the end, you will have a deeper understanding of the following Bash concepts :
- What are positional parameters and how they can be used;
- What Shell special parameters are and what are the most common Shell special parameters that you can use;
- How to declare and use for loops in order to iterate over an argument list;
- How to declare and use while loops and how to write proper termination conditions;
- How you can use “case” statements in order to specify special actions for given arguments;
- What Shell options are and how they can be captured using getopts;
- How to declare and execute simple Bash functions
That’s quite a long program so without further ado, let’s jump right into it.
Bash Positional Arguments
In Bash, you can provide “arguments” to the script you are writing.
“Arguments” are values passed to your script that can be interpreted inside your script as variables.
They can be used in order to provide additional information, context or meaning to your Shell script.
For example, if you want to execute a script that is creating three different users, you can provide the user names as arguments to your Shell script.
$ create-user john jack jimIn this case, the three names are passed as arguments to the Shell script and they can be used inside the script as variables.
In order to have access to the value of the argument provided, you can simply reference them as ${1} for the first argument, ${2} for the second argument and so on.
The ${0} refers to the path to the script currently being executed.
As a example, if you try to see the value of the first argument in your script, you would write
#!/bin/bash

echo "The first argument passed to the script is ${1}"

# This line will display "john"
Shell Special Parameters
In our previous tutorial, we already discovered some of the shell special variables when learning about exit statuses.
So what are Shell special variables?
Shell special variables are read-only variables that are created by Bash in order to store values such as the last exit status or the arguments provided by the user to the command-line.
In order to have a look at Shell special variables, you have to open the documentation for the bash command.
$ man bashWhen you are inside the documentation, hit the forward slash “/” and look for “Special Parameters“.
There you will be presented with a complete section as well as a description of all the Shell special parameters.
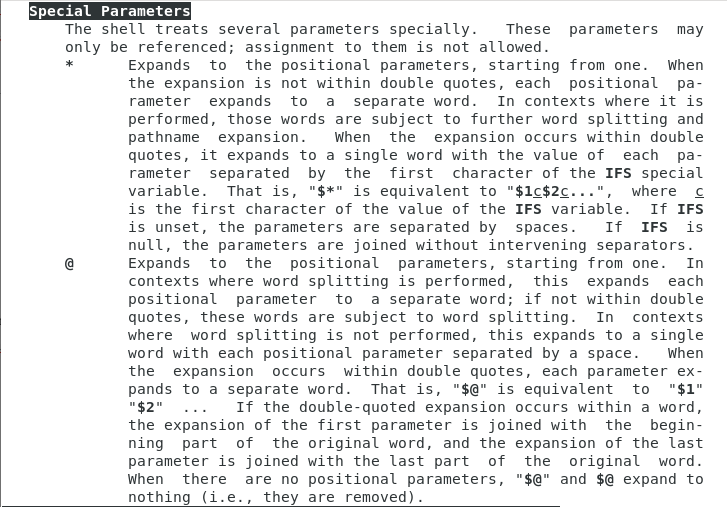
In our case, we are only interested in a couple of Shell special parameters :
- ? : results in the exit status of the last executed command (as a reminder, 0 for success and 1 for error)
$ echo "This is a successful command"

$ echo ${?}
0- # : describes the number of positional arguments provided to the command;
$ ./myscript "First argument" "Second argument"

Number of arguments provided is 2- @ : expands the positional arguments provided into a space-separated list of arguments. Arguments provided in quotes are preserved;
- * : expands the positional arguments provided into one single string of arguments. Arguments provided in quotes are expanded;
- 0 : provides the script name or the path to the script being executed.
Now, what would is the purpose of Shell special variables?
Shell special variables can be used with loops in order to iterate over all arguments provided to a Shell script for example.
This is what we are going to illustrate in our next section.
Using For Loops in Bash
The “FOR” statement is a shell keyword and it is used in order to iterate over a list and execute actions for every item on that list.
In order to get some help related to the “for” keyword, use the help command.
$ help for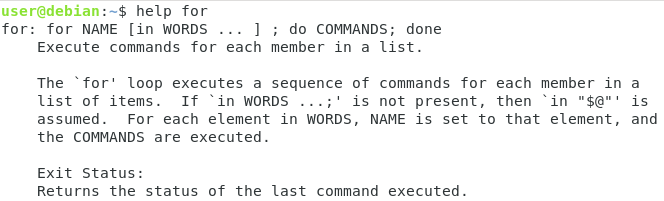
As you can see, the for loop expects a list of words to be provided in order to iterate over it.
For each iteration, the commands specified will be executed.
for X in WORDS
do
  COMMANDS
done
As a quick example, you can provide a list of strings separated by white spaces to the for loop and echo the result to the standard output.
$ for X in "First" "Second" "Third"
> do
> echo $X
> done

First
Second
Third
In this case, using the for loop is not very useful, but it can be very useful when combined with Shell special parameters.
Let’s say for example that you want to iterate over the list of arguments provided to the command-line.
Instead of having to guess how many arguments were provided, you can use the for loop with the “${@}” special variable.
If for example you want to create a user for every username provided to the command-line, you can use the for loop to that effect.
#!/bin/bash

for USERNAME in ${@}
do
  echo "Created username ${USERNAME}"
done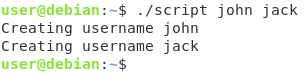
Awesome!
You know how you can iterate over the argument list provided to your script now.
Now that you understand “for” loops better, you are ready to learn about “while” loops.
Using While Loops in Bash
The “WHILE” statement is a shell keyword that evaluates a condition and executes a statement if the condition evaluates to true.
The “WHILE” statement lasts until the condition evaluates to false at some point.
while [[ condition ]]
do
  COMMANDS
done
As an example, let’s assign a value to the X variable and print the value of X until X is lower than 1.
#!/bin/bash

X=3
while [[ ${X} -ge 1 ]]
do
  echo "Value of X is ${X}
  X=$((X-1))
done
On the first iteration, X will be equal to 3 thus returning true to the condition specified in the while loop.
On every iteration of the while loop, the X variable will decrease by one, reaching a value lower than 1 at some point.
When X is lower than 1, the condition will return false and the while loop will simply exit.
Needless to say that other conditional statements such as “IF” or loops such as “FOR” can be imbricated into a while loop to create complex scripts.
While Infinite Loop
As described in the introduction, the while loop keeps on evaluating until the condition set evaluates to false.
This is quite important because it unveils one of the inherent problems of the while loop : it can lead to infinite loops.
Infinite loops are loops that are running indefinitely and that never stop.
They are often caused by a badly designed condition and they will prevent your script from finishing its execution.
In order to illustrate infinite loops, let’s take a look at the following loop.
X=1
while [[ ${X} -eq 1 ]]
do
  echo "Value of X is ${X}"
done 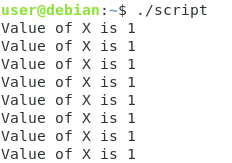
As you can see, in this case, the script will keep on evaluating forever unless you shut the process down using Ctrl + C.
Now that you have a better understanding of the while loop, let’s see how you can use the “case” statement in order to create complex conditional statements.
Case Statement Explained
The case statement is a popular statement used in many programming languages.
The case statement is a shell expression used in order to match patterns and execute matching conditions.
The syntax of the case statement is as follows.
case <pattern> in
  option1)
    COMMAND
    ;;
  option2)
    COMMAND
    ;;
  *)
    COMMAND
    ;;
esac
As an example, let’s say that you want to want to create a script that is able to interpret commands such as “start”, “finish” or “restart” provided as a script argument.
In order to match those commands, you can use the “${1}” special variable (in order to capture the first positional argument) and match it against a list of predefined commands.
Using the case command in a script, this would give us the following output
case "${1}" in
  start)
    echo "You executed start"
    ;;
  finish)
    echo "You executed finish"
    ;;
  restart)
    echo "You executed restart"
    ;;
  *)
    echo "You provided an unknown command to the script"
esac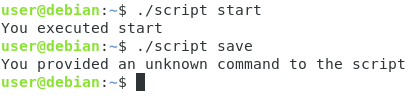
Providing conditional matching in case
In some cases, you want the case statements to be a little more permissive than they are.
You may want them to match multiple expressions for example, or to match text starting with a given string.
Luckily for you, the case statement understands globbing characters.
You can have a look at the Pattern Matching section of the bash documentation.
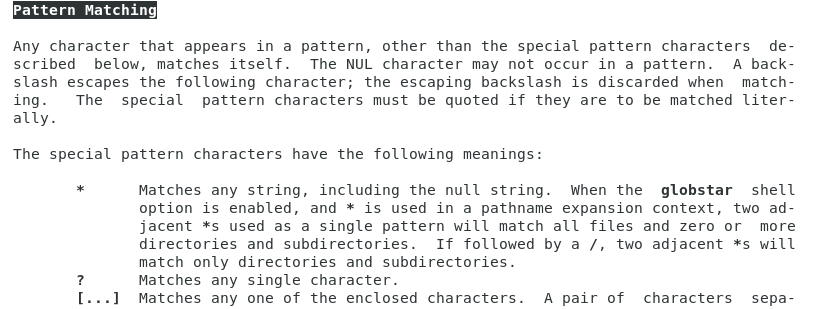
Using this section, you can specify that you want to match multiple patterns under the same statement using the “|” operator.
case <pattern> in
  option1|option2)
    COMMAND
    ;;
  option3)
    COMMAND
    ;;
  *)
    COMMAND
    ;;
esac
You can also provide patterns that begin with a defined string and have the “*” operator match the rest of the pattern.
case <pattern> in
  opt*)
    COMMAND
  *)
    COMMAND
    ;;
esac
Now that you learnt about the case statement, you are ready to parse Shell script options using the getopts command.
Parsing script options using getopts
In order to parse script options, you need to know how to use the case statement and the while statement.
Pretty much as all the commands we used before, getopts is a Shell built-in and its documentation can be read using the help command.
$ help getopts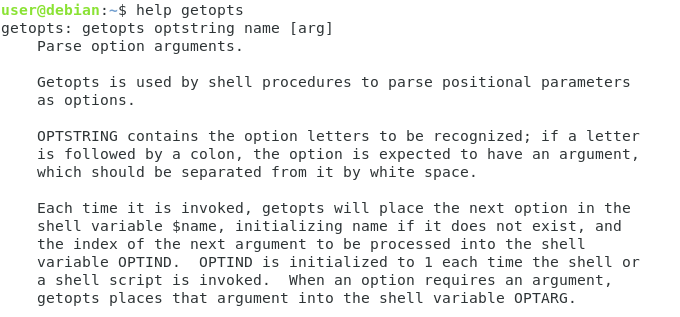
In order to use the getopts command, you have to combine the while statement and the case statement.
The syntax of the getopts command is as follows
while getopts <options> <variable>
do
  case "$OPTION" in
    option)
      <command>
      ;;
    option_two)
      <command>
      ;;
    *)
      <command>
      ;;
  esac
done
As a quick example, let’s say that you want to be able to have the “-a” option and the “-b” option for your script.
As the beginning of the script, you would write the following getopts statement.
while getopts "ab" FLAG
do
  case "${FLAG}" in
    a)
      echo "You provided a to the script"
      ;;
    b)
      echo "You provided b to the script"
      ;;
    *)
      echo "Unknown usage, provide a or b to the script"
      ;;
  esac
done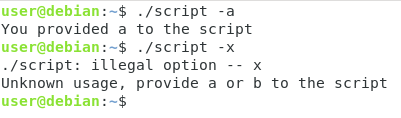
Bash options arguments
In some cases, you may want to provide arguments to the options that you are giving to your Shell script.
Say for example that you want to have a “-n” option and provide a number for it.
In order to indicate that you expect an argument to your option, you have to append a “:” character right after your option.
while getopts "<option>:<option2>" VARIABLE
do
  <commands>
done
Given the example we wrote just before, in order to indicate that the “a” flag expects an argument, you would write the following script.
while getopts "a:b" FLAG
do
case "${FLAG}" in
a)
echo "You provided a to the script"
;;
b)
echo "You provided b to the script"
;;
*)
echo "Unknown usage, provide a or b to the script"
;;
esac
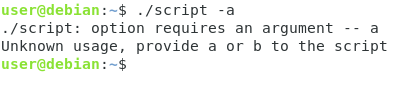
doneNow, when trying to execute your script with the “a” option, you will be presented with an error if you don’t provide an argument to the option.
Accessing Bash options arguments
Now declaring arguments for your options is great, but accessing their values would be even greater.
In order to accede to the value of the argument provided to the option, you can use the ${OPTARG} special variable.
Back to our previous example, let’s try to have a look at the value provided by the user.
while getopts "a:b" FLAG
do
  case "${FLAG}" in
    a)
      echo "You provided a to the script"
      echo "You gave ${OPTARG} to the a option."
      ;;
    b)
      echo "You provided b to the script"
      ;;
    *)
      echo "Unknown usage, provide a or b to the script"
      ;;
  esac
done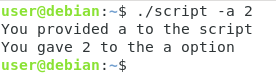
Awesome!
You finally know how you can retrieve arguments provided to your options.
Bash Functions
For the last chapter of this complete Bash scripting guide, we are going to take a look at Bash functions.
So what are Bash functions?
Bash functions usually store multiple commands and they are used in order to factorize and re-use code in multiple places.
Declaring Bash Functions
In order to declare a Bash function, provide the name of the function with left and right parenthesis right after the Bash function name.
#!/bin/bash

my_function() {

  <command1>
  <command2>
  <command3>

}
Alternatively, you can simply provide the function name but you need to write the keyword “function” before the function name.
#!/bin/bash

function my_function {

  <command1>
  <command2>
  <command3

}
As an example, let’s say that you want to declare a Bash function that sends a static log message to your log files.
In order to achieve that, you would write the following function.
log_to_file() {

   logger -p local0.notice "This is a message coming from a Bash function"
   echo "Correctly recorded a message in the system logs"
}
Executing Bash Functions
Now that your Bash functions are defined, you will need to call them in order to execute the code that they store.
In order to execute Bash functions, simply write the function name where you want them to be called.
#!/bin/bash

# Declaring a Bash function

log_to_file() {

   logger -p local0.notice "This is a message coming from a Bash function"
   echo "Correctly recorded a message in the system logs"
}

# Executing a Bash function

log_to_file
Executing this script would give you the following output
$ Correctly recorded a message in the system logsBash Functions Arguments
Having Bash functions just executing simple static commands is not very beneficial.
In most cases, you want to be able to pass function arguments in order to dynamically execute functions.
In a Bash script, when you want to access the arguments provided to the script, you can use the “${1}”, ${2}” and so on notation.
When running a Bash function, you can use the exact same syntax to have references to the function arguments.
#!/bin/bash

repeat() {
  echo "You said ${1}"
}

repeat "Linux"
Executing this command would give you the following output
$ ./script

"You said Linux"
Conclusion
In this tutorial, you learnt advanced features of the Bash scripting language.
You learnt about positional arguments and about Bash special variables.
You are also now able to execute simple Bash loops such as the for and the while loops.
Finally, you can now design scripts that accept options and that contain functions in them.
If you are interested in Bash or in Linux System Administration, make sure to read our other tutorials on the subject.