
This tutorial focuses on how to create swap space on Ubuntu 20.04 using a swap partition or a swap file.
For system administrators, it is quite common for servers to run out of RAM.
In some cases, you may have launched too many programs or some of the programs are already using too many resources.
In this case, you don’t have many options.
You can either stop some processes in order to gain some RAM, but you may not be able to do that.
Fortunately, you have another solution : adding some swap space.
In this tutorial, you will learn how you can add swap space on Ubuntu 20.04 : via a swap partition or a swap file.
Prerequisites
Before starting, make sure that you have sudo privileges on Ubuntu 20.04.
$ groups
If you see the “sudo” groups in the group list, you should be able to create a swap partition.
Check Existing Swap Partitions
In order to check existing swap partitions on your system, you have to use the “swapon” command.
$ sudo swapon --showBy default, during your Ubuntu installation, it is very common for a swap partition to be created already.

As a consequence, you should see the following output on your console.

As you can see, I own a swap partition named “dm-1” of size 980 Mb.
However, my current RAM is sufficient for my server, so it is not used at all.
If no swap spaces are configured on your server, you should see the following output.

Add Swap Space on Ubuntu 20.04 using a swap partition
The first way to add swap space on Ubuntu is to add a swap partition.
In order to add this partition, we are going to use :
- the “lvcreate” command if you are on a LVM device (meaning a disk partition formatted as LVM)
- the “fdisk” command if you are on a “regular” disk.
a – Create Swap Partition on a LVM device
First of all, you need to inspect the existing partitions on your host.
$ sudo fdisk -l
As you can see here, I already own three partitions :
- /dev/sda1 : my bootable partition as I am dealing with a MBR disk here;
- /dev/sda2 : an extended partition of size 14.5 GBs;
- /dev/sda5 : my primary LVM partition.
Knowing that, you can either create a swap partition on the extended partition or on your primary LVM partition.
In this case, we choose to create this partition on the LVM one.
As a consequence, we will have to check that we have some space for it.
As a reminder, /dev/sda5 is a disk partition, also called a physical volume, linked to a volume group.
In order to check if we have some remaining space, we need to use the “vgs” command.
If you are not familiar with LVM, I recommend that you read first our dedicated article on the subject.
$ sudo vgs
In this case, we have about 980 Mb of remaining space which should be enough for our swap partition.
In order to create a new logical volume on this volume group, we are going to use the “lvcreate” command.
$ sudo lvcreate -L 500M -n lvswap vgubuntu
Note : you may be prompted to delete a swap signature on a given logical volume. You can press “y”, you are asked this information because there was an existing partition with the same name before.
You can verify that your logical volume was correctly created using the “lvs” command.
$ sudo lvs
b – Create Swap Partition on a regular partition
You can skip this section and go to the next one if you already created your partition on a LVM device.
If you are dealing with a “regular” Linux partition, you will have to use the fdisk command.
In our case, our “regular” (Linux type) partition is named “/dev/sda2“.
$ sudo fdisk /dev/sda

Welcome to fdisk (util-linux 2.34).
Changes will remain in memory only, until you decide to write them.
Be careful before using the write command.

Command (m for help): n
To create a new partition, you have to use the “n” option.
Command (m for help): n
Partition type
   p   primary (1 primary, 0 extended, 3 free)
   e   extended (container for logical partitions)
Select (default p) :
You can choose to create a “primary” partition. If you have more than four primary partitions, then you can create a logical one.
Select (default p) : p
Partition number (2-4, default 2):
You can leave the defaults in this case.
On the next prompt, you are asked to specify the first sector, you can also leave it to the defaults.
All space for primary partitions is in use
Adding logical partition 5
First sector (48291898-65062911, default 48291840):
Finally, you are asked to specify the total size of the partition to be created. In our case, we are going to choose a 1GB swap space (or “+1G“).
Last sector, +/-sectors or +/-size{K,M,G,T,P} : +1G

Created a new partition 5 of type 'Linux' and of size 1 GiB.
By default, your partition will be created with a “Linux” type by default.
You want to change that to a swap partition type.
To achieve that, type “t” for “type” and change it to “82” (for swap)
Command (m for help): t
Partition number (1,2,5, default 5): 1
Hex code (type L to list all codes): 82
Hit Enter, and make sure that your partition type was correctly changed.
Changed type of partition 'Linux' to 'Linux swap / Solaris'Don’t forget to write your changes to the disk using the “w” command.
Command (m for help): w

The partition table has been altered
Syncing disks.
c – Enabling your swap partition
First, make sure to run the mkswap in order for the swap headers to be correctly set for the partition.
# For a regular partition
$ sudo mkswap /dev/sda5

# For a LVM partition
$ sudo mkswap /dev/vgubuntu/lvswap
Now that headers are set, it is as simple as activating your swap space using “swapon“.
# For a regular partition
$ sudo swapon /dev/sda5

# For a LVM partition
$ sudo swapon /dev/vgubuntu/lvswap
Now that your swap is on, make sure to list your swap partitions again with the “–show” option.
$ sudo swapon --show
Awesome, you successfully created a swap partition on Linux!
d – Make your swap space permanent
As any other partitions, you need to make your partitions permanent.
If you were to restart your server just now, changes would not be persisted.
First of all, you need to get your UUID for the newly created partition.
$ sudo blkid | grep "swap"
Copy the UUID value and edit the fstab file to append the following changes.
$ sudo nano /etc/fstab

UUID=<copied value>   none   swap  defaults   0   0
Save your file, and restart your system to make sure that your changes are permanent.
$ sudo reboot
$ sudo swapon --show
Awesome, your changes are now permanent!
Add Swap Space on Ubuntu 20.04 using a swap file
Another common way of adding space is to create a file dedicated to it.
Many tutorials are not specifying this detail, but swap files cannot contain any holes at all.
It means that you should not use the cp command on your host to create a swap file.
For this, you are going to use the “dd” command that makes sure that you don’t have any holes in your file.
a – Create a swapfile using dd
To add swap space, run the following command
$ sudo dd if=/dev/zero of=swapfile bs=1MB count=$((1*2014))
In this case, you are going to create a 2Gb swap space.
Make sure that your swap file was created by issuing the following command.
$ ls -l swapfileb – Secure your swapfile with permissions
Swap files are meant to be used for memory optimization purposes.
As a consequence, they should not be edited or modified in any way.
As a consequence, we are going to change its permissions.
$ sudo chmod 600 swapfileIn this case, the file is read-write only for the root account.
c – Enable your swapfile
In order to enable your swap file, you can use the “mkswap” command followed by the “swapon” one.
$ sudo mkswap swapfile
$ sudo swapon swapfile
Awesome, you successfully created your swap file!
The last thing that you have to do is to make it permanent using fstab.
d – Make your swap file permanent
To make your swap space permanent, edit the /etc/fstab file and paste the following changes.
$ sudo nano fstab

<path_to_file>/swapfile none swap defaults 0 0
Save your file and restart to make sure that the swap space is still mounted.
$ sudo reboot
$ sudo swapon --show
You have successfully added some swap space on your Ubuntu 20.04!
Troubleshooting
When adding swap space on Ubuntu 20.04, you may run into the following error.
- swapon: /swapfile: read swap header failed.
This error is happening when you don’t run the mkswap command before running the swapon command.
As a reminder, mkswap sets the header for the file or the partition to be used as swap space.
If you forget to run the mkswap command, Linux won’t be able to assign it as swap space on your host.
- Failed to find logical volume “vg/lv”
This error happens when you deleted a logical volume that was defined to be loaded in your initramfs configuration.
In order to fix that, you have two choices :
- Run “update-initramfs -u“
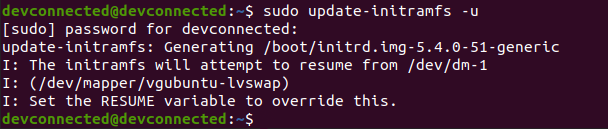
- Make sure that no logical volumes were originally mentionned in the “resume” file of your initramfs.
Icons made by Freepik from FlatIcon.