
DNS, short for the Domain Name System protocol, is used on Linux systems in order to retrieve IP addresses associated with names.
For example, when you are performing a ping request, it is quite likely that you are using the DNS protocol to retrieve the server IP.
In most cases, the DNS requests that you perform are stored in a local cache on your operating system.
However, in some cases, you may want to flush the DNS cache of your server.
It might be because you changed the IP of a server on your network and you want to changes to be reflected immediately.
In this tutorial, you are going to learn how you can easily flush the DNS cache on Linux, whether you are using systemd or dnsmasq.
Prerequisites
In order to be able to flush your DNS cache, you have to know how DNS resolution works on your Linux system.
Depending on your distribution, you may be facing different Linux services that act as a DNS resolver.
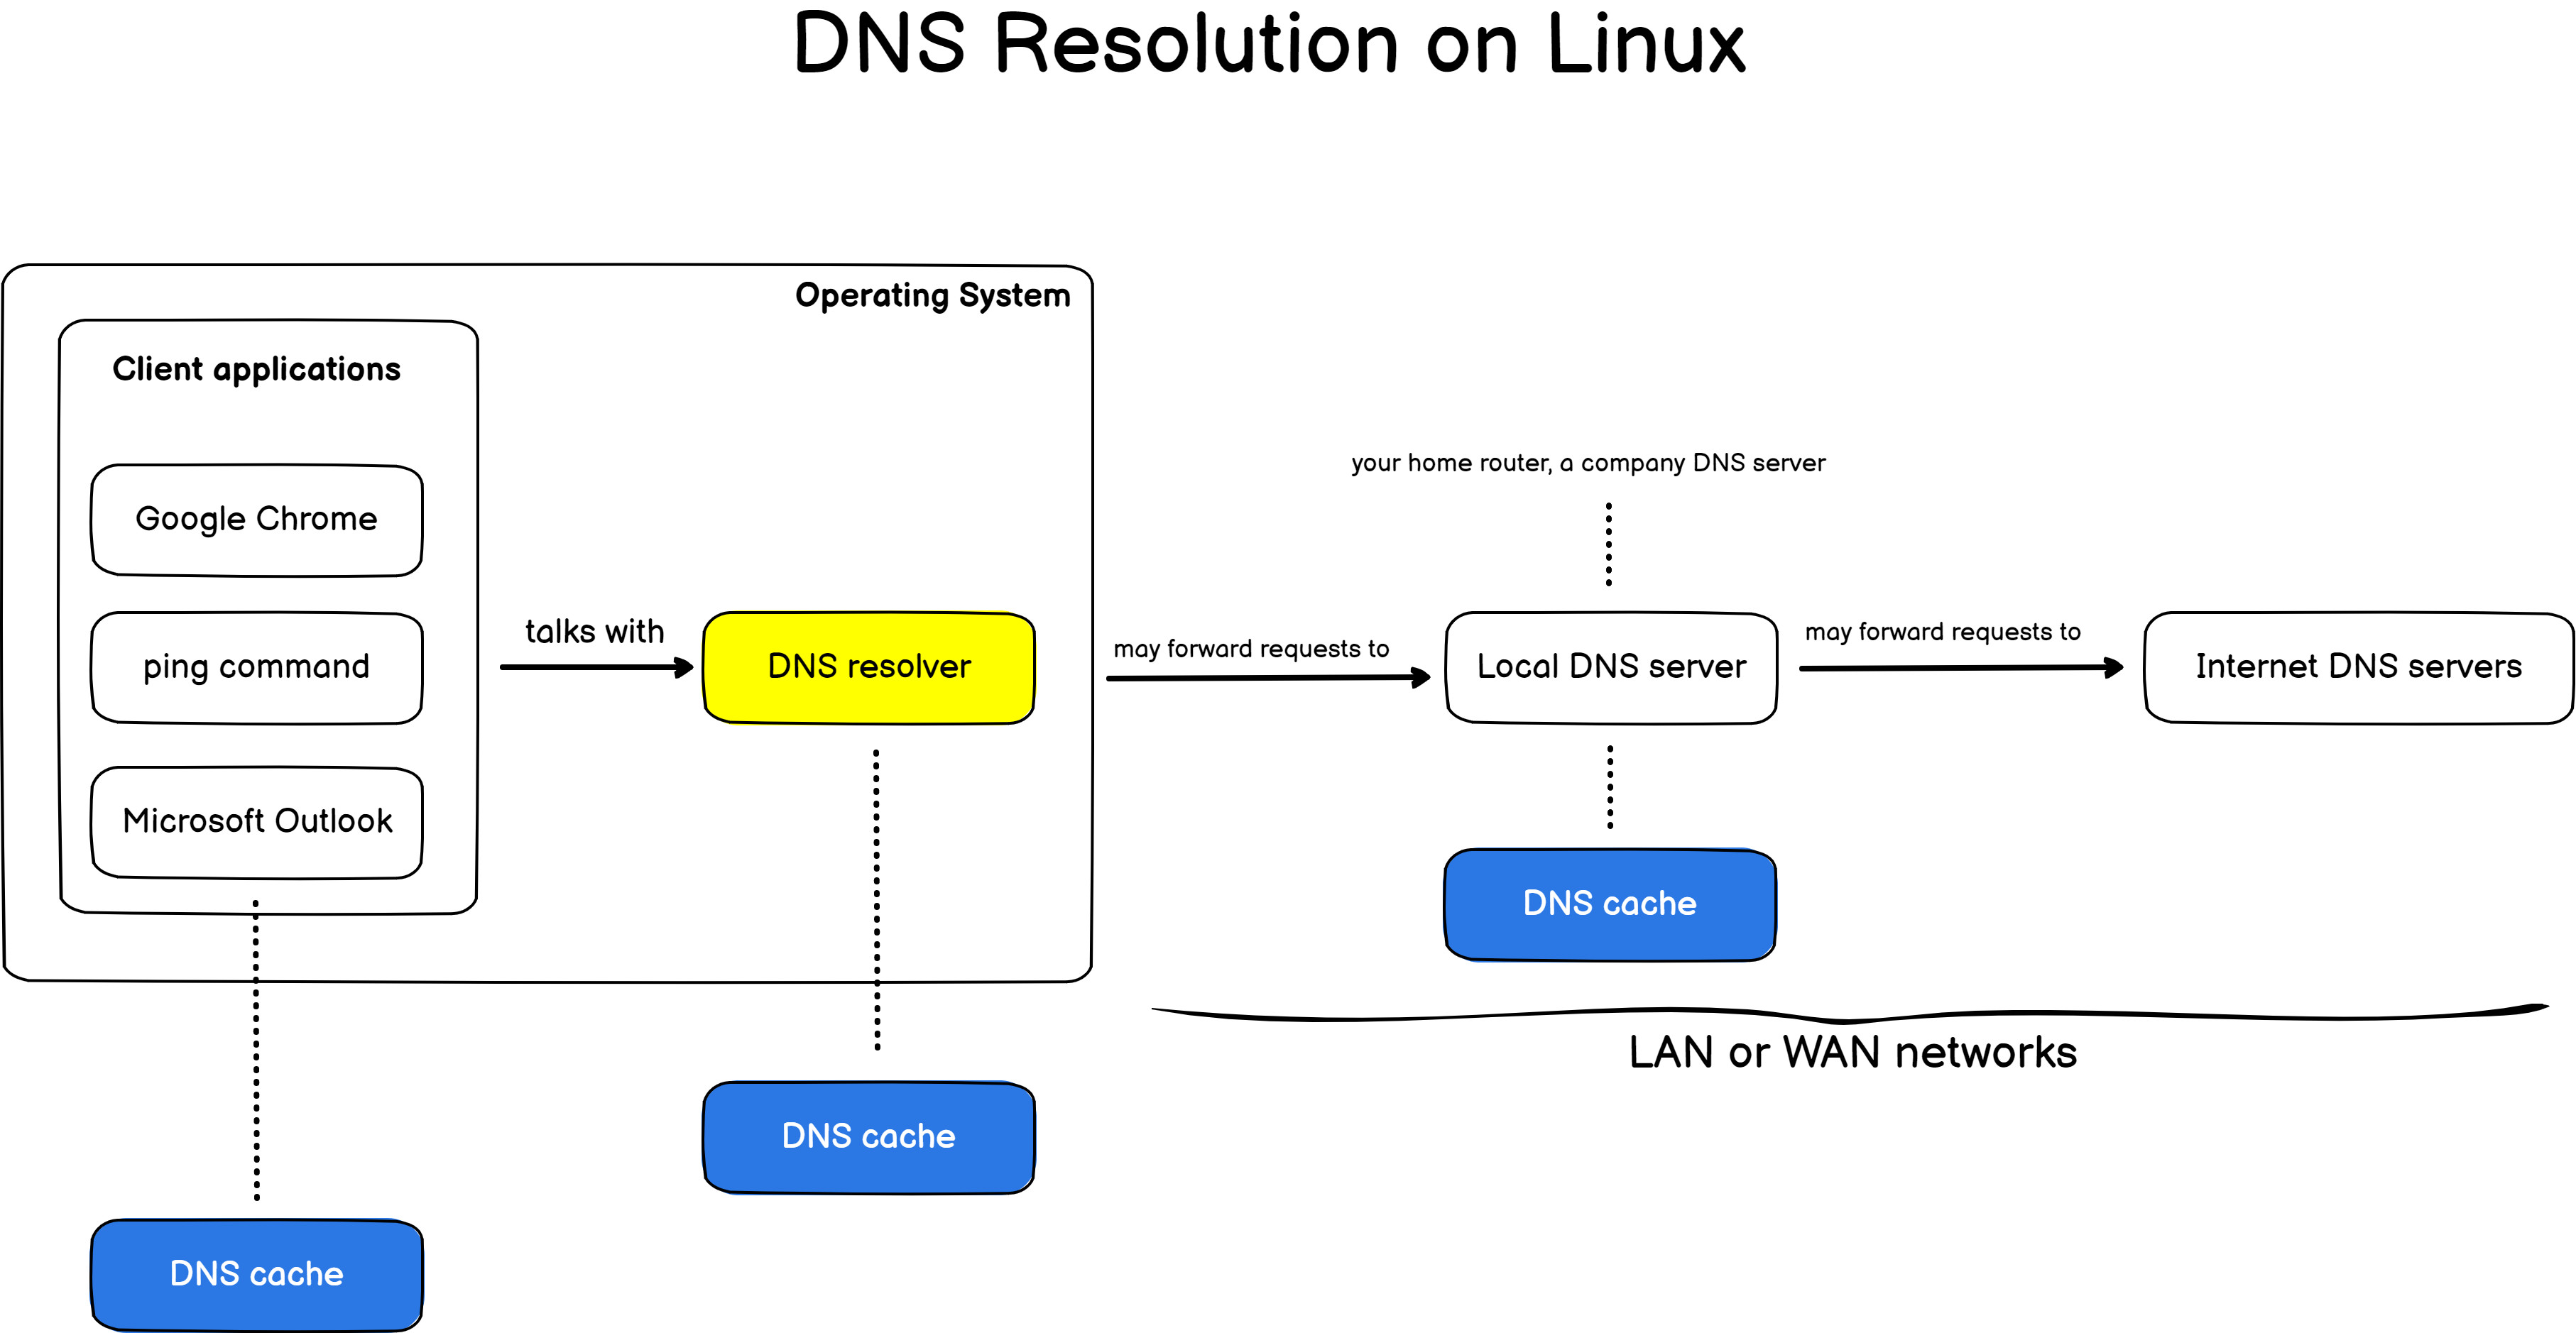
Before you start, it is quite important for you to know how DNS resolution will actually happen on your operating system.
If you are reading this article, you are looking to flush the cache of your local DNS resolver. But as you can see, there are many different caches from your local application until the actual Internet DNS servers.
In this tutorial, we are going to focus on the yellow box meaning the local stub resolver implemented on every Linux system.
Finding your local DNS resolver
On most Linux systems, the DNS resolver is either “systemd-resolved” or dnsmasq. In order to know if you are dealing with one or another, you can execute the following command
$ sudo lsof -i :53 -SNote : so why are we running this command? As DNS runs on port 53, we are looking for the commands associated with the service running on port 53, which is your local DNS resolver or “stub”.

As you can see, on a recent Ubuntu 20.04 distribution, the service listening on port 53 is systemd-resolved. However, if you were to execute this command on Ubuntu 14.04, you would get a different output.

In this case, the local DNS used in dnsmasq and commands are obviously different.

Knowing this information, you can go the chapter you are interested in. If you were to have a different output on your server, make sure to leave a comment for us to update this article.
Flush DNS using systemd-resolved
The easiest way to flush the DNS on Linux, if you are using systemd-resolved, is to use the “systemd-resolve” command followed by “–flush-caches”.
Alternatively, you can use the “resolvectl” command followed by the “flush-caches” option.
$ sudo systemd-resolve --flush-caches

$ sudo resolvectl flush-caches
In order to verify that your Linux DNS cache was actually flushed, you can use the “–statistics” option that will highlight the “Current Cache Size” under the “Cache” section.
$ sudo systemd-resolve --statistics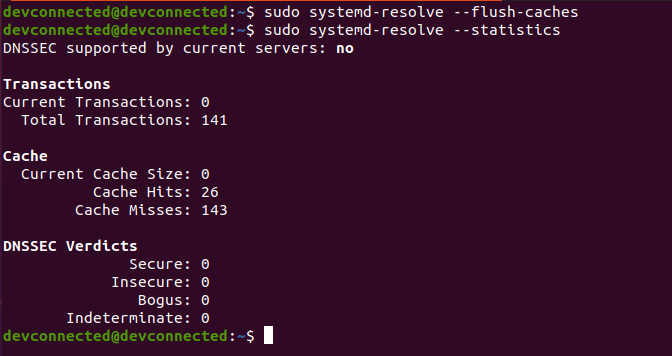
Congratulations, you successfully flushed your DNS cache on Linux!
Flush DNS cache using signals
Another way of flushing the DNS cache can be achieved by sending a “USR2” signal to the “systemd-resolved” service that will instruct it to flush its DNS cache.
$ sudo killall -USR2 systemd-resolvedIn order to check that the DNS cache was actually flushed, you can send a “USR1” signal to the systemd-resolved service. This way, it will dump its current state into the systemd journal.
$ sudo killall -USR1 systemd-resolved

$ sudo journalctl -r -u systemd-resolved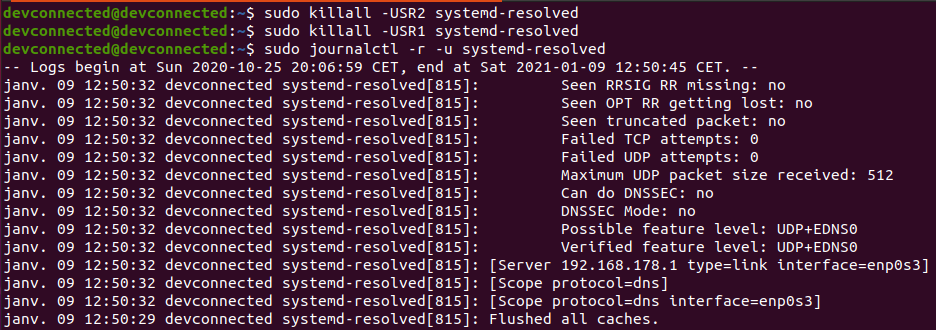
Awesome, your DNS cache was correctly flushed using signals!
Flush DNS using dnsmasq
The easiest way to flush your DNS resolver, when using dnsmasq, is send a “SIGHUP” signal to the “dnsmasq” process with the “killall” command.
$ sudo killall -HUP dnsmasq
Similarly to systemd-resolved, you can send a “USR1” to the process in order for it to print its statistics to the “syslog” log file. Using a simple “tail” command, we are able to verify that the DNS cache was actually flushed.
Now what if you were to run dnsmasq as a service?
Dnsmasq running a service
In some cases, you may run “dnsmasq” as a service on your server. In order to check whether this is the case or not, you can run the “systemctl” command or the “service” one if you are on an SysVinit system.
$ sudo systemctl is-active dnsmasq

# On SysVinit systems
$ sudo service dnsmasq status
If you notice that dnsmasq is running as a service, you can restart it using the usual “systemctl” or “service” commands.
$ sudo systemctl restart dnsmasq

# On SysVinit systems
$ sudo service dnsmasq restart
After running those commands, always make sure that your services were correctly restarted.
$ sudo systemctl status dnsmasq

# On SysVinit systems
$ sudo service dnsmasq status
Conclusion
In this tutorial, you learnt how you can quickly and easily flush your DNS cache on Linux.
Using this article, you can easily clear the cache for systemd and dnsmasq local resolvers. However, you should know that there is another common DNS, named bind, that is purposefully omitted in this article.
Another article about setting up a local DNS cache server using BIND should come in the near future.
If you are interested in DNS queries and how they are performed, you can use this very useful article from “zwischenzugs” named the “Anatomy of a DNS query“. The article is particularly useful if you want to debug DNS queries and you wonder how they are performed.
Also if you are interested in Linux System Administration, we have a complete section about it on the website, so make sure to check it out.

4 comments
sudo lsof -i :53 -S gives no output at all on my system, mxlinux 19.3 using sysvinit, not systemd.
It means that you don’t have either systemd-resolved or dnsmasq, just resolved.conf or sth like that.
executing
sudo lsof -i :53 -S
I get both systemd-resolved and dnsmasq entries:
COMMAND PID USER FD TYPE DEVICE SIZE/OFF NODE NAME
systemd-r 1082 systemd-resolve 12u IPv4 29782 0t0 UDP localhost:domain
systemd-r 1082 systemd-resolve 13u IPv4 29783 0t0 TCP localhost:domain (LISTEN)
dnsmasq 1602 libvirt-dnsmasq 5u IPv4 36775 0t0 UDP withbook:domain
dnsmasq 1602 libvirt-dnsmasq 6u IPv4 36776 0t0 TCP withbook:domain (LISTEN)
└─ $ ▶ sudo lsof -i :53 -S
[sudo] password for mikeit:
both of them, why this?
p.s. you are welcome in a world full of information but very often superficial and not incisive
COMMAND PID USER FD TYPE DEVICE SIZE/OFF NODE NAME
systemd-r 908 systemd-resolve 12u IPv4 41809 0t0 UDP localhost:domain
systemd-r 908 systemd-resolve 13u IPv4 41810 0t0 TCP localhost:domain (LISTEN)
dnsmasq 1510 libvirt-dnsmasq 5u IPv4 54981 0t0 UDP uby-m2desk:domain
dnsmasq 1510 libvirt-dnsmasq 6u IPv4 54982 0t0 TCP uby-m2desk:domain (LISTEN)