
As a network engineer, you probably spend a lot of time thinking and planning your network infrastructure.
You plan how computers will be linked, physically using specific cables but also logically using routing tables.
When your network plan is built, you will have to implement every single link that you theorized on paper.
In some cases, if you are using Linux computers, you may have to add some routes in order to link it to other networks in your company.
Adding routes on Linux is extremely simple and costless : you can use the Network Manager daemon (if you are running a recent distribution) or the ifconfig one.
In this tutorial, you will learn how you can easily add new routes on a Linux machine in order to link it to your physical network.
Prerequisites
In order to add routes on your Linux machine, you need to have administrator rights.
In order to verify it, you can run the “sudo” command followed by the “-v” option (in order to update your cached credentials).
$ sudo -vIf you don’t have sudo rights, you can have a look at our dedicated articles on getting administrator rights on Ubuntu or CentOS.
Add route on Linux using ip
The easiest way to add a route on Linux is to use the “ip route add” command followed by the network address to be reached and the gateway to be used for this route.
$ ip route add <network_ip>/<cidr> via <gateway_ip>

# Example
$ ip route add 10.0.3.0/24 via 10.0.3.1
By default, if you don’t specify any network device, your first network card, your local loopback excluded, will be selected.
However, if you want to have a specific device, you can add it to the end of the command.
$ ip route add <network_ip>/<cidr> via <gateway_ip> dev <network_card_name>As an example, let’s say that you want two LAN networks to be able to communicate with each other.
The network topology has three different Linux machines :
- One Ubuntu computer that has the 10.0.2.2/24 IP address;
- Another Ubuntu computer that has the 10.0.3.2/24 IP address;
- One RHEL 8 computer that will act as a simple router for our two networks.
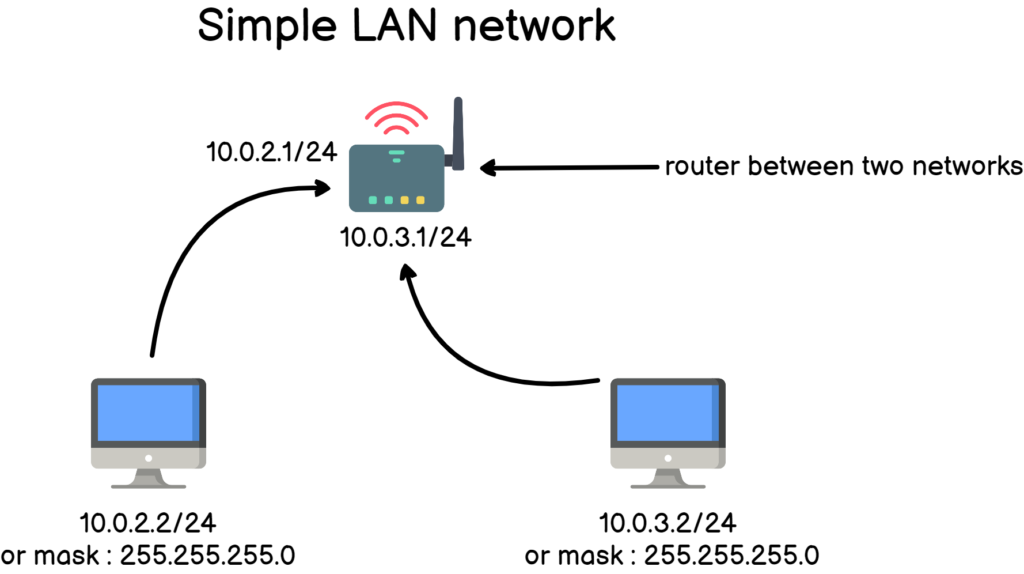
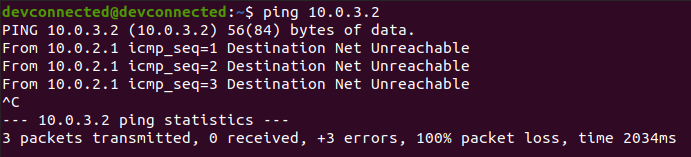
The first computer cannot ping the other computer, they are not in the same subnet : 10.0.2.0 for the first computer network and 10.0.3.0 for the second one network.
As the two hosts are not part of the same subnet, the ping command goes to the default gateway.
In order to see the routes already defined on your machine, use the “ip route” command with no arguments. You can also use the “ip r” command as an abbreviation.
$ ip r
This is the routing table of your Linux computer : every computer has one. A router happens to manage many more routes than that but it is essentially using the same routing syntax.
So how does one read that?
In order to understand this output, you have to read from top to bottom :
- By default, network calls will be forwarded to the local default gateway which is 10.0.2.1
- UNLESS your call is for the 10.0.2.0/24 network. In this case, it will simply be sent on your local network via your default physical link (physically a CAT network cable)
- UNLESS your call is for the 169.254.0.0/16 network. In this case, it will also be sent on your local network using your default physical link.
Note : did you know? The 169.254.0.0/16 address is called APIPA (for Automatic IP Address Addressing). It is the default IP used by a system that failed to reach a DHCP server on the network.
In our case, in order to call the 10.0.3.2/24 IP address, the call will be forwarded to our 10.0.2.1 router.
However, is our router able to forward calls addressed to the 10.0.3.0/24 network?
A simple “ip r” command on the router can give us a hint.

As you can see, the router is only linked to the 10.0.2.0/24 network which is obviously an issue.
In order to add a route on our Linux router, we use the “ip route add” command.
$ sudo ip route add 10.0.3.0/24 via 10.0.3.1
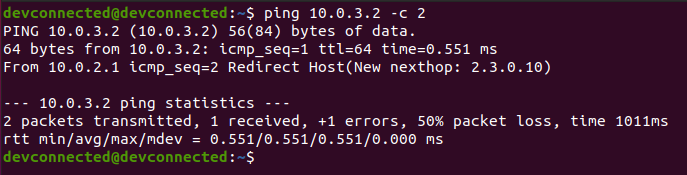
Now, if you were to ping your second computer on the first computer, you would be able to reach it.
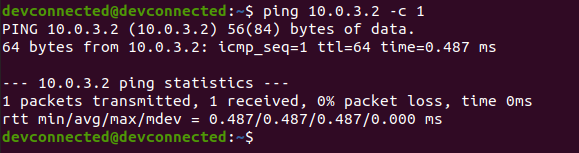
Awesome, you have successfully added a route from one Linux computer to another!
Adding permanent route configuration on Ubuntu
On Ubuntu, there are three ways of adding a permanent route to your Linux machine :
- You can add it to your Network Manager configuration file;
- You can edit your Netplan YAML configuration file;
- You can add your route to the “/etc/network/interfaces” file if you are using an old Ubuntu distribution.
Using Network Manager
To add a permanent route to the Network Manager, you have to navigate to the connection file located at “/etc/NetworkManager/system-connections”.

Edit your “Wired connection” file and add a “route1” property in the IPv4 part of the network configuration.
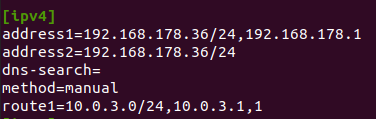
The route has to be defined as : the network IP address followed by the CIDR, next the default gateway and finally the next-hop.
In order for the changes to be applied, you can restart your network connection, and execute the “route -n” command in order to see your route.
$ sudo nmcli connection reload
Awesome, you have added a permanent route to your Linux server!
Using Netplan
Netplan is an Ubuntu exclusive but it can be quite useful if you want to configure your network using a simple YAML file.
To add a permanent route using Netplan, add the following section to your “/etc/netplan” configuration file.
$ sudo vi /etc/netplan/<configuration_file>.yaml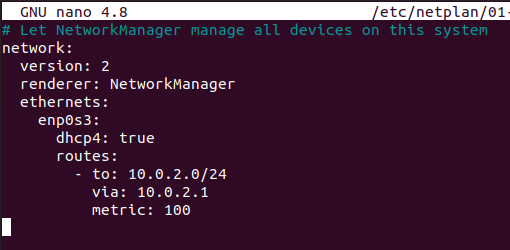
For the changes to be applied, you will have to execute the “netplan” command with the “apply” argument.
$ sudo netplan apply
Congratulations, you have configured your network using Netplan. If you want to read more about Netplan and its objectives, you can have a look at the dedicated documentation.
Using /etc/network/interfaces
To add a permanent route to a distribution using ifup and ifdown, edit the “/etc/network/interfaces” file and add the following section.
$ sudo vi /etc/network/interfaces

auto eth0
iface eth0 inet static
      address 10.0.2.2
      netmask 255.255.255.0
      up route add -net 10.0.3.0 netmask 255.255.0.0 gw 10.0.2.1
Adding permanent route configuration on RHEL
By adding the route in the previous section, there is a chance that your distribution created a file for the route to be persisted.
However, if it is not the case, you need to add it in order to keep your route when restarting your server.
On RHEL and CentOS distributions, you need to create a file named “route-<device>” in the “/etc/sysconfig/network-scripts” folder.
$ sudo vi /etc/sysconfig/network-scripts/route-enp0s3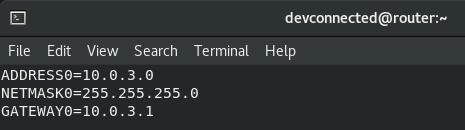
Add route on Linux using nmcli
Another way of adding a route on Linux is to use the “nmcli” utility and add an IPV4 route using the “modify” command.
$ sudo nmcli connection modify <interface_name> +ipv4.routes "<network_ip> <gateway_ip>" Note : need a complete article about the Network Manager? We have a complete article about configuring your network using Network Manager.
For example, using the infrastructure of the previous section, in order to add a route, we would execute the following command.
$ sudo nmcli connection modify enp0s3 +ipv4.routes "10.0.3.0/24 10.0.3.1"As changes are not made live, you will need to reload your network connections from disk using the “nmcli reload” command.
$ sudo nmcli connection reload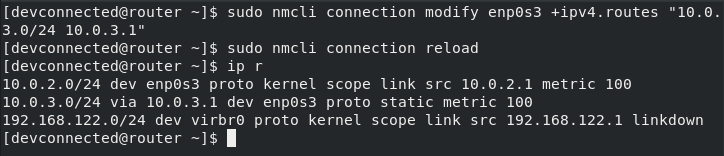
Awesome! Now there is a route between your first and second network.
As a consequence, you will be able to ping your second computer from the first computer.
Adding a route using the network graphical interface
If you are not into executing commands in the terminal, luckily for you, there is a way to add a route on Linux using a graphical interface.
Whether you are on Ubuntu, Debian or RHEL makes no difference as they all share the same network panel on GNOME.
At the top right corner of your screen, look for a small network icon and click on it.
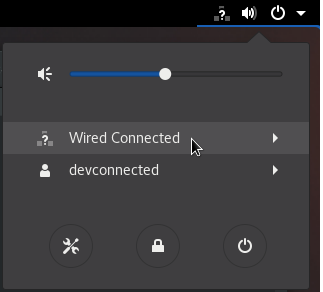
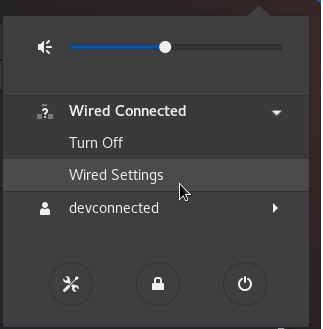
Click on “Wired Connected” and look for the “Wired Settings” panel under it.
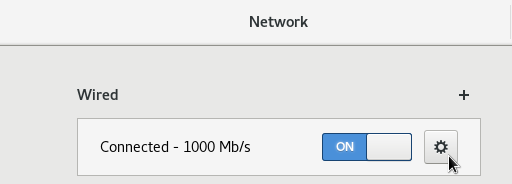
When the panel opens, look for the “Wired” section and click on the small gear wheel right next to it.
In the “Wired” panel, you will be presented with many different parameters : your current IPv4 address, your current MAC address, an optional IPv6 address and your link speed.
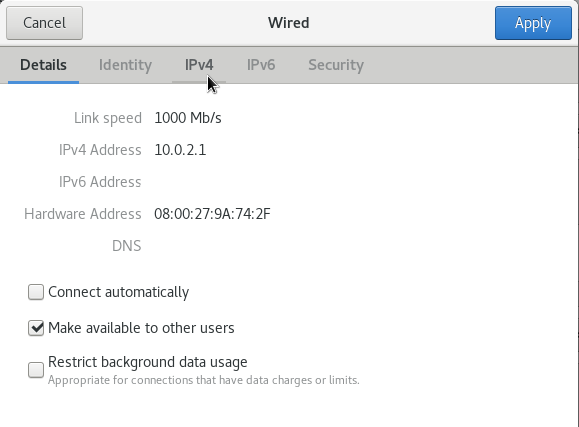
In the “IPv4” tab, you will be presented with your current IP configured (most likely two for your computer to act as a Linux router).
Right under it, you will see the “Routes” section. In there, you can specify the input of the previous sections.
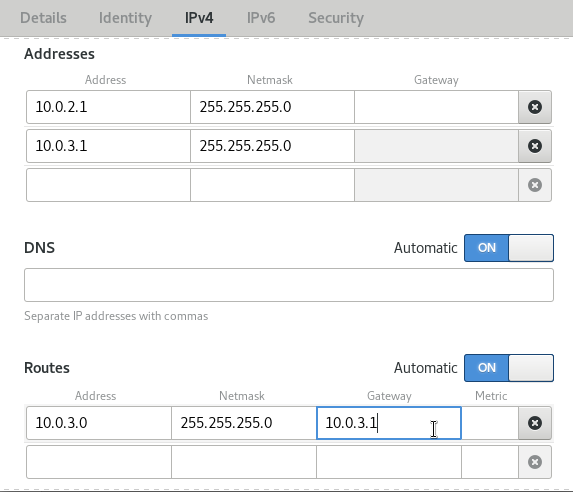
When you are done, click on the “Apply” blue button at the top right corner of the window.
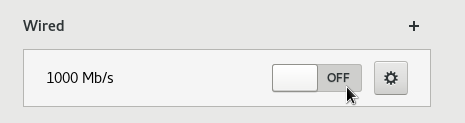
In order for the changes to be applied, you will need to restart your network. You can achieve that by clicking on the “on/off” toggle in the “Wired” window of the network parameters.
Done!
You have successfully added a route on Linux using the graphical interface, your computers should now be able to talk to each other.
Troubleshooting Internet issues on Linux
In some cases, you may want to add a route on your Linux because you want to be able to reach websites outside of your local network, say 8.8.8.8 for example.
As an example, let’s say that you have a local router linked to “Internet” that resides at 192.168.178.1/24.
Inspecting your current routes is an easy way for you to guess why you are not able to reach Internet websites.
The thought process is quite simple :
- Is the IP that I am trying to reach a part of my subnet or not?
- If yes, I should be able to reach it without any routes, everything will be handled by the ARP protocol and Ethernet.
- If not, I need to have a route from my computer to a router that is able to forward requests to Internet.
However, remember that routes are two-lane highways : you need to be able to reach an external IP, but the external IP needs to be able to reach back to you.
As a consequence, routes need to be correctly defined on your local network architecture. As a diagram is more useful that a thousand words, here is a way to understand it.
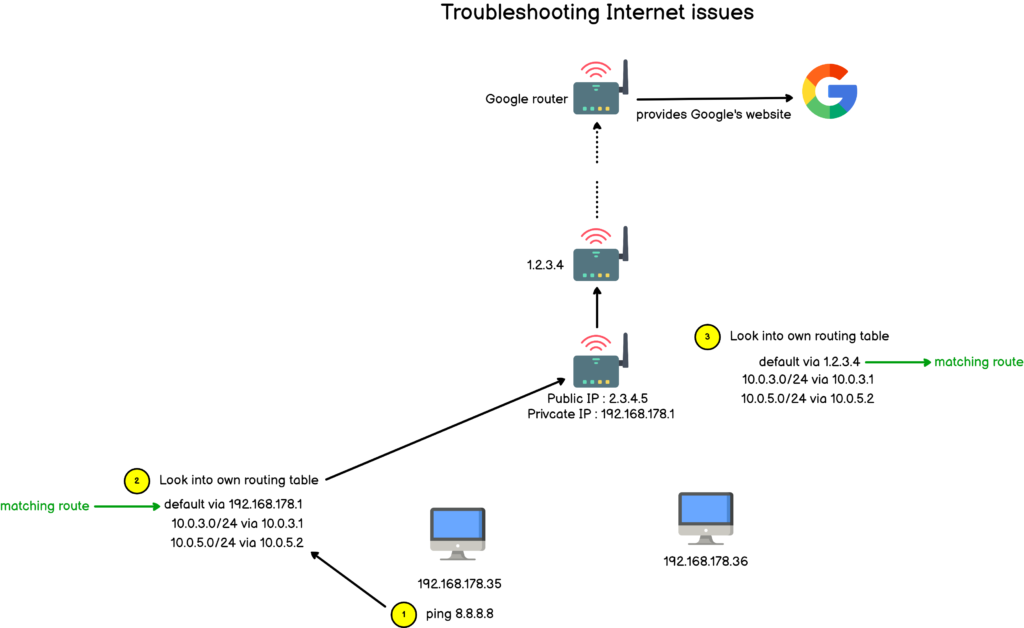
Whenever you are troubleshooting Internet issues, you have to think with routes : do I have a route from my computer to the computer that I am trying to reach?
Are the computers or routers between me and the target configured to handle my calls?
Reaching a part of the network is great, but is this part of the network able to answer me back?
In our diagram detailed above, our router may receive an answer from Google, but it has to know what to do with the request. In your local home network, you don’t have to worry about it as most of the requests are forwarded using the NAT protocol (short for Network Address Translation Protocol).
Conclusion
In this tutorial, you learnt how you can easily add a new route on many different Linux distributions.
Right now, as for other topics, some tools co-exist on Linux making the network configuration a bit convoluted sometimes.
However, we listed most of the options that you may encounter. If we forgot about an option, make sure to leave a comment for us to know.
If you are interested in Linux System Administration, make sure to have a look at our dedicated section on the website.

2 comments
In simple LAN network example, both 10.0.2.0/24 and 10.0.3.0/24 are connected to the Router so connected routes should be populated for both network. It means no need to set a static route to 10.0.3.2/24 on Router.
Nice guides. Appreciate the write up.