
When working on a project, you are probably managing many different branches in your repository.
As the number of branches grow, you may need to work on different tasks in parallel, going from one branch to another all the time.
As a consequence, you may need to switch branches very frequently.
In this tutorial, you are going to learn how you can switch branches easily on Git.
By the end of this tutorial, you will know how you can safely commit your work in one branch, switch to another and start working on another feature.
Switch Branch using git checkout
The easiest way to switch branch on Git is to use the “git checkout” command and specify the name of the branch you want to switch to.
If the destination branch does not exist, you have to append the “-b” option, otherwise you won’t be able to switch to that branch.
$ git checkout <existing_branch>

$ git checkout -b <new_branch>
As an example, let’s say that you want to switch to the master branch to another branch named “feature” in your repository.
First, make sure that the target branch exists by running the “git branch” command.
$ git branch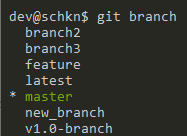
Now that you made sure that your branch exists, you can switch from the master branch to the “feature” branch by executing the “git checkout” command.
$ git checkout feature
That’s it!
You have successfully switched to your “feature” branch with the checkout command.
On the other hand, if you try to switch to a non-existing branch, you will the following error message
$ git checkout non-existing-branch

error: pathspec 'non-existing-branch' did not match any file(s) known to git
To solve this error, you will have to append the “-b” (for “new branch”) option to the checkout command.
$ git checkout -b non-existing-branch

Switched to a new branch 'non-existing'
Now that you know more about the “checkout” command, let’s see another useful command to change branch using Git.
Switch branch using git switch
A quick way of switching branch on Git is to use the “git switch” command and specify the name of the branch you want to switch to.
If the destination branch does not exist, you have to specify the “-c” option (for “create branch“), otherwise you will get an error message when switching to that branch.
$ git switch <existing_branch>

$ git switch -c <non_existing_branch>
Again, as an example, let’s say that you want to switch to the “feature” branch from the “master” branch.
In order to switch from the “master” branch to the “feature” branch, use the “git switch” command and specify the destination branch (which is “feature” in this case)
$ git switch feature
On the other hand, if you try to switch to a non existing branch, you will get the following error message
$ git switch non-existing-branch

fatal: invalid reference: non-existing-branch
To solve this error, make sure to append the “-c” option to the “git switch” command to specify that you want to switch to a new branch.
$ git switch -c non-existing-branch

Switched to a new branch 'non-existing-branch'
Congratulations, you have now successfully switched to another branch and you can start working on it.
Checkout Remote Branch on Git
In some cases, you may be interested in checking out remote branches from your distant repository.
In order to switch to a remote branch, make sure to fetch your remote branch with “git fetch” first. You can then switch to it by executing “git checkout” with the “-t” option and the name of the branch.
$ git fetch

$ git checkout -t <remote_name>/<branch_name>
The “-t” option in checkout stands for “track” and it is used to create your branch and setting up the upstream branch automatically to the remote branch.
As an example, let’s say that you have a branch named “remote-branch” on the “origin” remote.
In order to checkout the remote branch, you will need to execute the checkout command and specify the information specified above.
$ git checkout -t origin/remote-branch

Branch 'remote-branch' set up to track remote branch 'remote-branch' from 'origin'.
Switched to a new branch 'remote-branch'
As you can see, the remote tracking information was set automatically : as a consequence, if you commit any modifications, you will automatically push them to the upstream branch.
Checkout New Branch from Specific Commit
In some cases, you may need to switch to a new branch, but you want it to start from a specific commit on the branch.
In order to checkout a new branch from a specific start point, you have to execute the “git checkout” command and specify the “-B” option, as well as the branch and its start point.
$ git checkout -B <branch> <start_point>In order to checkout to a specific start point, you will have to list the commits done in you repository using the “git log” command.
$ git log --oneline --graph

* 98a14be Version 2 commit (master, HEAD)
* 53a7dcf Version 1.0 commit
* 0a9e448 added files
* bd6903f first commit
As you can see, the HEAD of the master branch is at 98a14be but we want to checkout to the commit just before HEAD (which is 53a7dcf).
In order to switch to the master branch, on this specific commit, we are going to execute the “git checkout” command and specify the “master” branch as well as the commit SHA.
$ git checkout -B master 53a7dcf

Switched to and reset branch 'master'
In order to check that you are correctly on a specific commit, you can use the “git log” command again.
$ git log --oneline --graph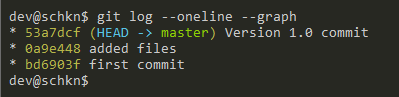
Awesome, you have successfully switched to another branch on a specific commit.
Conclusion
In this tutorial, you learnt how you can easily switch to a branch on Git using the checkout command or the switch command.
You also learnt that you can switch to a branch that does not exist yet by specifying the “-b” option or the “-c” option.
Finally, you have discovered advanced tips related to switching branches : checking out a remote branch and checking out a branch from a specific starting point.
If you are interested in Software Engineering or in Git, we have a complete section dedicated to it on the website, so make sure to check it out!

11 comments
Useful and neatly organised tutorial
very good content
Very helpful! Was looking for the exact info on git branches
Clear and Concise. Very good.
Typo:
$ git checkout -b non-existing-branch
Switched to a new branch ‘non-existing’
where ‘non-existing’ should read ‘non-existing-branch’?!
git branch
git checkout branch
git checkout -b
git add .
git commit -m “commit content”
git push –set-upstream origin
Very Good article. Thank you
Excellent article. I am able to understand switching branch for existing and non-existing branches. Thank you so much.
When we checkout/switch to a non-existing branch, is it created on the current branch?
Very Useful, Thank you so much.
Very good