
Docker images are a big part of the Docker ecosystem.
Docker images are used to define instructions to be executed on your containers.
On Docker images, you may choose to have a specific operating system, to install specific packages or to execute a set of predefined commands.
However, if you create multiple environments or multiple tools, your list of Docker images will be growing quickly.
As a consequence, you may need commands in order to list your Docker images easily.
In this tutorial, you are going to learn how you can list your Docker images using Docker commands.
List Docker Images
The easiest way to list Docker images is to use the “docker images” with no arguments.
When using this command, you will be presented with the complete list of Docker images on your system.
$ docker imagesAlternatively, you can use the “docker image” command with the “ls” argument.
$ docker image lsNote that you will have to make sure that you have written “image” and not “images”.
As an example, let’s say that you want to list Docker images on your current Windows operating system.
To achieve that, you would run the following command
$ docker images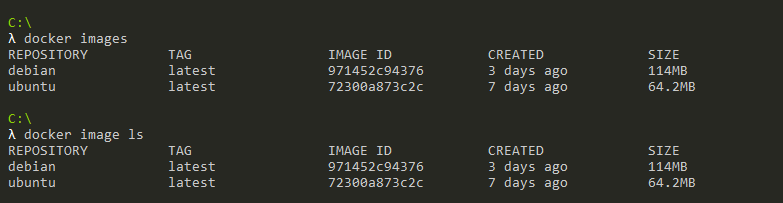
Congratulations, you successfully listed Docker images on your system!
Using those commands, you will be presented with all the results, but what if you want to restrict your results to specific words?
Filtering Docker Image List
In order to filter the Docker image list results, you need to use the “docker images” command with the “–filter” followed by the filter in the form of a key-value tuple.
$ docker images --filter "<key>=<value>"With the “–filter” option, you can specify the following keys :
- “reference” : that can be used in order to isolate images having a certain name or tag;
- “before” : to filter images created “before” a specific point in time;
- “since” : to filter images since a specific point in time (usually another image creation);
- “label” : if you used the LABEL instruction to create metadata for your image you can filter them later with this key
- “dangling” : in order to isolate images that are not used anymore.
As a short example, let’s say that you want to filter your image list given the name of your image.
As a reminder, we had an “Ubuntu” and a “Debian” image sitting on our Docker machine.
If we want to isolate all the images starting with “Deb”, we would run the following command.
$ docker images --filter "reference=deb*"
Similarly, if you are working with multiple images of the same repository, you can add an additional tag separated by a colon character.
$ docker images

REPOSITORY          TAG                 IMAGE ID            CREATED             SIZE
debian              8                   00b72214a37e        3 days ago          129MB
debian              latest              971452c94376        3 days ago          114MB

$ docker images --filter "reference=debian:8"

REPOSITORY          TAG                 IMAGE ID            CREATED             SIZE
debian              8                   00b72214a37e        3 days ago          129MB
Awesome, you successfully filtered your images given the image name specified.
Filtering Unused Docker Images
As a reminder, “dangling” images are not images that are not used by any container anymore. We would define those images as “unused”, but not as “dangling”.
“Dangling” images are created whenever you create a new version of a Docker image with the same “image plus tag” pair.
In short, you would have the following output when listing your images
$ docker images -a
REPOSITORY          TAG                 IMAGE ID            CREATED             SIZE
debian              8                   00cc44e1e1a2        3 days ago          129MB
<none>              <none>              00b72214a37e        5 days ago          110MB
Those images or layers are not actively used anymore : they have been “re-tagged”.
If you want to filter images that are defined as “dangling”, you can append the “dangling=true” option.
$ docker images --filter "dangling=true"

REPOSITORY          TAG                 IMAGE ID            CREATED             SIZE
<none>              <none>              00b72214a37e        5 days ago          110MB
Bonus : if you are looking to prune your dangling images, you can simply execute the “docker images purge”
Great, you now know how you can easily filter your dangling images on your Docker environment.
Filtering Images on Date
In some cases, you want to list Docker images depending on their creation date or when they were downloaded for the first time.
Unfutortunately, you can’t specify a specific Unix epoch or point in time, you have to specify it depending on another image.
So for example, if you are looking to list Docker images created before another image, you would run the following command.
$ docker images --filter "before=<image_name>"In our case, the “Debian Jessie” image was the most recent one : to list images created before, we would run the following command.
$ docker images --filter "before=debian:8"

REPOSITORY          TAG                 IMAGE ID            CREATED             SIZE
debian              latest              971452c94376        3 days ago          114MB
ubuntu              latest              72300a873c2c        7 days ago          64.2MB
Similarly, you can choose to list Docker images created after another image, you would use the “since” keyword instead of the “before” keyword.
$ docker images --filter "since=<image_name>"

$ docker images --filter "since=ubuntu"

REPOSITORY          TAG                 IMAGE ID            CREATED             SIZE
debian              8                   00b72214a37e        3 days ago          129MB
debian              latest              971452c94376        3 days ago          114MB
Awesome, you can filter your images depending on when they were created!
Listing and Formatting Docker Images
In our previous chapters, we got the same output when running our commands.
Docker will by default display the results in a set of five different columns : repository, tag, image ID, the creation date and the size of your image.
However, in some cases, you may want to have a different output if you need to process the information in a specific system for example.
In order to list and format Docker images, you have to use the “docker images” command followed by the “–format” option and a Go template.
$ docker images --format <go_template>In short, a Go template is a set of variables that are enclosed in double curly braces, representing the different columns to be displayed.
For example, if you want to have the output as the repository named followed by the image ID, you would run the following command.
$ docker images --format "{{.Repository}} has the following {{.ID}}"
Here is a list of the different placeholders that you can use in order to format your docker images.
| Placeholder | Description |
| .ID | The ID of your image |
| .Repository | The image repository |
| .Tag | The tag of your image |
| .Size | The size of your image |
| .CreatedSince | The time since your image was created |
| .CreatedAt | The point in time when your image was created |
| .Digest | The digest of your image (in short their UUIDs) |
Great, now you have all the tools to filter your images following a specific format.
Listing Only Image IDs
In order to list only image IDs on Docker, you have to use the “docker images” command with the “–quiet” option to suppress all other columns.
$ docker images --quiet

$ docker images -q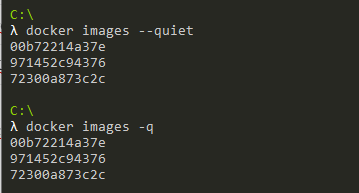
As you can see, you are only presented with the list of image ID available in your current Docker environment, awesome!
Conclusion
In this tutorial, you learnt how you can easily list your Docker images using the “docker images” command.
You also learnt that it is possible for you to append options in order to have a more detailed output.
You can use filters to have specific columns or to isolate dangling images for example.
If you are looking for more tutorials related to Docker, we have multiple articles that may interest you :
Also, if you are interested in Docker or DevOps, we have a complete section dedicated to it on the website, so make sure to check it out!
1 comment
Sorry I think there is a little mistake: the command to delete danglig docker images is “docker image prune” and not “docker image purge” as you wrote.
Anyway thanks for the article, very useful and clear!