
As a system administrator, you may be asked to manage disks between different operating systems such as Windows, Linux and MacOS.
As a consequence, you may have to format your disk partitions accordingly in order for them to be compatible across multiple environments.
What filesystems should you use?
Should you go for an ext2, ext3 or ext4 filesystem for your disks? Or maybe should you stick with FAT filesystems that are more compatible across operating systems?
In this tutorial, we are taking a look at ways to format disk partitions on Linux as well as the thinking process behind choosing the correct filesystem for your partitions.
Prerequisites
In order to format disk partitions on Linux, you need to be a sudo user on your host.
In order to verify that you are sudo, run the “sudo” command with the “-l” option to see your rights listings.
$ sudo -l

User <user> may run the following commands on <host>:
    (ALL : ALL) ALL
If you are looking for resources in order to be sudo on Debian/Ubuntu or on RHEL/CentOS, make sure to take a look at our dedicated guides.
When you are ready, you can jump to the next section.
List Existing Partitions on Linux
First of all, in order to format partitions, you obviously need to identify the different partitions available on your system.
To identify existing partitions on Linux, use the “lsblk” command that lists block devices (hard drives, USB drives) on your system.
$ lsblk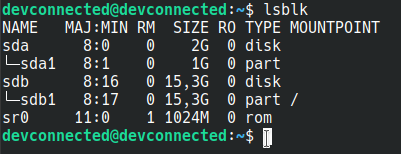
As you can see here, we own two disks named sda and sdb.
The sdb drive is already partitioned and contains the sdb1 partition mounted on the root mountpoint.
On the other hand, the sda drive contains a partition that is not already mounted : this partition would be a great candidate for formatting.
Note : if you have a disk but it does not contain any partitions yet, make sure to read our guide on how to create disk partitions on Linux.
List Non Formatted Partitions on Linux
In order to list non formatted partitions on Linux, use the “lsblk” command with the “-f” option.
The “-f” command stands for “filesystems” and displays information about filesystems that may already be written to a disk.
$ lsblk -f

NAME    FSTYPE    LABEL        UUID                                    MOUNTPOINT
sda
├─sda1
sdb
├─sdb1  ext4                   b9df59e6-c806-4851-befa-12402bca5828    /
As you can see, the sdb1 already hosts a ext4 filesystem whereas the sda1 does not.
As a consequence, we are going to use the sda1 partition in order to format our disk partition.
Choose your filesystem type
Before formatting any disks or any USB drives, you have to decide on which filesystem types you want to create.
Why is it so important?
Choosing a filesystem type is very important because not all filesystems are compatible between all the operating systems available.
Have you ever tried to insert a USB drive with an EXT4 filesystem into a Windows operating system?
You essentially would not be able to read your USB drive.
To choose your filesystem type, you can use the following table that shows the compatibility between different operating systems as well as the max file size and the max volume size.
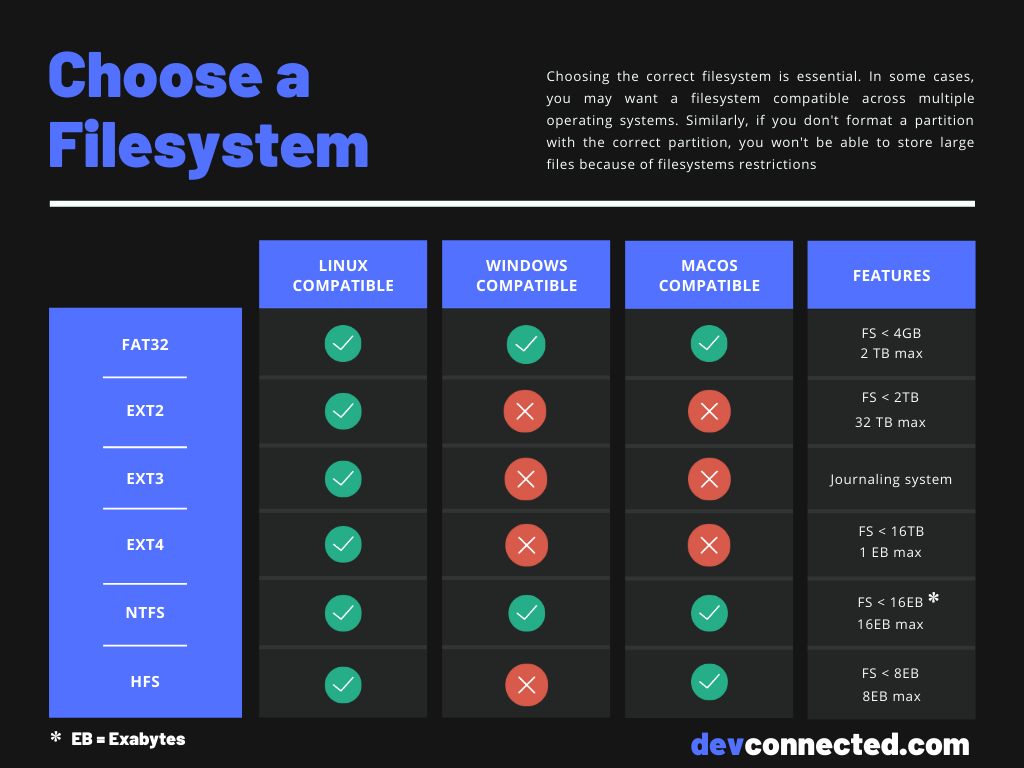
As you can see, pretty much all filesystems are compatible with Linux operating systems.
In the table, when filesystems are said to be non-compatible, it doesn’t take into account the fact that third-party software may exist in order to read those filesystems.
Drivers may exist in order to read EXT2 filesystems on Windows operating systems for example.
In the next sections, we are going to see how you can create EXT4 partitions as well as FAT32 and NTFS partitions for Windows.
Format a Disk using EXT4 filesystems
In general, if you are formatting disks for Linux operating systems, you may want to format it with an EXT4 filesystem.
EXT4 is a modern filesystem that implements journaling.
In short, this filesystem keeps track of all the operations done on the filesystem before performing them.
This comes very handy when you power off your server while performing some writes operations on the system.
By not committing the operations instantly, your kernel will be able to track changes not already done and resume its normal execution.
In order to format a partition with an EXT4 filesystem, you need to use the “mkfs” command and specify the “ext4” filesystem.
$ sudo mkfs -t ext4 /dev/sda1

mke2fs 1.44.1 (24-Mar-2018)
Creating filesystem with 4096 1k blocks and 1024 inodes

Allocating group tables: done
Writing inode tables: done
Creating journal (1024 blocks): done
Writing superblocks and filesystem accounting information: done
To verify that your filesystem was correctly created, make sure to run the “lsblk” command again with the “-f” flag.
$ lsblk -f

NAME    FSTYPE    LABEL        UUID                                    MOUNTPOINT
sda
├─sda1  ext4                   26529dea-c28a-4330-b549-8c8158efc7c7
sdb
├─sdb1  ext4                   b9df59e6-c806-4851-befa-12402bca5828    /
Now that your filesystem is correctly created, you will need to mount your filesystem for it to be accessible.
To mount an EXT4 filesystem, use the mount command and specify the correct partition, as well as the mount point.
sudo mount <partition> <mountpoint>For example, in order to mount the partition we just created to a directory located in the home directory of our current user, we would run
$ sudo mount /dev/sda1 /home/<user>/partitionIn order to verify that your partition was correctly mounted, you can still run the “lsblk” command with the “-f” flag.
$ lsblk -f

NAME    FSTYPE    LABEL        UUID                                    MOUNTPOINT
sda
├─sda1  ext4                   26529dea-c28a-4330-b549-8c8158efc7c7    /home/<user>/partition
sdb
├─sdb1  ext4                   b9df59e6-c806-4851-befa-12402bca5828    /
Awesome!
You learnt how you can format your disk partitions with an EXT4 filesystem and how you can mount it to start creating files.
Let’s see how you can achieve the same result using a FAT32 filesystem.
Format a Disk using FAT32 filesystems
The FAT32 filesystem stands for File Allocation Table and it was developed following on from previous filesystems such as FAT16 and FAT12.
Even if FAT is not the default filesystem on most modern computers, it is still widely used on floppy disks and on USB drives.
In fact, the FAT filesystem is quite handy for small files and small total volume size providing a great overall performance.
In order to format a partition with an FAT32 filesystem, you need to use the “mkfs” command and specify the FAT32 filesystem.
$ sudo mkfs -t vfat /dev/sda1

mkfs.fat 4.1 (2017-01-24)
Again, run “lsblk” with the “-f” option to make sure that your changes were written to the disk.
$ lsblk -f

NAME    FSTYPE    LABEL        UUID                                    MOUNTPOINT
sda
├─sda1  vfat                   26529dea-c28a-4330-b549-8c8158efc7c7
sdb
├─sdb1  ext4                   b9df59e6-c806-4851-befa-12402bca5828    /
You can mount your newly created partition by using the “mount” command.
$ sudo mount /dev/sda1 /home/<user>/partitionFinally, if you plan on formatting entire disks for Windows, you may be tempted to use the NTFS filesystem.
Let’s see how you can format your disks using NTFS on Linux.
Format a Disk using NTFS filesystems
Developed by Microsoft, the NTFS filesystem is the filesystem commonly used on most Windows distributions nowadays.
NTFS comes as a very big improvement from the FAT filesystem and the HPFS filesystem providing enhanced performance, as well as better reliability and scability.
In order to format a partition with a NTFS filesystem, you need to use the “mkfs” command and specify the NTFS filesystem.
$ sudo mkfs -t ntfs /dev/sda1

Cluster size has been automatically set to 4096 bytes.
Initializing device with zeroes: 100% - Done.
Creating NTFS volume structures.
mkntfs completed successfully. Have a nice day.
Again, to make sure that your filesystem was correctly set, run the “lsblk” command with the “-f” flag.
$ lsblk -f

NAME    FSTYPE    LABEL        UUID                                    MOUNTPOINT
sda
├─sda1  ntfs                   26529dea-c28a-4330-b549-8c8158efc7c7
sdb
├─sdb1  ext4                   b9df59e6-c806-4851-befa-12402bca5828    /
To mount a NTFS filesystem, use the “mount” command and specify the mountpoint you want to use.
$ sudo mount /dev/sda1 /home/<user>/partitionCongratulations!
You successfully formatted your disk on Linux using a NTFS filesystem.
Conclusion
In this tutorial, you learnt how you can format disks on Linux using the mkfs command and how it can be used in order to create various filesystems : EXT4, FAT32 and NTFS.
You also learnt more about filesystems compatibility and which filesystem you should use if you plan on switching disks between Linux and Windows, or between Linux and MacOS operating systems.
As a side note, mount your partitions using mount will not make the mountpoint definitive and it will be resetted on the next restart.
If you are interested in Linux system administration, make sure to read our dedicated category on the website.
This article is part of a series on disk management :
2 comments
[…] How To Format Disk Partitions on Linux […]
[…] you format filesystems on those partitions in order to store your […]