This tutorial focuses on how to find files on Linux using the find and the locate command.
As a system administrator, it is a very common task to look for a specific file on your file system.
However, it might be sometimes hard to find files on a Linux filesystem especially if you have dozens of different users.
There are two commands that can help you achieve your goal : find and locate.
In this tutorial, we are going to see how to use those commands effectively and how they can be tuned to achieve what we are looking for.
Find Files using the Find command

The first way to find and locate files on a Linux host is to use the find command.
By default, the find command is available on all distributions and it has the following syntax
$ find <options> <path> <expression>Quick tip : do you have some trouble remembering if path or expression comes first?
Remember that for the grEP is Expression Path, and find is the opposite, so Path Expression!
Find is a pretty powerful command as it has way more options than the locate command.
Here are all the possibilities of the find function on Linux.
Find files with find by filename
The most common usage of the find function is to locate files given their filenames.
$ find <path> -name <pattern>The main difference between find and locate when it comes to searching for files is that find will lookup for filenames while locate will look for paths to the file.
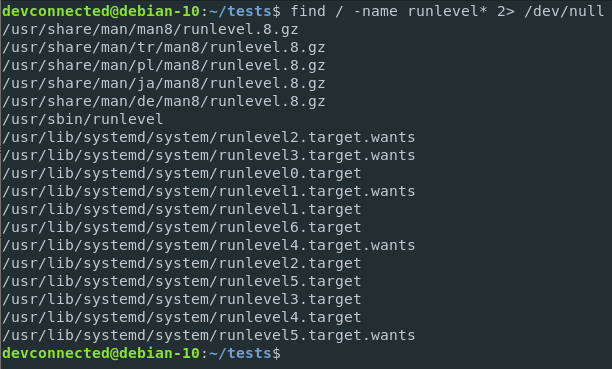
For example, if we go back to the runlevel example we used before, here’s how to look for runlevel files using the find command.
$ find / -name runlevel*
What’s the “2> /dev/null” part?
I redirected the error output to /dev/null using output redirection to avoid error messages on the console.
Find files using find by filetype
As we previously discussed in our article on hard and soft links, files are assigned file types and it is used as a way to differentiate them.
Here is a recap of all the file types used on Linux.
- f : a standard file
- d : a folder or directory
- l : a symbolic link or soft link
- b : block devices (such as a hard drive for example)
- c : character devices (serial ports, sound cards)
- p : named pipe
- s : socket
Knowing all those file types, you are now able to search for files by file type with the find command.
$ find <path> -type <filetype>For example, if we search for all the symbolic links on the host, we would issue the following command.
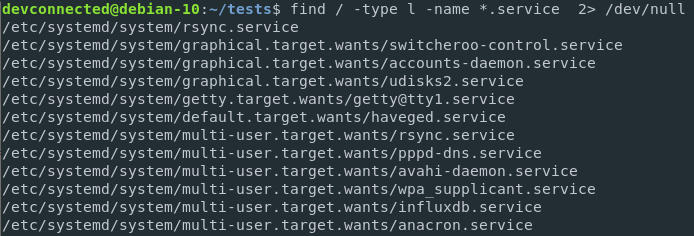
$ find / -type lParameters can be combined, for example if I am looking for all symbolic links whose filenames are ending with “.service” (to isolate all systemd services for example), I would run the following command.
$ find / -type l -name *.service
Find files using a pattern (for extensions)
Similarly to the locate command, you are able to find files on Linux using a pattern.
As a reminder, a pattern is a string that includes globbing characters (such as *, ?, or ranges).
This option is particularly when you are trying to find files given an extension, for example Javascript files.
To find files on Linux using a pattern, run the following command
$ find <path> -name ".<extension>"$ find / -name "*.js"
Files files on Linux by owner
Sometimes, you want to isolate files created by a certain user.
When deleting a user on your host, you may want to delete all files associated with this user for example.
Sometimes, users create files out of their home directory and deleting a user home directory isn’t sufficient by itself.
As a consequence, to find files created by a certain user on Linux, run the following command
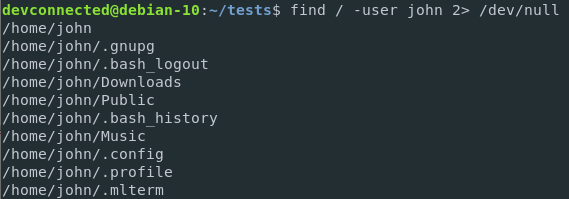
$ find <path> -user <user>For example, to find all files owned by “john” on my host, I would run the following command.
$ find / -user john
Now what if I want to delete all files owned by john with a simple command?
It can be easily be achieved using the delete flag.
$ find / -user john -deleteFind files on Linux by permissions
Using the find command, you can also find and locate files that have certain permissions on your host.
$ find <path> -perm <permissions>As a reminder, here is how file permissions work on Linux.
To find all files that have full permissions (a 777 given the binary notation), you can run the following command.
$ find / -perm 777It can be quite handy if for security reasons you want to inspect if no files are configured with full permissions on your system.

Find files with find by size
Another very handy way to find and locate files on Linux is to find the find command with the size option.
The size option allows you to search for files that are exactly the size you are specifying, greater than a specific size or lower than a specific size.
To search for files by size, use the following command
$ find <path> -size <size>The size is defined by the following prefixes :
- c: bytes
- b: 512-byte blocks
- k: Kilobytes
- M: Megabytes
- G: Gigabytes
You can specify a “+” if you are looking for files greater than the size specified.
For example, in order to find files greater than 1 GB on your system, run the following command
$ find / -size +1GTo find files lower than 10 MBs on your system, run the following command
$ find / -size -10MFinally, to search for files that are exactly the size specified in the query, you should not append any plus or minus prefixes to the command.
$ find / -size 1024kThe command just defined will find all files that are exactly 1024 Kbs in size on your host.
Find files on Linux by modification date
Using the find, you are also able to find files given a modification date, recent or not.
This command is very handy and used quite often by system administrators to find files or directories that have been recently modified.
To search for files using find by modification date, run the following command
$ find <path> -mtime <time>Where time represents the files modified 24*<time> hours ago.
As a consequence, time is expressed in days.
Similarly to the size option, you can append a “plus” or a “minus” operator to the time to look for files modified more than <time> days ago, or less than <time> days ago.
For example, to look for files modified exactly 3 hours ago, you would run the following command.
$ find / -mtime 3To find files modified more than one week ago, you would run the following command
$ find / -mtime +7To find files modified less than two days ago, you will run the following command
$ find / -mtime -2Find files with dynamic depth
As you probably noticed, since the beginning of this tutorial, we are giving examples of files searches starting from the root directory.
As a consequence, all folders are browsed recursively.
However, we can restrict the number of directories recursively traveled from one directory, this is called the depth.
To limit file searches to a given depth, run the following query
$ find <path> -maxdepth <depth>As an example, here is how you can restrict files searches to the current directory, with no children directories being browsed.
$ find / -maxdepth 1You can obviously combine this command with the name flag in order to search for files with a given name in the current directory.
$ find . -maxdepth 1 -name *.tar
Chaining find with -exec
In some cases, you may find useful to chain the find command with the exec one.
The exec option can be used in order to chain multiple commands together : taking the result of the first one as an input of the second one.
Let’s say for example that you want to find all files modified less than one minute ago
$ find /home/user -mmin -1
./file1
Now let’s say that you want to delete all files that were modified less than one minute ago.
You can chain the find command with the -exec option using this syntax.
$ find /home/user -mmin -1 -exec echo rm -f '{}' \;
We obviously first “echo” the results as we want to make sure that we are deleting the correct files.
When you are ready to delete those files, simply remove the echo command.
$ find /home/user -mmin -1 -exec rm -f '{}' \;Find Files on Linux using the Locate command
Another great way to find and locate files on Linux is to use the locate command.

Prerequisites
If the locate command in not available on your system, make sure to read the next section to get locate running on your system.
a – Installing Locate on APT and RPM based distributions
To install locate, you will need sudo privileges on your Linux host.
To check if locate is installed on your host, run the locate command in the command line.
$ locateIf locate is installed on your computer, it will expect an expression to provided

If locate is not installed on your host, an error message will be displayed

To install locate on Ubuntu 18.04 and Debian 10, run the following command.
$ sudo apt-get install mlocateSimilarly, if you are on a CentOS or Fedora based distribution, run the following command to install locate.
$ sudo yum install mlocateb – Updating your mlocate database
The locate function works with a local database stored on your filesystem that stores every single filename of your host.
When performing a locate command, locate will search into the database prepared by updatedb for the file you are searching for.
Periodically, a cron job updates the mlocate.db file for you to look for the most recent entries.
The database is located at /var/lib/mlocate/mlocate.db by default and the updatedb configuration file is stored at /etc/updatedb.conf.
For now, you can leave the default options and run a simple updatedb command for your database to refresh.
$ sudo updatedb
Locate files given a name pattern
The most basic way to find files on Linux is to provide a pattern to the locate command.
By default, the syntax of the locate command is the following one
$ locate [OPTION]... [PATTERN]...If you are looking for a given configuration file on your system, an easy way to find it is to provide its complete file name to the locate command.
$ locate updatedb.conf
As you can see, the locate command is returning the complete paths to the file I am looking for.
Locate files in restricted directories
Sometimes, you may not have access to some directories on your system.
As a consequence, you won’t be able to locate the files located into it.
Let’s take the example of a forbidden folder containing a file named “restricted-file“.

To locate files located on restricted directories, you have to run the locate command with sudo privileges.
$ sudo locate restricted-file
Locate files using a pattern
Using the locate command, you can provide “patterns” in the form of globbing characters.
Globbing characters, also called wildcards, are characters used in order to match one or multiple entries with a simplified expression.
The most popular one is the “*” that will match any character including none.
Here’s a recap table for globbing characters and their functions.
| Wildcard | Description | Example | Matches | Does not match |
|---|---|---|---|---|
* | matches any number of any characters including none | devco* | devconnected, devcoco, devco.com | devdevco, |
[abc] | matches one character given in the bracket | [ab]ab | aab, bab | cab |
[a-z] | matches one character from the (locale-dependent) range given in the bracket | runlevel[0-9] | runlevel1, runlevel2, runlevel6 | runlevels, runlevelo |
As an example, here’s a way to locate all text files on your system.
$ locate *.txt
Locate files using a regular expression
As stated in the official man page for locate, the locate command accepts a pattern as an input.
It means that you are able to provide a regular expression to the locate command.
To find and locate files given a regex, use the –regex option for the locate command.
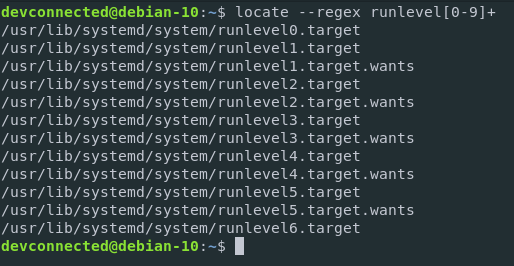
$ locate --regex <regex>For example, to isolate all files starting with runlevel followed by a number, you would run the following command.
$ locate --regex runlevel[0-9]+
When using regexes, there is one important point that you should be aware of when locating files.
The locate command is looking for paths to files in its local database.
As a consequence, when searching for files, you should be aware that your regular expression has to match the path to the file and not the file name alone.
For example, if I look for files starting with “run”, no results won’t be returned as the path to the file starts with “/usr”.

Locate files using case insensitive option
When searching for files on your filesystem, you may not be sure about the way a given file was named.
Was it written in uppercase or in lowercase? Does it contain any uppercase letters at all?
To find and locate files using a case insensitive option, append the -i option to your locate command.
$ locate -i <file_pattern>
Search files by content using grep

In some cases, you may be interested in searching for files that are matching a specific word of sentence that is located INSIDE the file.
This may happen for example if you are trying to find the file containing specific log events.
The first way to search for files matching a specific word is by using the grep command
$ grep -r <pattern> <path>Note : do not forget the “-r” option if you are searching files through entire directories.
For example. if you are searching all the files having “error” in their content, located in your home directory, you would type
$ grep -r error /home/user
In some cases, you may want to find files given a regular expression.
In order to find files using a regular expression, use the “-E” option.
$ grep -r -E <expression> <path>Let’s say for example that you want to find the file matching the ‘abc’ pattern in one of your files, you would type
$ grep -r -E "abc.*" --color /home/user
Note : the color option is used in order to highlight matches using the grep command.
Find files using which

Another great way to locate files on Linux is to use the which command.
The which command is used in order to locate the files associated with a specific command.
This can become very handy when you don’t know where you stored your binaries for a command or if you need to locate a command in order to add it to your PATH.
$ which <command>For example, in order to search for files associated to the “ls” command, you would type
$ which ls
/usr/bin/ls
As you can see, you are given the complete path to the file.
Locate binaries using whereis
Similarly, it is completely possible to search for files by using the whereis command.
The “whereis” command can be seen as a superset of the “which” command : “whereis” provides information about the name of the command, the file location as well as the location of the manual pages.
To execute whereis, simply type “whereis” and append the name of your command.
$ whereis ls
ls: /usr/bin/ls /usr/share/man/man1/ls.1.gz
Pretty handy!
Conclusion
In today’s tutorial, you learnt how you can find and locate files on Linux using two important commands : locate and find.
Even if option were presented individually, you should remember that they can be combined in order to be able to specify even more the files you are looking for.
As always, if you are interested in Linux system administration, we have a complete section dedicated to Linux on our website.

As always, here is a short video on the subject in case you prefer Youtube videos.


6 comments
Hello,
I think we can use the option “-delete” with -exec
$find -name “files” -exec -delete
Hello!
Indeed that’s a great alternative to running “exec” with the rm command, it is supposedly more efficient as it is not spawning another process.
For reference, here’s a link on StackExchange.
How to find efficiently based on ACLs?
Hello,
In order to find files based on ACL rights, you would not use the find command but the getfacl one.
Again, you will find relevant information about ACL searching with the following link.
Yes, I know the getfacl command, you have to grep after… It’s not like find but more like ls -lR !
We need a find that works on ACL 😉
Great article!
I would also like to point out that there are some GUI tools that can be used in order to find files on Linux
Ever heard of Cerebro for example?
It’s a great tool, I am not sure it is available for every distribution though