
If you are new to Linux administration, you may be wondering how Linux file permissions work on Linux systems.
Maybe you have been denied the read access to a file and you are trying to discover why and how to solve it.
Or you may have tried to move a file from a directory to another, only to discover that you don’t have the permissions to do it.
Today, we are taking a very close look at how file permissions work on Linux.
Ready?
This article has an exercises article associated with it, read to train on the subject.
I – What You Will Learn
Here are all the concepts that you will learn if you complete the tutorial until the end:
- How to read file, directory and link permissions in the command line using the ls command;
- Understand the binary numeral system used by the mask for newly created files
- What is the mask on Linux systems and what it is used for;
- How to manage access permissions on files and directories;
- What are the suid, the sgid and the sticky bit;
II – Linux Permissions Basics
Before starting out, there are some very basics concepts that you need to understand before jumping into more complex details.
On Linux systems, rights are essentially divided into two categories:
- Ownership: the user and the group owning the file, meaning that they either created it or they were assigned as owners of the file or directory.
- Permissions: given a file or a directory, permissions represent the set of actions that you are able to perform depending on who you are (the user account you are logged in) and the group that you belong to.
But, where would you be able to see this information?
The most common way to check Linux permissions is by using the ‘ls‘ command, with a ‘al‘ option.
$ ls -al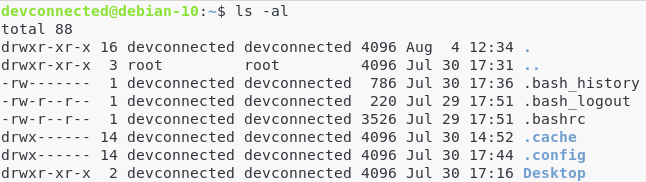
Those are the permissions for my user (devconnected) on my home directory.
But what do those columns even represent?
Here is how to understand the output of the ls command.
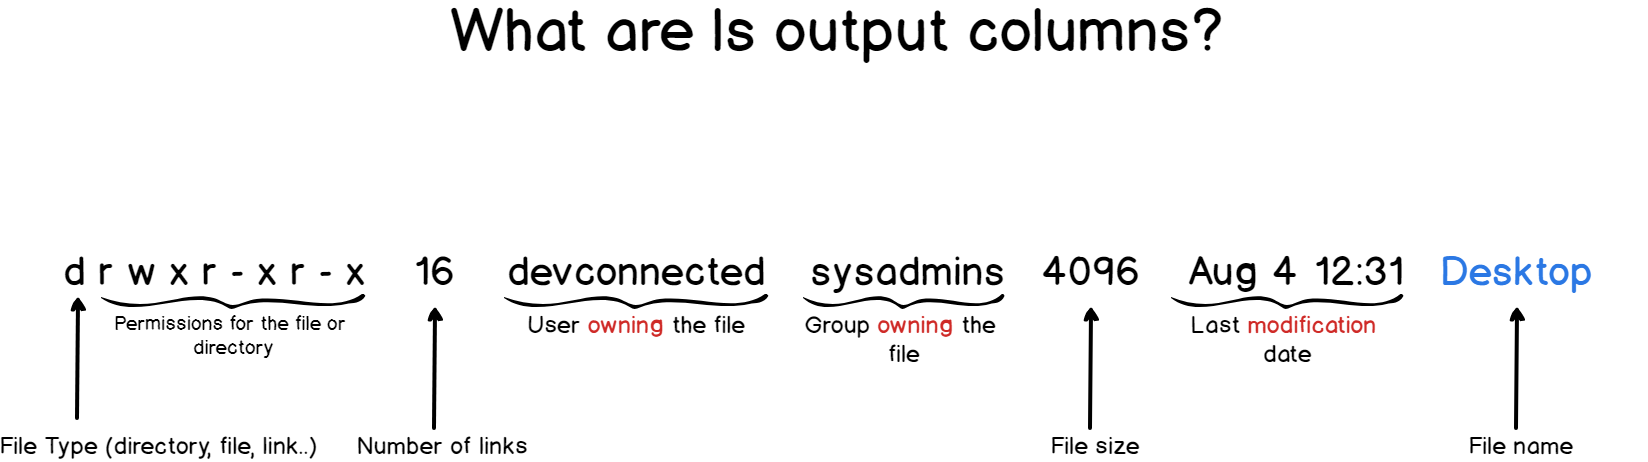
For this tutorial, we are going to focus only on the first, third and fourth columns as the others are not very relevant to permissions anyway.
a – Understanding Linux File Types
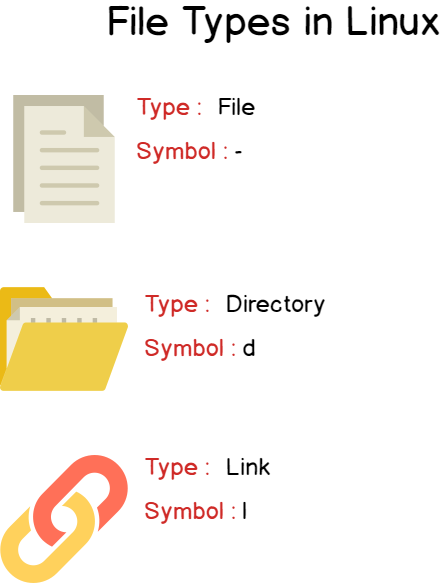
You probably heard it before, but on Linux, everything is a file.
As a consequence, links are files, but directories are also files.
When you are reading the first column of the ls output, you should pay attention to the first bit.
Linux files can have multiple types, but they are most of the time either a file (-), a directory (d) or a link (l).

In the previous ls output, I had a file named .bash_history, another one named .bashrc and three directories named .cache, .config and Desktop.
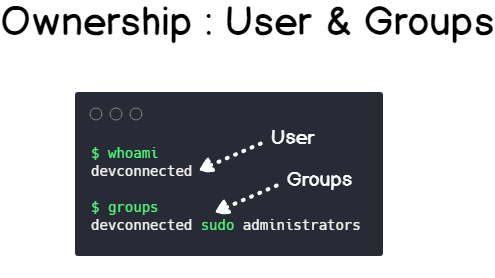
b – Understanding File Ownership
If you take another look at the output of the ls command, you will see that “devconnected” appears on two separate columns.
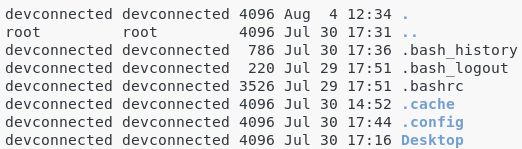
The third column is called the “user” column and it is dedicated to show who is actually owning the file.
In this case, as I am in my home directory, I am the actual owner of this file.
Quick tip : users are visible in the /etc/passwd file.
The fourth column is called the “group“.
In Linux, users belong to groups, for example the administrators group, the sudo group or the normal user group.
In this case, my “devconnected” user belongs to a group called “devconnected”.
As you can see on the second line, the “..” folder (which is in this case the /home directory) is owned by the “root” user that belongs to a group named “root”.
Quick tip : groups are visible in the /etc/group file.
c – Understanding Linux File Permissions
File Permissions
Now that you have a better understanding of the different file types, it is time to focus on the rest of the first column : the permissions.
Permissions are divided into three categories : user permissions, group permissions and the “other” permissions.
On each of those categories, you either have a letter or a dash.
Letters can either be r for read access, w for write access and x for the permission to “execute it“.
A dash simply means that you don’t have the permission.
Let’s have a look a look at the first line of our previous ls output.

The first dash indicates that the .bash_history is a file.
Then for the user, you have the following permissions set : “r w -” which means that the “devconnected” user can read and write in the file but not execute it.
For the group, you have the following permissions set : “- – -” which means that the “devconnected” group cannot read, write nor execute the file.
Finally, for the “others”, you have the same rights as the devconnected group which means that they cannot do anything at all.
Your turn : what are the permissions for this file?

Here is a table of what read, write and execute permissions mean for files.
| Permission | Description |
| r (or read) | The user, group or others can read the file, with a command such as cat, or vi (in read-only mode) |
| w (or write) | The user, group or others can modify and save the file with commands such as nano or vi |
| x (or execute) | The user, group or others can execute the file. This is most of the time used for scripts. |
Directory Permissions

However, as you probably saw it, the same read, write and execute apply for directories.
What does it mean for a directory to be executable?
Similarly, what does it mean to be able to write to a directory?
Here is a table of what read, write and execute permissions mean for directories.
| Permission | Description |
| r (or read) | The user, group or others can list the content of the directory (using a ls command for example) |
| w (or write) | The user, group or others can add or delete files from the directory |
| x (or execute) | The user, group or others can go through the directory for navigation. |
III – Understanding the Binary Numeral System
a – Converting values from binary to decimal
In order for you to understand what is a permission mask and what it is used for on Linux distributions, you need to have some basics on the binary numeral system.
(If you feel like this is too basic for you, feel free to skip directly to the next section)
In a binary numeral system, we count with only two numbers: zero and one.
This system is great for computers, but for us, it is not very handy.
We are used to represent numbers with the decimal system, meaning with numbers from zero to nine.
Fortunately for us, there is a conversion between the binary numeral system and the decimal system.
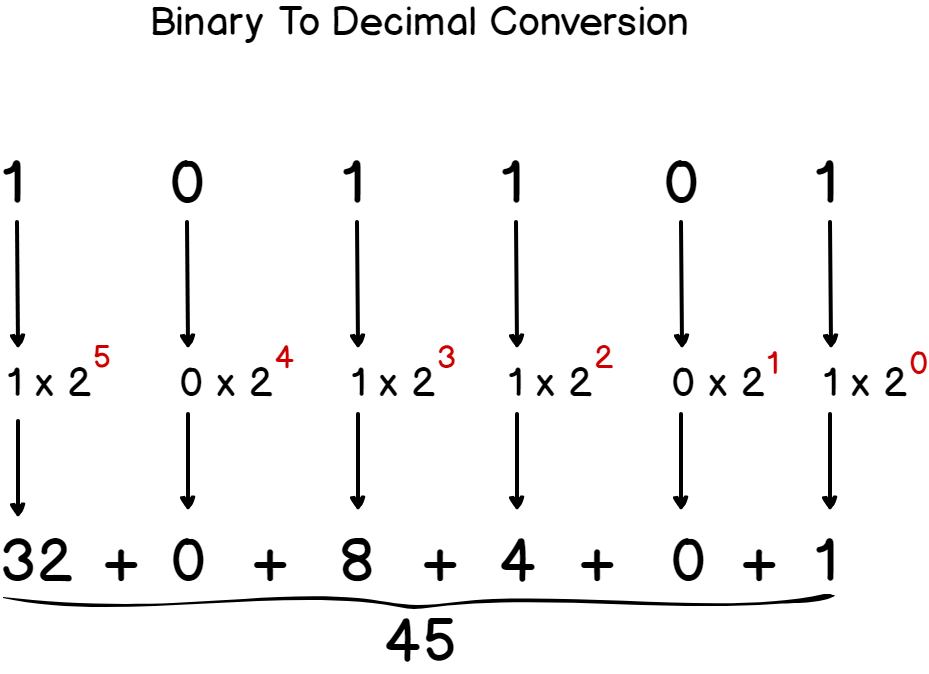
To convert a binary number to a decimal one : from right to left, each digit represents a power of 2.
Each power of 2 is summed to its preceding one to form the final decimal form.
Here’s a detailed schema of it.
If you need some practice, you can find some exercises on this at the end.
If you don’t want to do the conversion by yourself, there are plenty of tools that can convert binary numbers to text or decimal numbers. This is often quicker in order to find what the decimal representation of a binary number may be. An example of a tool would be this one : https://www.duplichecker.com/binary-to-decimal.php
Now that you have some basics about the binary numeral system, let’s see how it can be applied to Linux permissions.
b – Linux Permissions using the binary and decimal systems
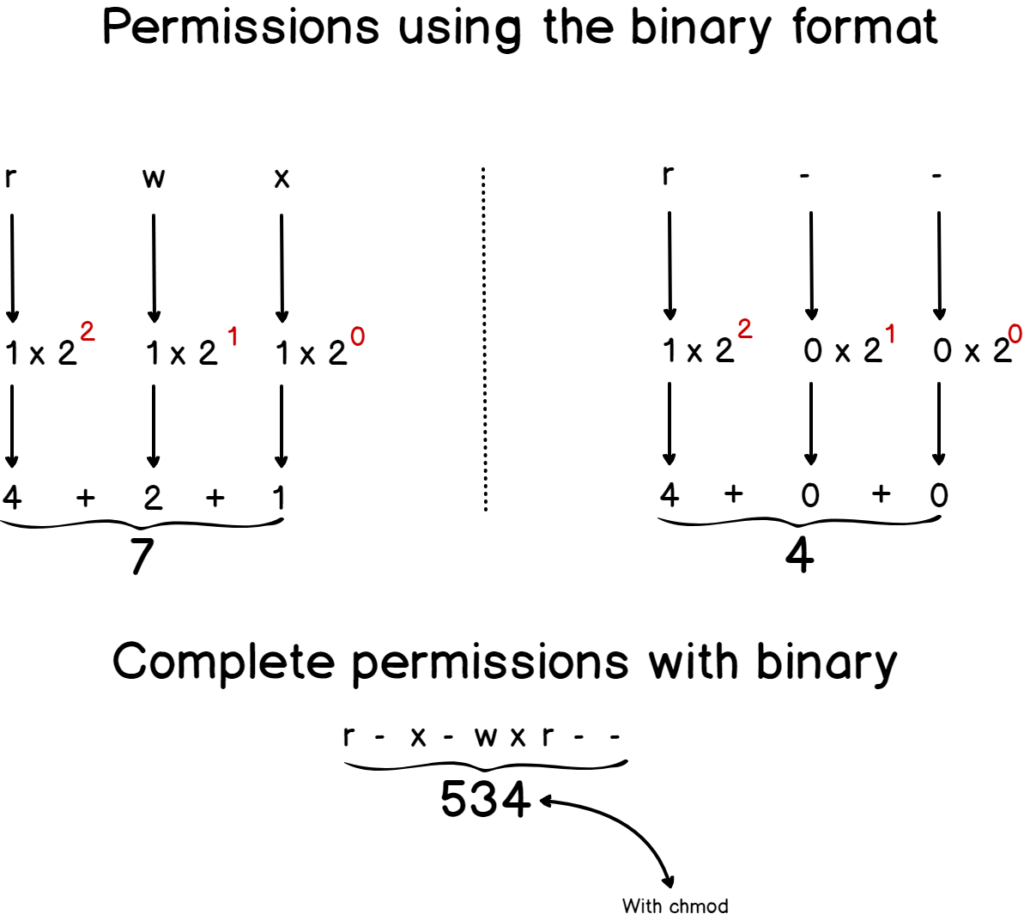
When dealing with permissions, besides using the “rwx” notation, we also use the decimal notation in order to describe permissions assigned to a file or a directory.
Instead of having to describe a directory permission as “r w x r w x r w x”, we give it a number which would be in this case 777.
Similarly, for a “r – – r w x r w x”, we would assign it the 477 number.
But how is this number even calculated?
Those numbers are calculated using the binary system we just learned about.
Each category computes the symbolic number by converting the existing permissions to its decimal form assigning a “one” if you have the permission and a “zero” if you don’t have the permission.
Finally, this triplet is converted to decimal using the technique that we saw before.
Here’s a schema that details it.
Now that you understand the decimal symbolic used for permissions, let’s have a look at the Linux permission mask.
III – What is the Linux permission mask?
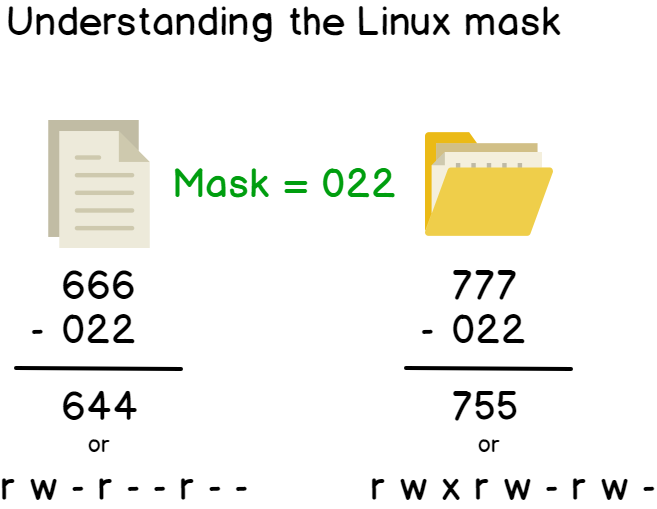
The Linux permission mask is a mask that sets the permissions for newly created files.
It can be accessed by running the umask command on your Linux system.

For now, you can focus on the last three digits of the mask : “022” (we are going to discuss the first zero in the next chapters).
The principle of the Linux mask is simple.
Every time you create a file or a directory, your system will apply the mask, consisting of applying consecutive bitwise operations to your initial set of permissions.
The only thing you have to remember is that files are created with a 666 permission, or a “r w – r w – r w -” permission.
Similarly, directories are created with a 777 permission, or a ” r w x r w x r w x” permission.
But those permissions are BEFORE applying the mask.
Here’s the resulting set of permissions when you apply the mask to them.
To prove it, let’s create a file on your system.
$ touch test
$ ls -l test
As you can see, the final permissions of my created file are ” r w – r – – r – -” which is the result we found with the bitwise operation.
Similarly, let’s create a directory on our system.
$ mkdir test-directory
$ ls -l | grep test-directory
Nice! Now that you know more about the Linux mask and how permissions are set for files and directories, let’s see how you can manage your permissions on a Linux system.
IV – How to manage permissions on a Linux system?
Permissions on a Linux system can be managed by using three commands: chmod, chown and chgrp.
Those commands respectively change the permissions of a file, change the owner of a file or change the group of a file.
Warning : you need to have elevated privileges (sudo) to perform those commands. Even if you own a directory, you won’t be able to change the owner or the group with your user account.
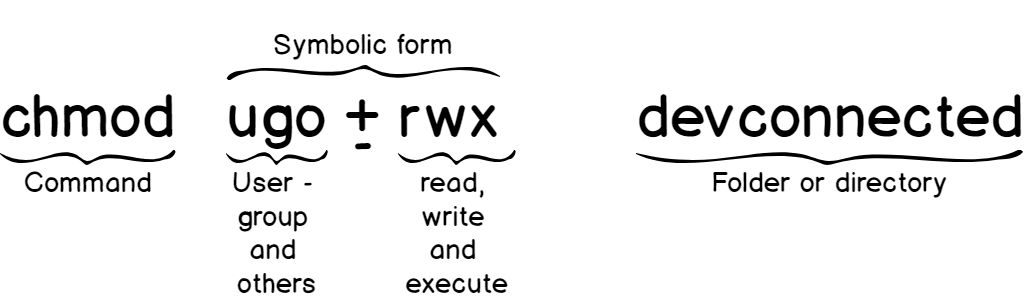
a – Using chmod
Using chmod is pretty straightforward.
The chmod command modifies the permissions of a file using either the decimal form or the symbolic form.
Modifying permissions using the decimal form
In order to modify permissions using the decimal form, you have to follow this syntax.

Here are some examples of the resulting file permissions given different chmod operations.
| Command | Resulting permissions |
| chmod 777 file | r w x r w x r w x (not recommended!) |
| chmod 444 file | r – – r – – r – – (read-only permissions) |
| chmod 421 file | r – – – w – – – x (owner can read, group can write, others can execute) |
| chmod 000 file | – – – – – – – – – (no permissions at all) |
Modifying permissions using the symbolic form
If you don’t want to remember which number associated with a permission, you can use the symbolic notation which is way more practical.
Here’s the syntax for the symbolic form.
Again, here is a table of some file permissions given different chmod operations.
| Command | Consequence on permissions |
| chmod u+rwx file | Adding the read, write and execute to the user (or owner of the file) |
| chmod go+r file | Adding the read permission to the group and the others category. |
| chmod o+rx file | Adding the read and execute permissions to the others category |
| chmod u-r file | Removing the read permission for the owner of the file. |
b – Using chown
Chown is a command that sets the owner of a file or directory.
It can only be used with sudo privileges, and even the owner of a file can’t modify its ownership.
The syntax is described below.

Similarly to the other commands, here are some examples using the chown command.
| Command | Resulting permissions |
| chown bob secretfile | Assigning bob as the owner of the secretfile |
| chown bob file1 directory1 | Assigning bob as the owner of the file1 and of the directory1 |
| chown bob:users file1 | Assigning bob as the owner and users as the group for the file1 |
| chown :users file1 | Assigning users as the group for the file1 |
Great! Now you have some understanding on the chown command.
Finally, let’s dive into the chgrp command.
c – Using chgrp
Chgrp is a command that sets the group property for a file or a directory.
Similarly, it requires sudo privileges to be run.
Here’s the syntax for the chgrp command.

Here are some examples using the chgrp command.
| Command | Resulting permissions |
| chgrp users file1 | Assigning users as the group for the file1 |
| chgrp -R users directory1 | Applying the users group recursively to directory1 and children. |
| chgrp -c users file1 | Assigning the users group to the file1 and giving all the changes done in the terminal |
V – What are the suid, guid and sticky bit?
Suid, guid and sticky bit are more advanced concepts of Linux permissions, but they can be very useful in different use-cases.
a – Understanding the suid
Suid stands for Set-User Identification and it is used by many commands on your system.
To see a quick example of where it is used, run the following command on your system.
$ ls -l /usr/bin/su
As you probably already noticed, the user permissions are a bit different from the usual “r w x” triplet.
Instead of having an execute permission, or a dash, the execute permission is replaced by the letter s.
This means that the suid is set for this file.
But what is it even used for?
The suid is used to execute a command as the owner of the file (in this case root) instead of the user that issued the command in the first place (devconnected in this case).
Fine, but why would we want to do that?
b – Why is the suid so important?
To illustrate why the suid is so important, let’s take the example of the passwd command.
On a Linux system, the passwd command sets the password for a user. It is often used when creating a new user, as a first connection password.

When you are setting a new password, the shadow file is modified on your system.
The shadow file (located at /etc/shadow) is a very restricted file that contains information about all the users on the machine, along with their encrypted passwords.
Take a look at the permissions of the shadow file.

Only the root account can write to this file. However, if I run a simple passwd command (as a non-sudo user), the command will be executed with my credentials (in this case, as devconnected).
Will I be able to write to the shadow file?
Not at all. That’s why the suid was invented.
If I run the passwd command, the command will be executed as the owner of the passwd file, which is in this case “root”.
As a consequence, the changes will be effective in the shadow file as root has the rights to write to this file.
c – Setting the suid using chmod
When using the decimal notation, you can append a “4” to the beginning of the usual form in order to set the suid to the file or directory.
Using the symbolic form, the suid is symbolized by the letter s, meaning that you would run:
$ chmod u+s file (to set the suid for the user)
$ chmod u-s file (to remove the suid for the user)
Fine, but what is the file is not executable?
You can still set the suid for a file even if the file is not executable. As a consequence, the suid will be displayed with a capital S instead of a lowercase s.

Here are some examples.
| Command | Resulting permissions |
| chmod 4777 file1 | Gives read, write, execute permissions to everybody – and the file1 will be executed as the owner of the file. |
| chmod 4444 file1 | Gives read permissions to everybody, the suid will be set, but the file is not executable. |
| chmod u+s file1 | Set the suid for the file1, the file will be executed as the owner of the file. |
| chmod 0777 file1 | Gives read, write, execute permissions to everybody – and the suid is not set. |
d – Understanding the guid
Using the same logic, the guid is used to execute a file as a member of the group owning the file.
Using the decimal form, you would append a “2” to the beginning of the usual form.
Using the symbolic form, you would simply use the letter s, like the suid, for the group.
Similarly, if the directory has its guid set but no permissions to execute the file, it will be represented with a capital S on the permission line.

Here are some examples.
| Command | Resulting permissions |
| chmod 2777 file1 | Gives read, write, and execute permissions to every user – and the file1 will be executed as a member of the group of the file. |
| chmod 0777 file1 | Read, write, and execute permissions to every user – but the guid is not set. |
| chmod g+s file1 | Set the guid active for the file1, the file will be executed a member of the group owning the file1 |
| chmod 2444 file1 | Read-only permissions to every user and the guid is set (with a capital S in the permission line) |
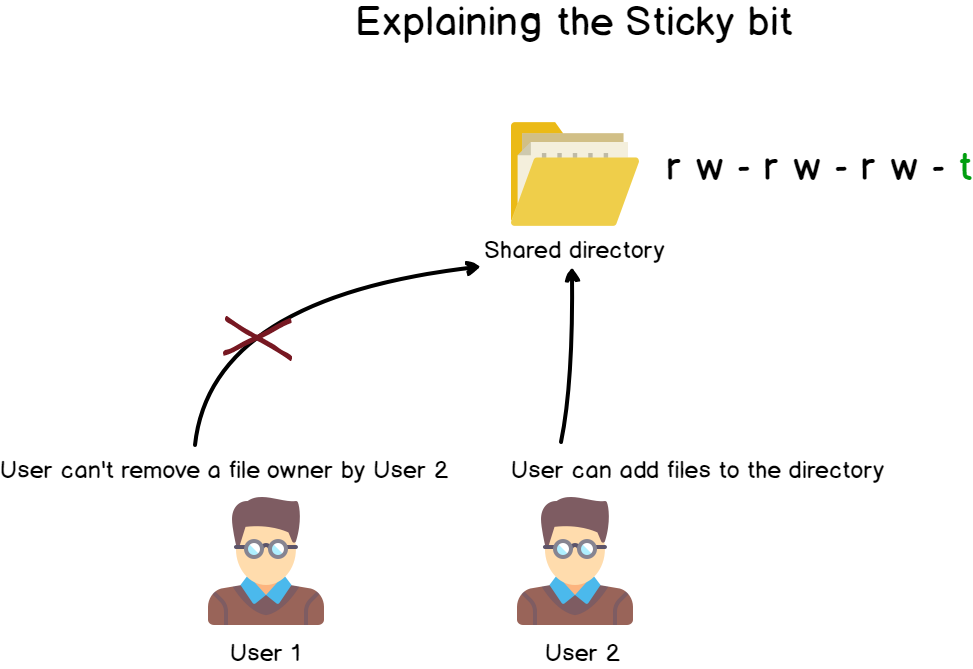
e – Understanding the sticky bit
As explained before, if a user has write and execute permissions on a folder, he will be able to add files to it, but also to delete files from it.
Now let’s say that you have two users working on the same Linux box. Those two users may be using the same folders (in the case of a shared directory for example).
A very standard example of this is the tmp directory. You may want to store your files in the tmp directory, but you don’t want other users to be able to delete your own files.
This is exactly the use case of the sticky bit : I want to be able to add files to a directory, as well as modify their contents, but I don’t want other users to move or delete my files (even if they own the permissions to add files themselves).
Using the decimal notation, you just have to stick a “1” to the beginning of the usual form.
With the symbolic notation, the sticky bit is represented with the letter t.
$ chmod +t directory1 (adds the sticky bit to the directory1)
$ chmod -t directory1 (removes the sticky bit from the directory1)
On the permission line, the sticky bit will be represented with a lowercase t (or an uppercase T if you don’t have execute permissions for the “others” category) at the end of it.

Again, here is a table with some sticky bit examples.
| Command | Resulting Permissions |
| chmod +t file1 | Setting the sticky bit for the file1 |
| chmod -t file1 | Removing the sticky bit for the file1 |
| chmod 1444 file1 | Read-only permissions, along with the sticky bit for the file1 |
| chmod 7777 file1 | Full permissions : suid, guid and sticky bit set (as well as read, write and execute) |
VI – Conclusion
From this tutorial, you probably now have a better idea of how Linux permissions work, how to manage them, and how to set them correctly.
Linux permissions are a very crucial subject, as system administrators have the responsibility to set them correctly to ensure that malicious intents do not mess with file integrity.
For those who prefer a video format, here’s a very great video on the subject by Chris Titus Tech.
If you are looking for more Linux related tutorials, do not hesitate to check what we wrote recently :
- Syslog : The Complete System Administrator Guide
- The definitive guide to centralized logging with Syslog on Linux
- Monitoring Linux logs using Rsyslog and Kibana
9 comments
[…] reserved Trending How To Setup Telegraf InfluxDB and Grafana on… Linux File Permissions Complete Guide Syslog : The Complete System Administrator Guide The Definitive Guide to Centralized Logging […]
Very Nice! I am bookmarking this for the students in my classroom. A great follow-up would be an article on access lists.
[…] How To Create a Database on InfluxDB 1.7… How To Setup Telegraf InfluxDB and Grafana on… Linux File Permissions Complete Guide Syslog : The Complete System Administrator Guide Monitoring Linux Processes using Prometheus […]
[…] you can see, file permissions on this file are restricted, which means that you are going to need sudo rights to modify this […]
[…] This is the set of exercises following the article on Linux Permissions. […]
[…] As a reminder, here is how file permissions work on Linux. […]
Amazing
Thank you for your articale.
Could you help me find out one intresting thing about FS permissions.
root creates file named root_file in regular user Alis home dir /home/Alis. Then root chmod 644 root_file.
[root@centos-lab Alis]# touch root_file
[root@centos-lab Alis]# echo “Root wrote this sentence” >> root_file
[root@centos-lab Alis]# chmod 644 root_file
[root@centos-lab Alis]# ls -li
total 4
963726 -rw-r–r–. 1 root root 25 Jun 8 21:21 root_file
[root@centos-lab Alis]#
After that user Alis opened root_file in vi and added text “Somehow Alis managed to add this sentence to root_file in vi”.
After that root_file changed owner and group owner to Alis and it’s contatin text written by root and added by Alis.
I could understand how it can be.
I supose that vi at first opened root_file with read permission, after edit this file content in a buffer, and then creates new file(owned by Alis, but named as old root file – root_file) and delete root old file root_file and creates new file root_file owned by Alis.
But the inode number of old(root file) and new(Alis files) is the same – this is big quation! It means that Alis could open with write permissions root file, change it content and change this file owner. But Alis has write permissions to /home/Alis dir so Alis can only delete root file or change its name, but not contnent and owner because this information is stored in inode to which Alis has not permissions.
[Alis@centos-lab ~]$ whoami
Alis
[Alis@centos-lab ~]$ who
Alis pts/0 2022-06-08 21:18 (192.168.31.171)
root pts/1 2022-06-08 21:18 (192.168.31.171)
[Alis@centos-lab ~]$ ls -li
total 4
963726 -rw-r–r–. 1 root root 25 Jun 8 21:21 root_file
[Alis@centos-lab ~]$ pwd
/home/Alis
[Alis@centos-lab ~]$ cat root_file
Root wrote this sentence
[Alis@centos-lab ~]$ echo “Alis added this sentence” >> root_file
-bash: root_file: Permission denied
[Alis@centos-lab ~]$ echo “Alis added this sentence” > root_file
-bash: root_file: Permission denied
[Alis@centos-lab ~]$ ^C
[Alis@centos-lab ~]$ vi root_file
[Alis@centos-lab ~]$ ls -li
total 4
963726 -rw-r–r–. 1 Alis Alis 87 Jun 8 21:29 root_file
[Alis@centos-lab ~]$ cat root_file
Root wrote this sentence
Somehow Alis managed to add this sentence to root_file in vi
[Alis@centos-lab ~]$
It is extraordinary to find a so well made explanation of this topic.
I have been in IT for most of my life with a Doctorate in Mathematics.