
Whether you are an experienced system administrator or just a regular user, you have probably already mounted drives on Linux.
Drives can be local to your machine or they can be accessed over the network by using the NFS protocol for example.
If you chose to mount drives permanently, you have probably added them to your fstab file.
Luckily for you, there is a better and more cost effective way of mounting drives : by using the AutoFS utility.
AutoFS is a utility that mount local or remote drives only when they are accessed : if you don’t use them, they will be unmounted automatically.
In this tutorial, you will learn how you can install and configure AutoFS on Linux systems.
Prerequisites
Before starting, it is important for you to have sudo privileges on your host.
To verify it, simply run the “sudo” command with the “-v” option : if you don’t see any options, you are good to go.
$ sudo -vIf you don’t have sudo privileges, you can follow this tutorial for Debian based hosts or this tutorial for CentOS based systems.
Installing AutoFS on Linux
Before installing the AutoFS utility, you need to make sure that your packages are up-to-date with repositories.
$ sudo apt-get updateNow that your system is updated, you can install AutoFS by running the “apt-get install” command with the “autofs” argument.
$ sudo apt-get install autofsWhen installing the AutoFS package, the installation process will :
- Create multiple configuration files in the /etc directory such as : auto.master, auto.net, auto.misc and so on;
- Will create the AutoFS service in systemd;
- Add the “automount” entry to your “nsswitch.conf” file and link it to the “files” source
Right after the installation, make sure that the AutoFS service is running with the “systemctl status” command
$ sudo systemctl status autofs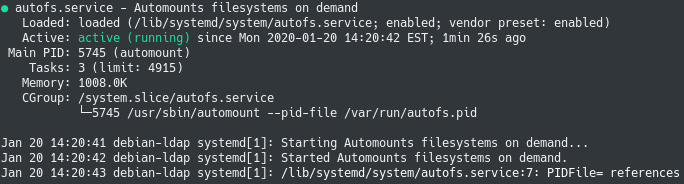
You can also enable the AutoFS service for it to be run at startup
$ sudo systemctl enable autofsNow that AutoFS is correctly installed on your system, let’s see how you can start creating your first map.
How AutoFS works on Linux
“Maps” are a key concept when it comes to AutoFS.
In AutoFS, you are mapping mount points with files (which is called an indirect map) or a mount point with a location or a device.
In its default configuration, AutoFS will start by reading maps defined in the autofs.master file in the /etc directory.
From there, it will start a thread for all the mount points defined in the map files defined in the master file.
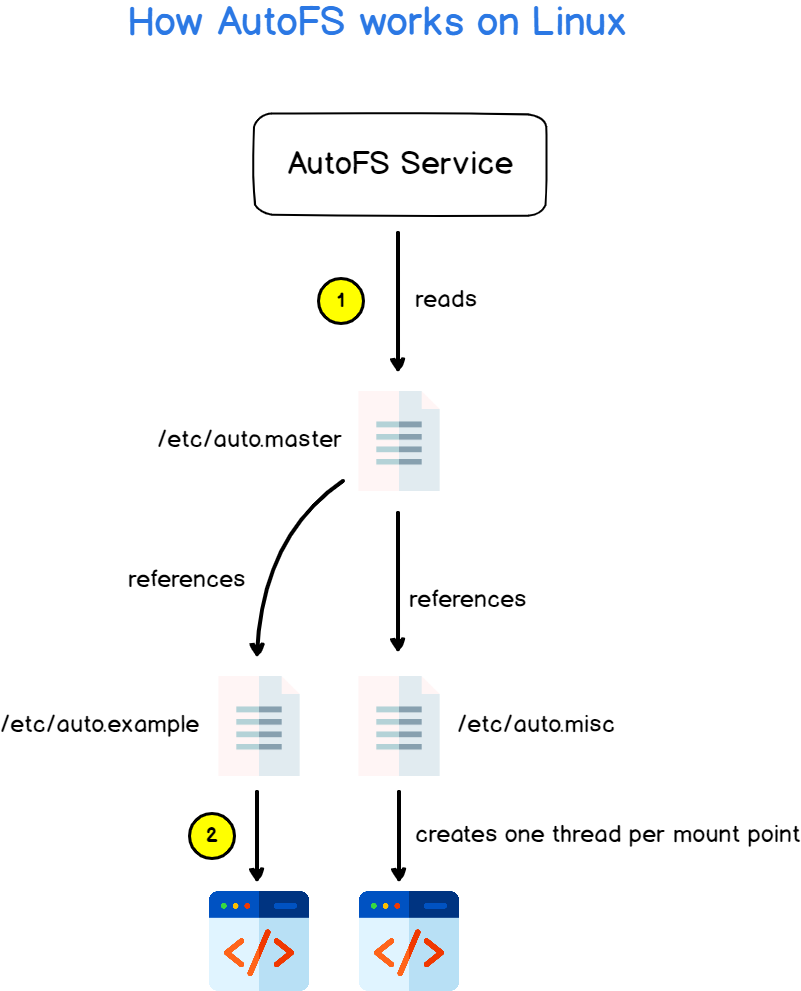
Starting a thread does not mean that the mount point is mounted when you first start AutoFS : it will only be mounted when it is accessed.
By default, after five minutes of inactivity, AutoFS will dismount (or unmount) mount points that are not used anymore.
Note : configuration parameters for AutoFS are available in the /etc/autofs.conf
Creating your first auto map file
Now that you have an idea on how AutoFS works, it is time for you to start creating your very first AutoFS map.
In the /etc directory, create a new map file named “auto.example“.
$ sudo touch /etc/auto.exampleThe goal of this map file will be to mount a NFS share located on one computer on the network.
The NFS share is located at the IP 192.168.178.29/24 on the local network and it exports one drive located at /var/share.
Before trying to automount the NFS share, it is a good practice to try mounting it manually as well as verifying that you can contact the remote server.
$ ping 192.168.178.29Creating a direct map
The easiest mapping you can create using AutoFS is called a direct map or a direct mapping.
A direct map directly associates one mount point with a location (for example a NFS location)
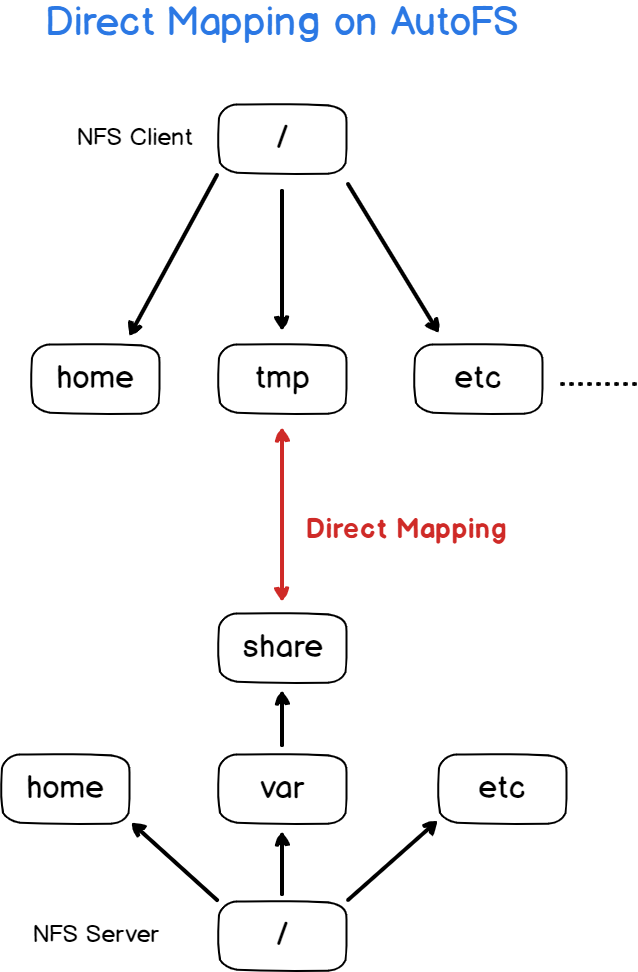
As an example, let’s say that you want to mount a NFS share at boot time on the /tmp directory.
To create a direct map, edit your “auto.example” file and append the following content in it :
# Creating a direct map with AutoFS

# <mountpoint>    <options>    <remote_ip>:<location>

/tmp              -fstype=nfs  192.168.178.29:/var/share
Now, you will need to add the direct map to your “auto.master” file.
To specify that you are referencing a direct map, you need to use the “-” notation
# Content of the auto.master file

/-    auto.example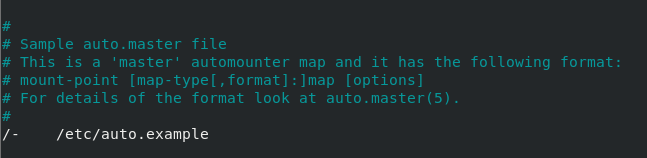
Now that your master file is modified, you can restart the AutoFS service for the changes to be effective.
$ sudo systemctl restart autofs

$ cd /tmp
Congratulations, you should now be able to access your files over NFS via direct mapping.

Creating an indirect mapping
Now that you have discovered direct mappings, let’s see how you can use indirect mappings in order to mount remote location on your filesystem.
Indirect mappings use the same syntax as direct mappings with one small difference : instead of mounting locations directly to the mountpoint, you are mounting it in a location in this mountpoint.
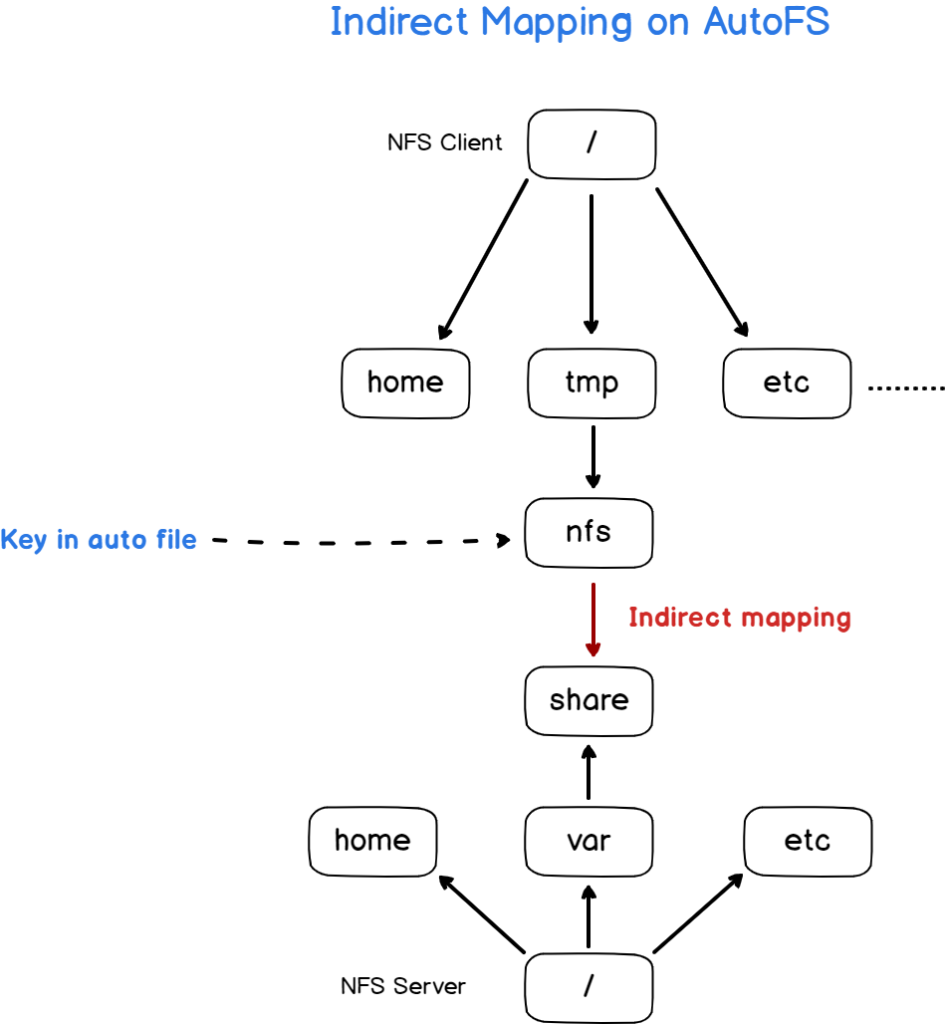
To understand it, create a file named “auto.nfs” and paste the following content in it
nfs -fstype=nfs 192.168.178.29:/var/shareAs you can see, the first column changed : in a direct map, you are using the path to the mountpoint (for example /tmp), but with an indirect map you are specifying the key.
The key will represent the directory name located in the mount point directory.
Edit your “auto.master” file and add the following content in it
/tmp /etc/auto.nfs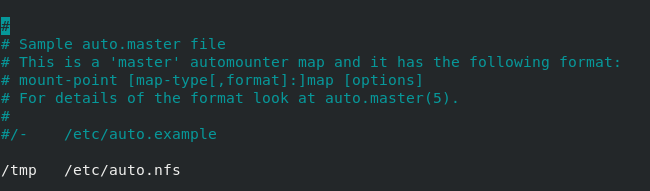
Restart your AutoFS service and head over to the “tmp” directory
$ sudo systemctl restart autofs

$ cd /tmp
By default, there won’t be anything displayed if you list the content of this directory : remember, AutoFS will only mount the directories when they are accessed.
In order for AutoFS to mount the directory, navigate to the directory named after the key that you specified in the “auto.nfs” file (called “nfs” in this case)
$ cd nfsAwesome!
Your mountpoint is now active and you can start browsing your directory.
Mapping distant home directories
Now that you understand a bit more about direct and indirect mappings, you might ask yourself one question : what’s the point of having indirect mapping when you can simply map locations directly?
In order to be useful, indirect maps are meant to be used with wildcard characters.
One major use-case of the AutoFS utility is to be able to mount home directories remotely.
However, as usernames change from one user to another, you won’t be able to have a clean and nice-looking map file, you would have to map every user in a very redundant way.
# Without wildcards, you have very redundant map files

/home/antoine  <ip>:/home/antoine
/home/schkn    <ip>:/home/schkn
/home/devconnected <ip>:/home/devconnected
Luckily for you, there is a syntax that lets your dynamically create directories depending on what’s available on the server.
To illustrate this, create a new file named “auto.home” in your /etc directory and start editing it.
# Content of auto.home

*    <ip>:/home/&
In this case, there are two wilcards and it simply means that all the directories found in the /home directory on the server will be mapped to a directory of the same name on the client.
To illustrate this, let’s pretend that we have a NFS server running on the 192.168.178.29 IP address and that it contains all the home directories for our users.
# Content of auto.home

*   192.168.178.29:/home/&
Save your file and start editing your auto.master file in order to create your indirect mapping
$ sudo nano /etc/auto.master

# Content of auto.master

/home     /etc/auto.home
Save your master file and restart your AutoFS service for the changes to be applied.
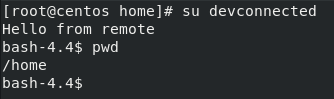
$ sudo systemctl restart autofsNow, you can head over to the /home directory and you should be able to see the directories correctly mounted for the users.
Note : if you see nothing in the directory, remember that you may need to access the directory one time for it to be mounted by AutoFS
Mapping and discovering hosts on your network
If you paid attention to the auto.master file, you probably noticed that there is an entry for the /net directory with a value “-hosts“.
The “-hosts” parameter is meant to represent all the entries defined in the /etc/hosts file.
As a reminder, the “hosts” file can be seen as a simple and local DNS resolver that associates a set of IPs with hostnames.
As an example, let’s define an entry for the NFS server into the /etc/hosts file by filling the IP and the hostname of the machine.

First of all, make sure that some directories are exported on the server by running the “showmount” command on the client.
$ sudo showmount -e <server>
Now that you made sure that some directories are exported, head over to your “auto.master” file in /etc and add the following line.
# Content of auto.master

/net   -hosts
Save your file and restart your AutoFS service for the changes to be applied.
$ sudo systemctl restart autofsThat’s it!
Now your NFS share should be accessible in the /net directory under a directory named after your server hostname.
$ cd /net/<server_name>

$ cd /net/<server_ip>
Note : remember that you will need to directly navigate in the directory for it to be mounted. You won’t see it by simply listing the /net directory on the first mount.
Troubleshooting
In some cases, you may have some troubles while setting up AutoFS : when a device is busy or when you are not able to contact a remote host for example.
- mount/umount : target is busy
As Linux is a multi-user system, you might have some users browsing some locations that you are trying to mount or unmount (using AutoFS or not)
If you want to know who is navigating the folder or who is using a file, you have to use the “lsof” command.
$ lsof +D <directory>
$ lsof <file>
Note : the “+D” option is used in order to list who is using the resource recursively.
- showmount is hanging when configuring host discovery
If you tried configuring host discovery by using the “-hosts” parameter, you might have verified that your remote hosts are accessible using the “showmount” command.
However, in some cases, the “showmount” command simply hangs as it is unable to contact the remote server.
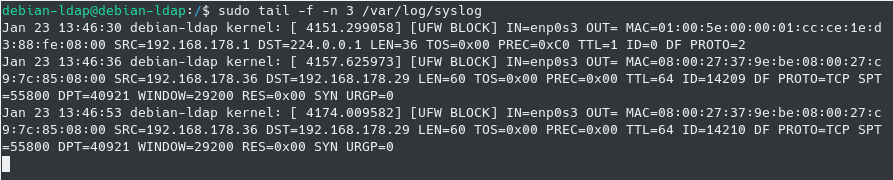
Most of the time, the server firewall is blocking the requests made by the client.
If you have access to the server, you try to inspect the logs in order to see if the firewall (UFW for example) is blocking the requests or not.
- Debugging using the automount utility
On recent distributions, the autofs utility is installed as a systemd service.
As a consequence, you can inspect the autofs logs by using the “journalctl” command.
$ sudo journalctl -u autofs.serviceYou can also use the “automount” utility in order to debug the auto mounts done by the service.
$ sudo systemctl stop autofs

$ sudo automount -f -v
Conclusion
In this tutorial, you learnt about the AutoFS utility : how it works and the differences between direct and indirect maps.
You also learnt that it can be configured in order to setup host discovery : out of the box, you can connect to all the NFS shares of your local network which is a very powerful tool.
Finally, you have seen how you can create indirect maps in order to automatically create home directories on the fly.
If you are interested in Linux system administration, we have a complete section dedicated to it, so make sure to have a look!

2 comments
Thank you for the article as this really helped in understanding autofs in detail and the benefits of different map files. Based on other articles I have read, your article is probably the most helpful ones as the debugging tips were right on the mark. While learning autofs functionality, I ran to the same issues and your explanations helped me a lot. Most of the available documentation does not clearly explain the role of a key in an indirect mapping file. I was navigating to the local mount and expecting to see the remote shares without realizing that I need to navigate first into the key->followed by the folder.
Thanks again.
Good article, however, in your steps you should specify what server i am supposed to be on when creating a file (such as auto.example).