
On Linux, it can be quite hard to manage storage and filesystems and it often needs a lot of different commands to move data.
Traditional storage is usually made of three different layers : the physical disk (whether it is a HDD or a SSD), the logical partitions created on it and the filesystem formatted on the partition.
However, those three layers are usually tighly coupled : it can be quite hard to shrink existing partitions to create a new one.
Similarly, it is quite hard to extend a filesystem if you add a new disk to your system : you would have to move data from one disk to another, sometimes leading to data loss.
Luckily for you, there is a tool, or an abstraction that you can use on Linux to manage storages : LVM.
LVM, short for Logical Volume Management, comes as a set of tools that allows you to extend, shrink existing volumes as well as replacing existing disks while the system is running.
In this tutorial, we are going to learn about LVM and how you can easily implement them on your system.
LVM Layers Explained
Before starting, it is important that you can get a strong understanding of how LVM are designed on your system.
If you have been dealing with regular storage devices before, you already know the relationship between disks and filesystems.
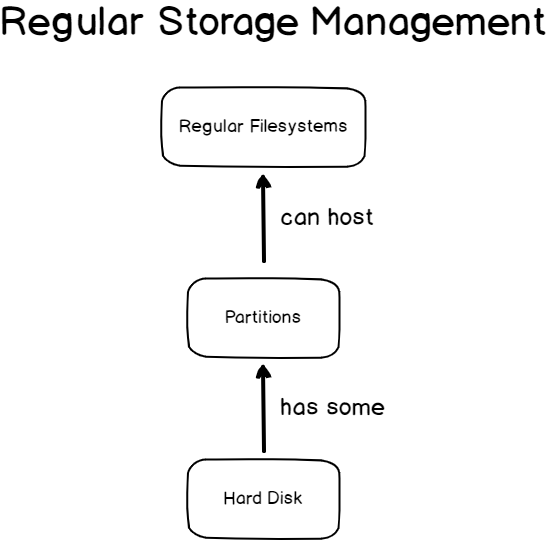
On Linux, you have physical disks that automatically detected and managed by udev when first inserted.
On those disks, you can create partitions using one of the popular utilities available (fdisk, parted or gparted).
Finally, you format filesystems on those partitions in order to store your files.
Using LVM, the storage design is a bit different.
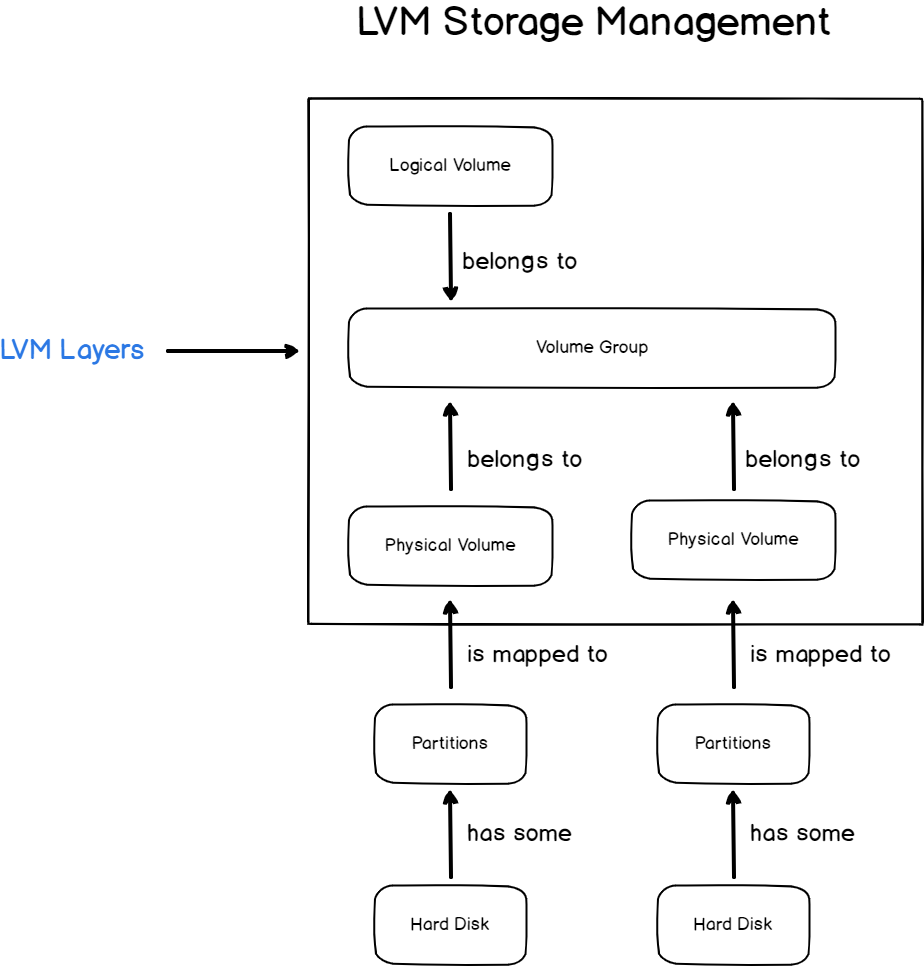
Between partitions and filesystems, you have three additional layers : physical volumes, volume groups and logical volumes.
Physical Volume
When using LVM, physical volumes are meant to represent partitions already existing on your hard drives.
When system administrators refer to “physical volumes”, they often mean the actual physical device storing data on our system.
Physical volumes are named in the same way than physical partitions : /dev/sda1 for the first partition of your first hard drive, /dev/sdb1 for the first partition of your second drive and so on.
Volume Group
Right over physical volumes, volumes group can be seen as multiple physical volumes grouped together to form one single volume.
Metaphorically, volume groups can be seen as storage buckets : they are a pool of different physical volumes that can be used to extend existing logical volumes or to create new ones.
Volume groups have no name convention, however it is common accepted that they are preceded with the “vg” prefix (“vg-storage“, “vg-drives” for example)
Logical Volumes
Finally, logical volumes are meant to be direct links between the volume groups and the filesystems formatted on your devices.
They have a one-to-one relationship with filesystems and they essentially represent a partition of your volume group.
Even if logical volumes are named in the same way mount points are, they are two different concepts and the logical volume is a very different entity from your filesystem.
Note : expanding your logical volume does not mean that you will automatically expand your filesystem for example.
Advantages of LVM over standard disk management
Logical Volume Management was built in the first place to fix most of the shortcomings associated with regular disk management on Linux.
One major advantage of LVM is the fact that you are able to reassemble your space while your system is running.
Modifying storage live
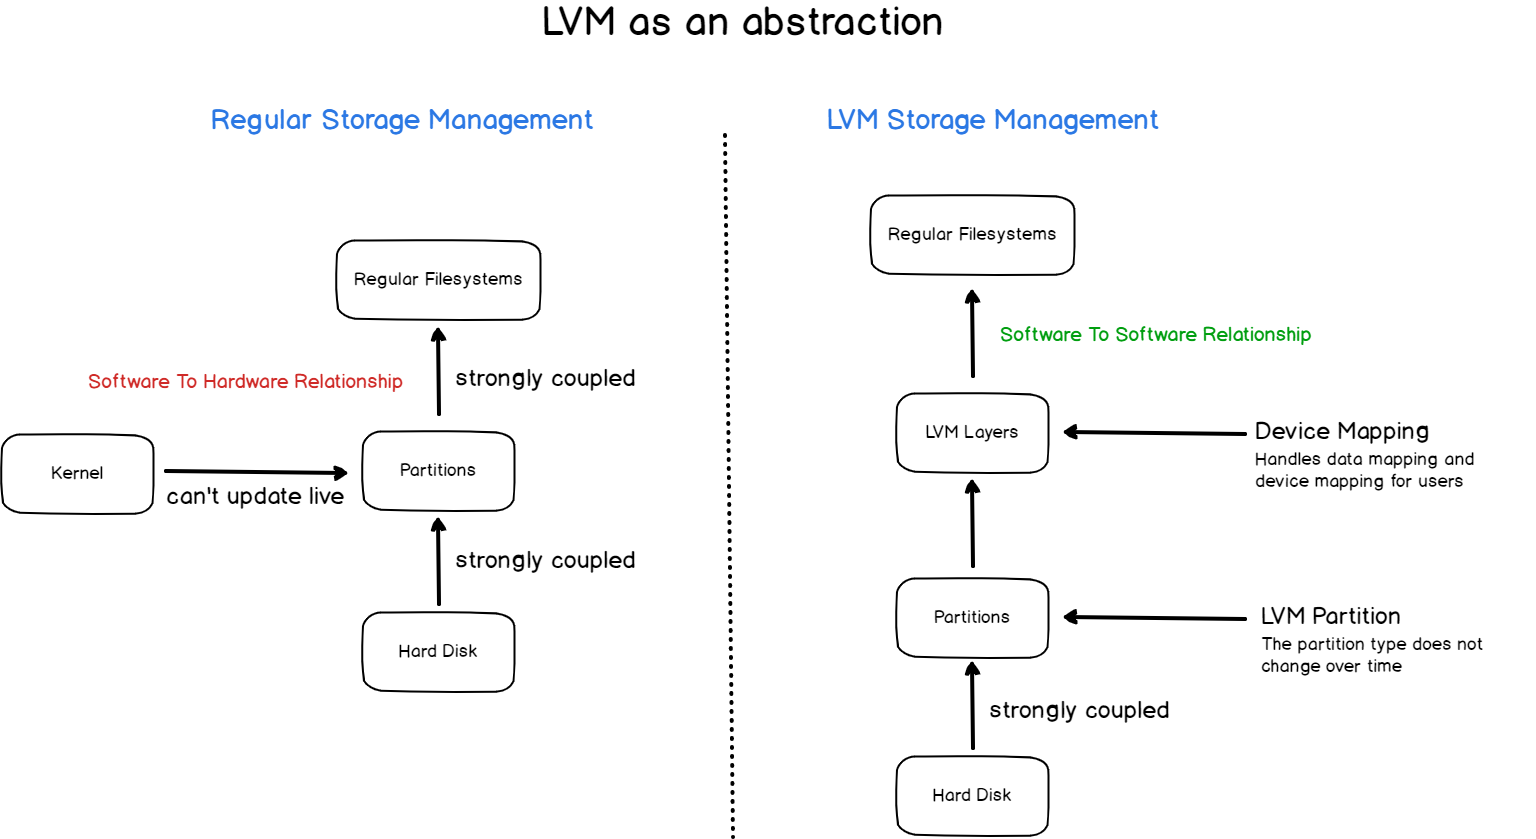
As you probably noticed in the past, your storage on a host is tightly coupled to the partitions written on your disks.
As a consequence, reformatting a partition or reassembling a filesystem over another partition forced any system administrator to restart the system.
This is mainly due to the fact that the Kernel cannot read the partition table live and it needs a full reboot in order to be able to probe the different partitions of your system.
This can obviously be a major issue if you are dealing with a production server : if your website is running on this server, you won’t be able to restart it without the website being down.
If your website is down, it means that you probably won’t be able to serve your customer needs, leading to a money loss.
LVM solves this issue by building an abstraction layer on top of regular partitions : if you are not dealing with regular partitions, you don’t need to re-read the partition table anymore, you just need to update your device mapping.
With this design choice, storage management becomes a software-to-software problematic and it is not tied to hardware anymore, at least not directly.
Spreading space over multiple disks
Another great aspect of LVM is the fact that you can easily spread data over multiple disks.
If you look at the diagram shown before, you will see that there is a strong coupling between filesystems and partitions : as a consequence, it is quite hard to have data stored over multiple disks.
LVM comes as a great solution for this problem : your logical volumes belong to a central volume group.
Even if the volume group is made of multiple disks, you don’t have to manage them by yourself, the device mapper does it for you.
This is true for expanding filesystems but also for shrinking them as well as transferring data from one physical device to another.
Managing LVM Physical Volumes
In this section, we are going to use commands in order to display, create or remove physical volumes on your system.
Display existing physical volumes
In order to display existing storage devices on Linux, you have to use the “lvmdiskscan” command.
$ sudo lvmdiskscanNote : if LVM utilities are not installed on your host, having a “command not found” error for example, you have to install LVM programs by running “apt-get install lvm2” as root.
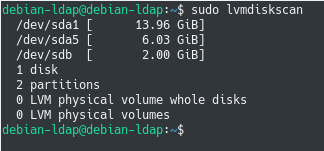
When running the “lvmdiskscan”, you are presented with the different disks available on your host.
On those disks, you also see partitions if they are already created on those disks.
Finally, probably the most important information, you see how many LVM physical volumes are created on your system.
Note : this is an important point of LVM flexibility : you can create physical volumes out of whole disks or partitions of those disks.
In this case, we are starting with a brand new server with no LVM physical volumes created.
To display existing physical volumes existing on your host, you can also use the “pvs” command.
$ pvsCreate new physical volumes
Creating new physical volumes on Linux is pretty straightforward : you have to execute the “pvcreate” and specify the underlying physical devices to be created.
$ pvcreate <device_1> <device_2> ... <device_n>In our case, let’s say that we want to create a physical volume for the second disk plugged on our host, which is “sdb”.
$ pvcreate /dev/sdbNote : you won’t be able to create physical volumes out of devices that are already mounted on your system. As a consequence, “sda1” (that usually stores the root partition) can not be easily transitioned to LVM.

Running the “lvmdiskscan” command again shows a very different output compared to the first section.
$ lvmdiskscan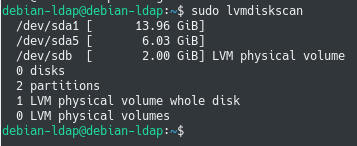
As you can see, our host automatically detects that one whole disk is formatted as a LVM physical volume and that it is ready to be added to a volume group.
Similarly, the “pvs” command has now a different output : our new disk has been added to the list of physical volumes available on our host.
$ pvs
Now that you have successfully created your first volume group, it is time to create your first volume group.
Managing LVM Volume Groups
Unless your system was preconfigured with LVM volumes, you should not have any volume groups created on your system.
To list existing volume groups on your host, you have to use the “vgs” command with no arguments.
$ vgsCreate Volume Group using vgcreate
The easiest way to create a volume group is to use the “vgcreate”, to specify the name of the volume group to be created and the physical volumes to be included in it.
$ vgcreate <volume_name> <physical_volume_1> <physical_volume_2> ... <physical_volume_n>In our case, we only have one physical volume on our host (which is /dev/sdb) that is going to be used in order to create the “vg_1” volume group.
$ vgcreate vg_1 /dev/sdb
List and Display Existing Volume Groups
Listing the existing volume groups on your system using “vgs” should now display the “vg_1” volume group you just created.
$ vgs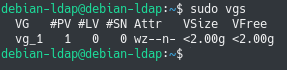
With no arguments, you are presented with seven different columns :
- VG : describing the volume group name on the host;
- #PV : displaying the number of physical volumes available in the volume group;
- #LV : similarly, the number of logical volumes created out of the volume group;
- #SN : number of snapshots created out of the logical volumes;
- Attr : describing the attributes of the volume group (w for writable, z for resizable and n for “normal”);
- VSize : the volume size in GBs of the volume group;
- VFree : the space available on the volume group
If you want to get more information on your existing volume groups, you can use the “vgdisplay” command.
$ vgdisplay

$ vgdisplay <volume_group>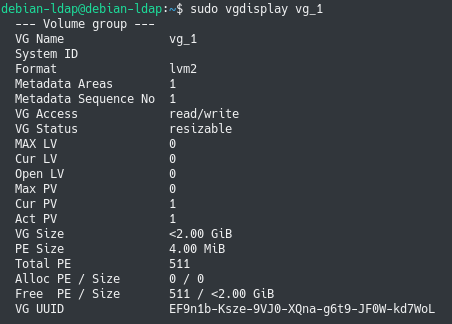
As you probably noticed, “vgdisplay” displays way more information than the simple “vgs” command.
Near the end of the output, you can see two columns named “PE Size” and “Total PE” short for “Physical Extents Size” and “Total Physical Extents”.
Under the hood, LVM manages physical extents which are chunks of data very similar to the concept of block size on partitions.
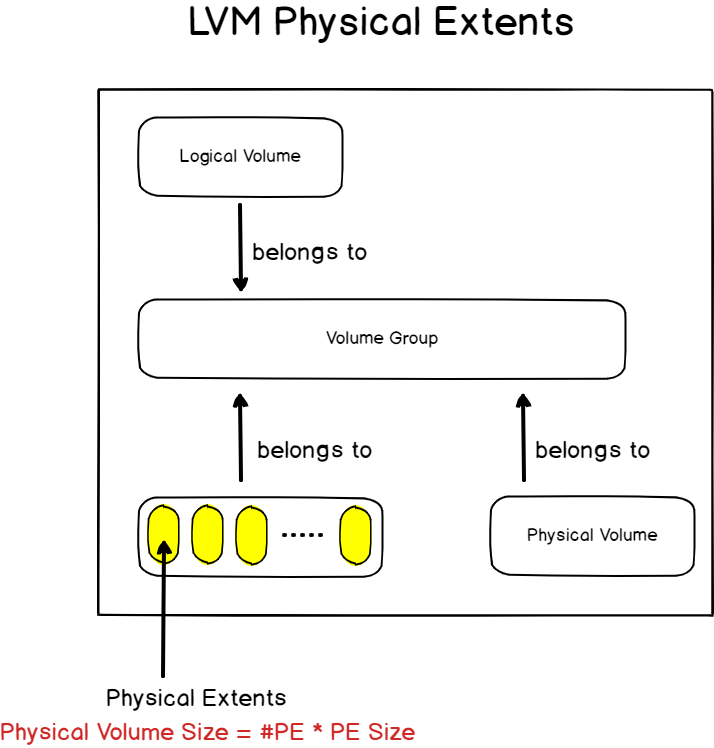
In this case, LVM manages for this volume group physical extents that are 4.00 MiB big and the volume group has 511 different physical extents. The computation obviously leads to a 2.00 GiB space in size (4*511 = 2.044 MiB or 2.00 GiB).
Practically, you should not have to worry about physical extents too much : LVM always makes sure that the mapping between physical extents and the logical volumes is preserved.
Now that you have created your first volume group, it is time to create your first logical volume to store data.
Managing LVM Logical Volumes
In order to create a logical volume in a volume group, you have to use the “lvcreate” command, specify the name of the logical volume and the volume group that it belongs to.
In order to specify the space to be taken, you have to use the “-L” option and specify a size (composed of a number and its unit)
$ lvcreate -L <size> <volume_group>If you want to give your logical volume a name, you can use the “-n” option.
$ lvcreate -n <name> -L <size> <volume_group>
Again, you can list your newly created logical volume by running the “lvs” command as sudo.
$ lvs
By running the “lvs” command, you are presented with many different columns :
- LV : displaying the name of the logical volume;
- VG : describing the volume group your logical volume belongs to;
- Attr : listing the attributes of your logical volume (“w” for writable, “i” for inherited and “a” for allocated);
- LSize : self explanatory, describing the size of your logical volume in GiB;
Other columns are describing advanced usage of LVM such as setting up mirrored spaces or striped ones. For this basic tutorial, we won’t describe them and they will be described in more advanced tutorials.
When you created your logical volume, some actions were taken by the kernel without you noticing it :
- A virtual device was created under /dev : in a folder named after your volume group name (“vg_1”), a virtual logical device was created named after the name of the logical volume (“lv_1”)
- The virtual device is a soft-link to the “dm-0” device available in /dev : “dm-0” is a virtual device that holds a mapping between your logical volumes and your real hard disks. (/dev/sda, /dev/sdb and so on)
Formatting and Mounting LVM Logical Volumes
The last step in order for you to start using your newly created space is to format and mount your logical volumes.
In order to format a logical volume, you have to use the “mkfs” command and specify the filesystem to be used.
$ mkfs -t <filesystem_type> <logical_volume>In our case, let’s pretend that we want to format our logical volume as an “ext4” filesystem, we would run the following command
$ mkfs -t ext4 /dev/vg_1/lv_1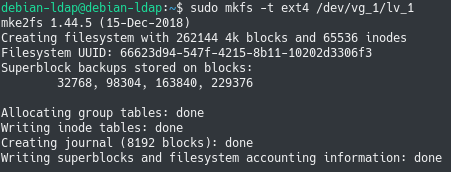
Now that the logical volume is formatted, you simply have to mount it on one folder on your system.
In order to mount a LVM logical volume, you have to use the “mount” command, specify the logical volume name and the mount point to be used.
$ mount <logical_volume> <mount_point>For the example, let’s pretend that we are going to mount the filesystem on the “/mnt” directory of the root directory.
$ mount /dev/vg_1/lv_1 /mntIf you now run the “lsblk” command, you should be able to see that your logical volume is now mounted.
$ lsblk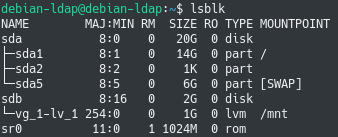
Congratulations, you can now start using your newly created volume!
Expanding Existing Filesystems using LVM
As a use-case of LVM, let’s see how easy it can be to increase the size of a filesystem by adding another disk to your host.
If you add another disk to your host, udev will automatically pick it and it will assign a name to it.
To have the name of the disk device on your system, make sure to execute the “lsblk” command.
$ lsblk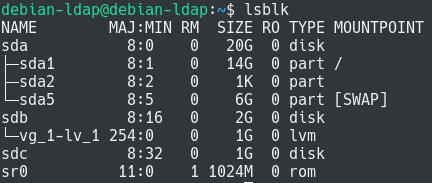
In our case, we added a new hard disk on the SATA connector which is named “sdc”.
To add this new disk to our LVM layers, we have to configure each layer of the LVM storage stack.
First, let’s mark this new disk as a physical volume on our host with the “pvcreate” command.
$ pvcreate /dev/sdc

Physical volume "/dev/sdc" successfully created
Then, you need to add your newly created physical volume to the volume group.
To add a physical volume to an existing volume group, you need to use the “vgextend” command, specify the volume group and the physical volumes to be added.
$ vgextend vg_1 /dev/sdc

Volume group "vg_1" successfully extended
With the “vgs” command, you can verify your volume group was successfully extended.
$ vgs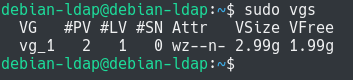
As you can see, compared to the first section, the output slightly changed : you now have two physical volumes. Also, the space increased from 2 GiB to almost 3 GiB.
Your logical volume is not bigger yet, you will need to increase its size to take some space available in the pool.
To increase the size of your logical volume, you have to use the “lvextend”, specify the logical volume as well as the size to be taken with the “-L” option.
$ lvextend -L +1G dev/vg_1/lv_1
As you can see, the logical volume size changed as well as the number of physical extents dedicated to your logical volume.
Increasing your logical volume does not mean that your filesystem will automatically increase to match the size of your logical volume.
To increase the size of your filesystem, you have to use the “resize2fs” command and specify the logical volume to be expanded (in this case “/dev/vg_1/lv_1”)
$ resize2fs /dev/vg_1/lv_1You can now inspect the size of your filesystem : it has been expanded to match the size of your logical volume, congratulations!
$ df -h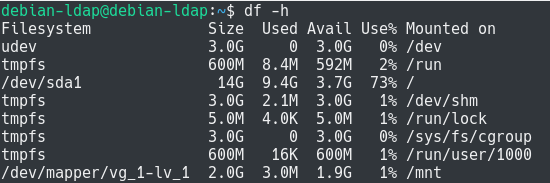
As you probably noticed, you increased the size of your filesystem by adding another disk, yet you did not have to restart your system or to unmount any filesystems in the process.
Shrinking Existing Filesystems using LVM
Now that you have seen how you can easily expand existing filesystems, let’s see how you can shrink them in order to reduce their space.
Before shrinking any logical volume, make sure that you see have some space available on the logical volume with the “df” command.
$ df -hUsing the logical volume from the previous section, we still have nearly 2 GiB available.
As a consequence, we can remove 1GiB from the logical volume.
To reduce the size of a logical volume, you have to execute the “lvreduce” command, specify the size with the “-L” option as well as the logical volume name.
$ lvreduce -L <size> <logical_volume>In our case, this would lead to the following command (to remove 1GiB of space available)
$ lvreduce -L 1G /dev/vg_1/lv_1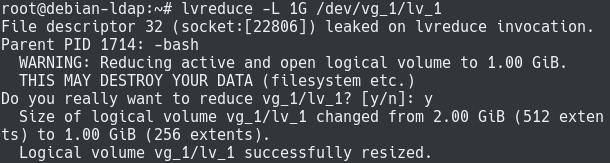
Note : note that this operation is not without any risks, you might delete some of your existing data if you choose to reduce your logical volume.
Consequently, the space was allocated back to the volume group and it is now ready to be used by another logical volume on the system.
$ vgs
Conclusion
In this tutorial, you learnt about LVM, short for Logical Volume Management, and how it is used in order to easily configure adaptable space on your host.
You learnt what physical volumes, volume groups and logical volumes are and how they can be used together in order to easily grow or shrink filesystems.
If you are interested in Linux System administration, we have a complete section dedicated to it on the website, so make sure to check it out!

4 comments
[…] Logical Volume Management Explained on Linux […]
[…] LDAP using ldapsearch (With Examples) How To Switch Branch on Git How To Zip Folder on Linux Logical Volume Management Explained on Linux How To Amend Git Commit Message How To Install AutoFS on Linux How To Change Root Password on […]
Hi,
Is there a limit in space on the booting disk? I have 2 SSD nvme disks of 2 Tb each.
The pvcreate en vgcreate were pretty straightforward.
The lvcreate ran, but only 1.8 Tb of the first pv was added (the vgcreate gave a volume of 3.8 Tb).
Is it merely a hardware problem? (On Windows 10 I had the same problem with a boot disk of 3 Tb)
I want to be sure before I format my disks.
Best regards,
Jean.
Hi!
As an experienced Oracle DBA, I found this tutorial very helpful. Your logical progression was really clear and the examples you gave helped me to apply it to my existing configurations. Thanks for taking the time to provide it! 🙂