
The Secure Shell (or SSH) is a cryptographic protocol enabling secure communication between clients and servers.
SSH is widely used to connect to remote Linux systems in a secure way. It is also used in the Windows ecosystem to connect to remote Windows machines via OpenSSH.
SSH has two ways of authenticating users on a machine : either via a password or via a public key authentication system. Using a key-pair authentication, you won’t need to type a password to login, everything is going to be automatic.
In this tutorial, we are going describe how to set up SSH keys on a Debian 10 Buster instance.
1 – Create SSH Key Pair on Debian
Before starting, make sure that you don’t have any pre-existing SSH keys into your ssh directory.
Run a simple ls command into your .ssh directory.
$ cd /home/user/.ssh
$ ls -al
In order to generate a SSH key on Debian, you are going to need the ssh-keygen tool.
By default, ssh-keygen is already installed on Debian 10.
To create a SSH key pair, use the following command.
$ ssh-keygen -t rsa -b 4096 -C "[email protected]"This ssh-keygen will take care of creating your key.
The -t flag specifies the type of encryption used (in this case RSA).
The -b determines the number of bytes used to create your key. In general, you want to use at least 2048 bytes for a key, but we are going to use 4096 in our case.
Finally, the -C flag provides a comment for the key pair, in this case the e-mail used.
When creating your SSH keys, you will be asked a number of questions.
Generating public/private rsa key pair.
Enter file in which to save the key (/home/user/.ssh/id_rsa):
You can leave this one as default, except if you want to store it in a custom key file.
Enter passphrase (empty for no passphrase)Choose a strong passphrase for your key. In case somebody steals your key, the passphrase will be required as a second security option.
If you want to automatically connect to your server without being prompted any password, leave the passphrase blank.
Password authentication will be disabled in the next chapters, but you will still be prompted with the passphrase if you decided to define one. Passphrases are recommended for production and sensitive environments.
Enter your passphrase again, and your SSH key should be created.
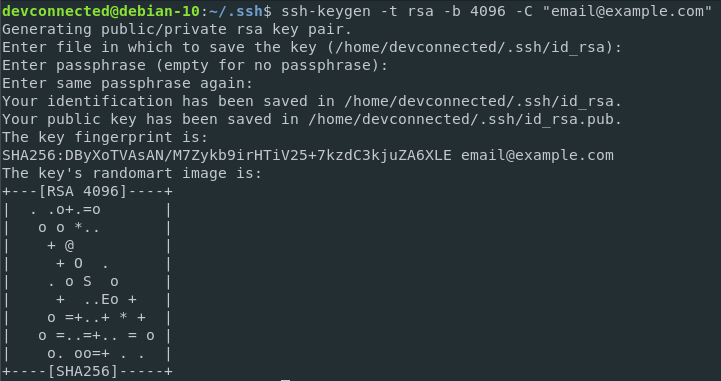
In this example, my file was created in /home/devconnected/.ssh directory.

As a result of your command, two files were created.
- id_rsa: this is the PRIVATE key that is going to be used on the server side to identify incoming client requests. It should obviously not be shared with anybody. It is also used by the client to verify the server’s identity.
- id_rsa.pub: the “pub” extension stands for “public”. This is the PUBLIC key that is going to be used by clients to connect to the server. This is the file that you are allowed to share with clients.
2 – Copy the SSH public key to your client host
In order to copy your newly created SSH key, you should not use an unsecure protocol (like TCP for example) as it would expose your SSH keys to hackers.
If your SSH keys are compromised, there are essentially no benefits in using a secure protocol like SSH.
As a consequence, here’s how you should copy your SSH keys to remote hosts.
a – Copy SSH keys using ssh-copy-id
To run ssh-copy-id, execute the following command.
$ ssh-copy-id remoteuser@remotehostYou may be prompted with the following question.
The authenticity of host '142.93.103.142' can't be established.
ECDSA key fingerprint is SHA256:/KdeEfkcNce332KdLPqadkKaPapvcN32.
Are you sure you want to continue connecting (yes/no)? yes
Finally, you will be asked to provide the password the remote user.
remoteuser@remotehost's password: Type in the password. As a result, you should see the following output.
Number of key(s) added: 1

Now try logging into the machine, with: "ssh 'remoteuser@remotehost'" and check to make sure that only the key(s) you wanted were added.
On my client host, in the .ssh directory, let’s see the files created.

Awesome, my client now has an authorized_keys file, specifying the host it can connect to.
Now on my client host, if I try to connect to my server with SSH, I should be able to do it.
b – Copy SSH keys using ssh without ssh-copy-id
In case you don’t have ssh-copy-id on your instance, you can also use the SSH command to securely transfer your file to the server.
The command is longer but it is as secure as a regular ssh-copy-id command.
Here is the command to copy your SSH keys to your client host.
$ cat ~/.ssh/id_rsa.pub | ssh remoteuser@remoteserver "mkdir -p ~/.ssh && cat >> ~/.ssh/authorized_keys"By running this command, you are going to be asked for the passphrase on the server.
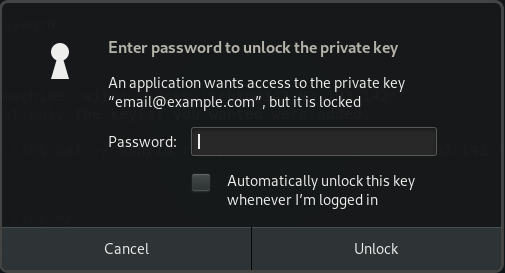
Enter the correct passphrase and click “Unlock”.
With this command, you are taking the content of your public key and sending it over SSH to your remote host.
The command first asserts that you have the .ssh folder on your remote host. The content is appended to the actual content of the authorized_keys file (if already existing).
Let’s take a look at our file on the remote host.
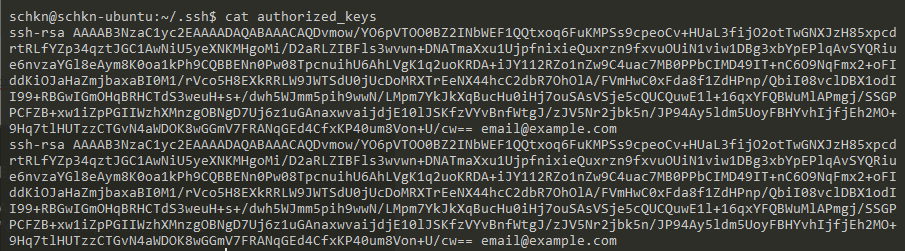
Great! The content was correctly appended to our existing authorized_keys file.
c – Copy SSH key manually to the client
Another alternative is to copy the content of your public key directly to the client filesystem.
First, display the content of the public key using the cat command.
$ cd /home/user/.ssh
$ cat id_rsa.pub
Go to your remote server, and find the .ssh folder on the client. You will need to append the content of the public key to the authorized_keys file on the server.
As you can see, file permissions on this file are restricted, which means that you are going to need sudo rights to modify this file.
$ cd /home/client/.ssh
$ sudo nano authorized_keys
Append your key by simply copying and pasting the content to the end of your existing authorized_keys file.

Save your file and exit your text editor.
Now that everything is ready, and that your SSH keys are set up, it is time for you to connect to your host using your keys.
3 – Connect to your remote host with SSH
Now that everything is ready, you need to connect to your server using key-based SSH authentication.
To do it, perform a normal SSH connection, like you used to do in the past.
$ ssh user@server_ipOn the first connection, you should be prompted to validate the identity of your server. This is a paragraph that you already saw when you were trying to copy your SSH keys to your client host.
The authenticity of host '142.93.103.142' can't be established.
ECDSA key fingerprint is SHA256:/KdeEfkcNce332KdLPqadkKaPapvcN32.
Are you sure you want to continue connecting (yes/no)? yes
If you defined a passphrase in the previous sections, you will be asked to provide it now.
Enter passphrase for key '/home/user/.ssh/id_rsa'On success, you are going to be connected to your remote host.
Congratulations! You successfully set up SSH key-based authentication for your servers.

4 – Disable the SSH password authentication
When you are connecting as a known client (a client that owns a public key for this specific server), you are not going to be asked for a password.
You can be asked for the passphrase if you configured it, but most of the time it is as seamless as connecting directly to your server without any prompt.
However, if you read my article about SSH geolocating, you may remember that hackers may try to brute-force their ways into your server.

Remember all the different combinations tried by hackers to gain access to my servers?
In order to prevent SSH attacks like this from happening, we need to disable password authentication for our server. This way, only users having a key will be able to login on the server.
To disable SSH password authentication, go the /etc/ssh folder, and edit your sshd_config file.
$ sudo nano /etc/ssh/sshd_configLook for the “PasswordAuthentication” section in this configuration file, and change its value to “No”.
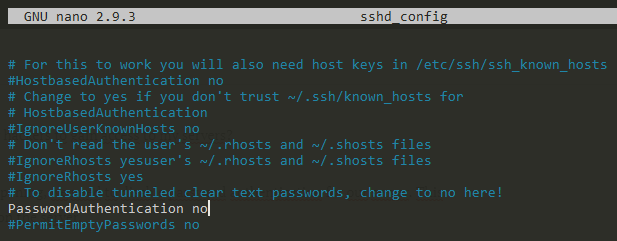
Restart your SSH service, and make sure that everything is working properly.
$ sudo systemctl restart ssh
$ sudo systemctl status ssh
Awesome!
You have successfully set up SSH keys for your Linux server.
5 – Allow/Deny certain users and groups to have SSH access
As an additional security rule, you can allow only certain users to access your server.
Similarly, you can deny specific users from accessing your server, if you want to ban a certain user or group for example.
In order to allow specific users to have SSH access, head over to your SSH configuration file, and add a AllowUsers entry to your file.
Similarly, if you want to whitelist a specific group on your server, add a AllowGroups entry to your SSH configuration file.
$ cd /etc/ssh
$ sudo nano sshd_config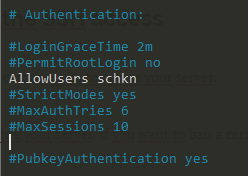
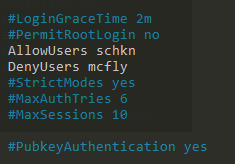
To deny certain users from using SSH on your server, add the following entries to your configuration file.
Similarly, if you want to deny certain groups to have SSH access to your server, add a DenyGroups entry to your SSH configuration file.
Restart your SSH service for the modifications to be applied.
$ sudo systemctl restart ssh
$ sudo systemctl status ssh
6 – Conclusion
Today, you successfully learned how to set up SSH keys on Debian 10 Buster, but the same steps can be applied to Ubuntu and CentOS machines.
Did you know?
SSH can also be used in order to setup SSH key-based authentication on Git.
Securing your server with SSH keys is a very crucial step if you want to prevent easy yet very effective attacks to be run against your server.
If you have a Debian machine on hosted servers, it is very likely that some bots are trying to access it. SSH Keys set up is one of the steps to make those attacks uneffective.
I hope that you learned something today.
Until then, have fun, as always.
3 comments
[…] you are curious about key-based SSH authentication on Debian 10, there is a tutorial available on the subject […]
[…] that your users are created, you can also set up SSH keys on Debian 10 for a seamless […]
Nice tutorial, however it seems that I’m having some issues with the opens-server on Debian 10 and macOS , maybe you could help.
Apparently I setup all, including key authentication then after a while and couple of restarts I cannot connect anymore to the box it asks password instead of key, and the correct password that I input is gives error and says that it is incorrect .
Any idea what this could be and from where it come and how can be fixed ?
Thanks