
In today’s tutorial, we are going to focus on adding a user to sudoers on the most recent CentOS distribution : CentOS 8.
The sudo command is one of the most popular command available on Linux.
It allows users to perform commands as another user, which is configured by default to run as the root user.
In CentOS 8, there are two ways of adding a user to sudoers : you can add it to the wheel group (similar to the sudo group on Debian based distributions) or you can add the user to the sudoers file.
Here are the details of the two methods used.
Prerequisites
In order to grant the sudo rights to an existing user, you are going to need the sudo command on your CentOS 8 host.
First, make sure that your packages are up to date on your host and install the sudo command.
$ su -
$ yum update
$ yum install sudo
To verify that the sudo command is correctly installed, you can run the following command
$ sudo -l
Adding an existing user to the wheel group
The first way to add a user to sudoers is to add it to the wheel group.
In order to add your user to the group, you can either use the usermod or the gpasswd command.
$ sudo usermod -aG wheel <user>Alternatively, here is the syntax using the gpasswd command.
$ sudo gpasswd -a <user> wheel
Adding user to the group wheel
Make sure that the user belongs to the wheel group with the groups command.
$ su - <user>
(enter the password for user)

$ groups
user wheel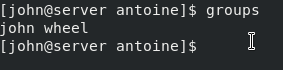
Alternatively, you can run the sudo command on the user you granted administrative rights.
$ sudo -lCongratulations!
You have added a user to sudoers on CentOS 8.
During your CentOS 8 installation process, if you chose not to set a root password, your root account may be locked by default. As a consequence, you will need to set a password to the root user account if you need to unlock it.
Adding an existing user to the sudoers file
The other method to grant administrative rights is to add the user to the sudoers file.
By default, the sudoers file is located at /etc/sudoers by default.
This file contains a set of rules that are applied to determine who has administrative rights on a system, which commands they can execute with sudo privileges, and if they should be prompted a password or not.
However, you should not modify the sudoers file by yourself because if you make any mistakes during the process, you might be locked out of your host forever.
Instead of modifying the sudoers file by yourself, you are going to use visudo.
Visudo is a tool that checks the integrity and the correctness of the commands typed before saving the sudoers file.
To execute visudo, type the following command
$ sudo visudoYou should now see the following screen
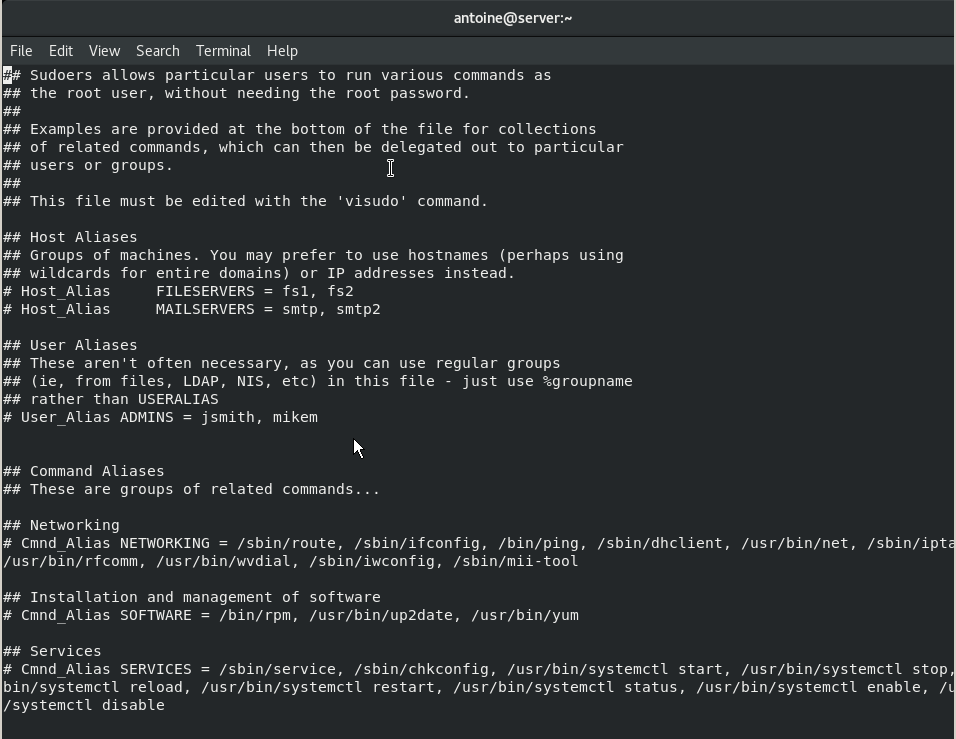
At the end of the file, add the following line.
$ <user> ALL=(ALL:ALL) ALLHere are some details about the syntax of the sudoers file.
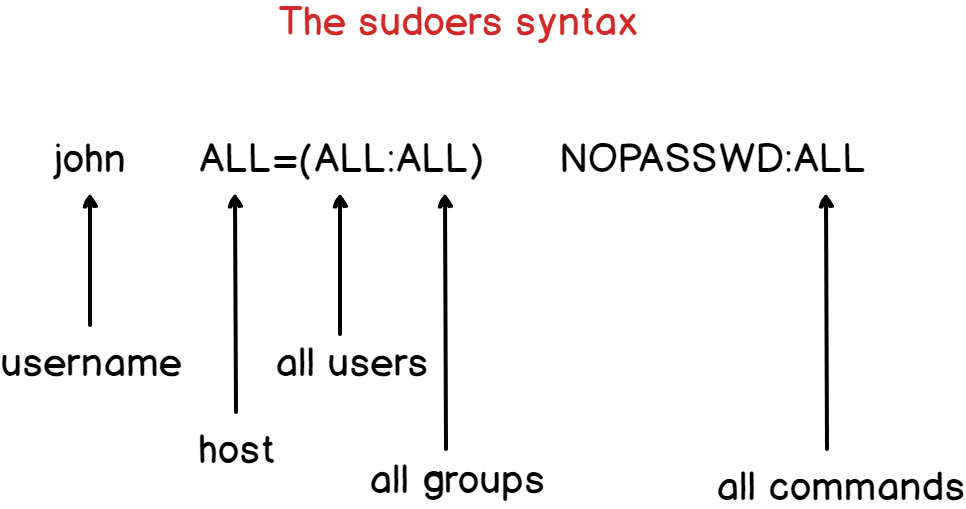
By default, the account password will be asked every five minutes to perform sudo operations.
However, if you want to remove this password verification, you can set the NOPASSWD option.
$ <user> ALL=(ALL:ALL) NOPASSWD:ALLIf you want to increase the password verification time, you can modify the timestamp_timeout (expressed in minutes).
In the example shown below, you will be asked to provide your user password every thirty minutes.
# /etc/sudoers
#
# This file MUST be edited with the 'visudo' command as root.
#
# See the man page for details on how to write a sudoers file.
#

Defaults        env_reset
Defaults        mail_badpass
Defaults        secure_path = /sbin:/bin:/usr/sbin:/usr/bin
Defaults        timestamp_timeout=30
Adding a group to the sudoers file
In the sudoers file, you can add a user but you can also add an entire group which can be quite handy if you want to have specific rules for different groups.
To add a group to the sudoers file, simply add a percent symbol at the beginning of the line.
$ %sysadmins ALL=(ALL:ALL) NOPASSWD:ALLMake sure that your user is part of the designed group with the groups command.
$ su - user
$ groups
user sysadmins
Again, you can test that your changes were applied by changing your password for example
$ sudo passwdConclusion
In this tutorial, you learnt how you can add a user to sudoers on CentOS 8, by using the usermod command or by changing the sudoers file.
If you are interested in Linux System Administration, we have a dedicated section, click the image below for more information.

7 comments
[…] Here’s one guide for Debian based systems and one for Red Hat based systems. […]
[…] By default, you will need privileged rights in order to run this command, so make sure that you have sudo rights either on Debian based distributions, or on Red Hat based distributions. […]
[…] you are looking for resources in order to be sudo on Debian/Ubuntu or on RHEL/CentOS, make sure to take a look at our dedicated […]
[…] you are not sure how to give sudo rights to users on Debian/Ubuntu or CentOS/RHEL, make sure to check our dedicated guides on the […]
[…] you are not sure on how to provide sudo rights for users on Debian 10 or CentOS 8, make sure to read our dedicated guides about […]
[…] If you don’t have sudo rights, you can have a look at our tutorials on becoming sudo on Debian or CentOS distributions. […]
[…] If this is not the case, you can read our guide on getting sudo privileges for Debian or CentOS hosts. […]