
As a network administrator, you probably know how costly routers can be.
If you are configuring a complex network architecture, you might need Cisco or Netgear routers, as they embed advanced features for network management.
However, if you plan on creating a small network for your company, there might be a cheapier alternative.
What if you could configure a simple Linux server to act as a static router?
Using those features, you could have a Raspberry Pi on your site, that could handle the traffic over two or three different networks.
In this tutorial, we are going to see how you can configure a Linux host to act as a simple static router.
We are also going to review the basics of subnetting in order for you to understand the rules you put in place.
Prerequisites
In order to configure a Linux server as a static router, you need to have sudo privileges on your host.
In order to verify it, you can run the “sudo” command with the “-v” option.
$ sudo -vIf you don’t have sudo rights, you can have a look at our tutorials on becoming sudo on Debian or CentOS distributions.
Now that you have sudo privileges, there are essentially three steps in order to configure your static router :
- You need to have a global view of your network architecture : what network IP addresses are and which networks will need to communicate with each other;
- You need to configure the static routing table on your Linux router;
- You need to enable IP forwarding for packets to flow down your router.
That’s quite a long program, so without further ado, let’s figure out the network architecture and what our network IP addresses are.
Understanding Network Architecture
For the sake of simplicity, we are going to configure a simple static router between two networks.
In order to determine the network IP addresses, let’s pick two hosts in each network : 192.168.200.2/24 and 192.168.190.2/24.
The two hosts don’t belong to the same subnet : as a consequence, they are not able to communicate directly.
Given the netmask of the first host, we are able to determine that the first network has an IP address of 192.168.200.0/24.
Similarly, the second network has an IP address of 192.168.190.0/24.
Using this information, we will be able to configure network interfaces on our Linux router.
Configuring Router Network Interfaces
In order to be able to route packets from one network to another, you need to have two network interfaces : one in the first network and another one in the second network.
In order to keep the tutorial simple, we are going to assume that both hosts are using the router as the default gateway for their respective networks.
This means that the first host is contacting the router on the 192.168.200.1/24 IP address and that second host is contacting the router on the 192.168.190.1/24 IP address.
First of all, you have to identify the network interfaces used for routing
$ ip link show
On this host, we have two network interfaces named “enp0s3” and “enp0s8”.
Note : You may have to write down those names as you will have to use them in the next section.
Now that you have your network interfaces names, you will configure your router with a static IP addresses.
Configuring Static IP Address on Debian
If you are running Debian or Ubuntu, head over to the /etc/network/interfaces file and add your two network interface information in it.
$ sudo nano /etc/network/interfaces

# Defining the first interface
auto <interface_name>
iface <interface_name> inet static
address 192.168.190.1
netmask 255.255.255.0

# Defining the second interface
auto <interface_name>
iface <interface_name> inet static
address 192.168.200.1
netmask 255.255.255.0
Note : do not forget to add the “auto” directive, otherwise your interfaces won’t be raised at boot time.
Save your file and restart your networking service in order for the changes to be applied.
$ sudo systemctl restart networking.service

$ sudo systemctl status networking.service
In this case, we are not using the NetworkManager : we are managing interfaces using the ifupdown utility (pretty much like in old distributions).
By now, your interfaces should be up and running, you can check them by running the “ip” command with the “a” option.
Îf your interfaces are not running, or marked as “DOWN”, you can bring them up by running the “ifup” command.
$ ifup <interface_name>Configuring Static IP Address on CentOS
In order to configure your CentOS host with a static IP address, head over to the “/etc/sysconfig/network-scripts” directory and create two distinct files for your network interfaces.
$ touch ifcfg-enp0s3 && touch ifcfg-enp0s8To configure a static IP address, you can add the following information in your file.
# Content of enp0s3

BOOTPROTO="static"
IPADDR=192.168.200.1
NETMASK=255.255.255.0
NAME="enp0s3"
ONBOOT="yes"

# Content of enp0s8
BOOTPROTO="static"
IPADDR=192.168.190.1
NETMASK=255.255.255.0
NAME="enp0s8"
ONBOOT="yes"
Note : do not forget to add the “ONBOOT” directives in order for your interfaces to be raised at boot time.
Now that you have your router connected to both networks, you will need to add a static route between your two networks in order for them to communicate.
Creating Static Routes using ip
Having two network interfaces does not mean that your kernel will naturally route packets from one interface to another.
First of all, make sure to list the existing routes that may exist on your server by running the “ip route” command.
$ ip route
Deleting existing static routes
If static routers are already defined for your network interfaces, you will need to delete them : otherwise, you won’t be able to add new ones.
To delete a route, use the “ip route” command with the “delete” option and specify the route to be deleted.
$ ip route delete <route>In our case, we want to delete routes that are pointing to the 192.168.190.0/24 and 192.168.200.0/24 networks.
$ ip route delete 192.168.190.0/24

$ ip route delete 192.168.200.0/24

$ ip route
Now that routes are deleted, you can add the ones you are interested in.
Creating new static routes
In order for the packets to flow from the first network to the second, your first network card need to point to the second one and vice-versa.
First, you can create a route from the first network adapter IP address to the second network IP address.
$ ip route add 192.168.200.0/24 via 192.168.190.1Using this rule, all packets coming using the 192.168.190.1 interface as their gateway can be redirected to the 192.168.200.0 network.
Similarly, you can add another route in the opposite direction in order for your packets to be able to flow back.
$ ip route add 192.168.190.0/24 via 192.168.200.1Now that your routes are added, you can verify that they are up and active by running the “ip route” command again.
$ ip route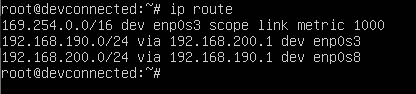
Now that your routes are added, there is one last step that you need to configure in order for your hosts to be able to ping each other.
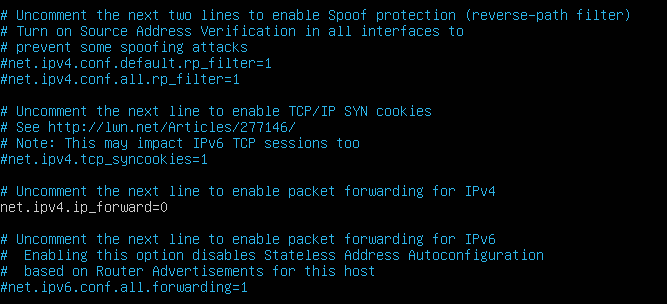
Enabling IP forwarding on Linux
Even if routes exist, the Kernel will not naturally forward packets to corresponding network interfaces without configuration.
In order to enable IP forwarding, head over to the /etc/sysctl.conf file and look for the “net.ipv4.ip_forward” parameter.
$ vi /etc/sysctl.confBy default, this parameter is set to “0”, but you want to set it to “1” in order to enable IP forwarding.
Save your file and refresh the system configuration by running the “sysctl” command.
$ sysctl -p /etc/sysctl.conf
Testing network connectivity
Now that IP forwarding is enabled, you should be able to ping from a host on the first network to a host on the second network.
In order to check it, connect to a host on the first network and run a “ping” command on a host located on the second network.
$ ping <host_second_network>In our case, we would want to ping the “192.168.190.2/24” host from the “192.168.200.2/24” one.
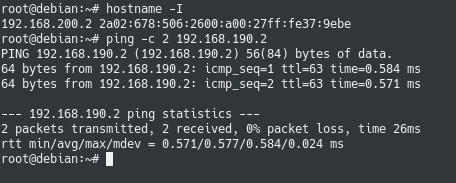
Awesome! Your first host is able to ping the second one.
As an additional check, you could make sure that your second host is able to ping the first one.
Great!
Now that your setup is ready, you should be able to add new hosts to both networks and start communicating between the two networks.
Conclusion
In this tutorial, you learnt how you can easily configure a Linux system as a static router.
This setup can be quite useful if you plan on building a small network infrastructure for your company.
Instead of buying and having to configure a Cisco router, you can simply use a Raspberry Pi as a static router.
If your company grows and you plan on having a bigger network infrastructure, then you can check managed routers as they will probably offer more flexibility to your needs.
If you are interested in Linux System Administration, we have a complete section dedicated to it on the website, so make sure to check it out!

2 comments
[…] How To Configure Linux as a Static Router […]
I have the following:
[nas]_eth0(#.#.10.95) —– eth0(#.#.10.90)_[laptop]_wlan0(#.#.1.81) —- wlan0(#.#.1.1)_[router]_wan(#.#.#.#)
the nas needs to access the ntp server on the internet.
[nas] gw = #.#.10.90
[laptop] ip route add #.#.10.0 via #.#.1.81
[laptop] ip route add #.#.1.0 via #.#.10.90 (this breaks things for me)
should I rather do:
[router] ip route add #.#.10.0 via #.#.1.81
?