
This tutorial focuses on how to create swap space on CentOS 8 using a swap file or a swap partition.
On CentOS 8, it is quite common to run out of memory.
It can be because you are running too many programs, or because some of your programs are taking too many resources from your CentOS 8 host.
As a consequence, if your RAM is full, you won’t be able to launch new programs on your computer.
You will have to shutdown processes by yourself in order to make room for new processes to come.
There is however another way to virtually increase your memory : by using swap space.
In this tutorial, we are going to see how you can easily create a swap space on CentOS 8.
We will see that you can do it either by creating a swap file or by creating a swap partition on your host.
Prerequisites
Before starting, make sure you have sudo privileges on CentOS 8.
$ sudo -vIf you are not getting any errors messages, you are ready to add swap space.
Checking existing swap partitions
First, you will need to check the existing partitions available on your host.
By default, when installing CentOS 8, a swap partition will automatically be created for you.
$ sudo swapon --showIf a partition is already existing, you should see the following output on CentOS 8.
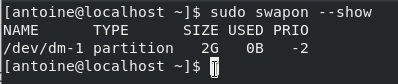
As you can see, I already own a swap partition named “dm-1” of size 2GB.
As the current memory on my computer is sufficient, my host is not using swap at the moment.
If no swap spaces are configured on your system, this is the output that you can expect.

Add Swap Space on CentOS 8 with a swap file
The first method to add swap space on CentOS 8 is to use a swap file.
Many tutorials are not specifying this detail, but swap files cannot contain any holes at all.
It means that you should not use the cp command on your host to create a swap file.
The fallocate command is not adapter neither (on filesystems such as XFS or ext4)
As a consequence, you are going to use the dd command in order to add swap space on CentOS 8.
In this case, we are going to create a 1 GB swap file.
a – Create a swapfile using dd
To add swap space, run the following command
$ sudo dd if=/dev/zero of=swapfile bs=1MiB count=$((1*2014))Make sure that your swap file was created by issuing the following command.
$ ls -l swapfile
b – Secure your swapfile with permissions
Swap files are only used by the operating system for memory optimization purposes.
As a consequence, they should not be modified by any user and they have to be managed only by the kernel itself.
To change the file permissions of your swap file, run the following co,,and
$ sudo chmod 600 swapfileIn this case, the swap file will be marked as read-write for root.
c – Enable your swapfile
Now that your swapfile is secure, it is time to activate your swap space.
To enable swap space on CentOS 8, run the following command.
$ sudo mkswap swapfileThis step is necessary, as this is the step that sets the swap headers on your file.
If you don’t perform this operation, your file will not be readable by the Kernel.

Now that the swapspace is correctly set, you can enable it.
$ sudo swapon swapfileTo verify that your swap space is active, you can run the initial command with the –show flag.
$ sudo swapon --show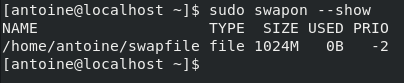
d – Make your swap space permanent
Similarly to the creation of filesystems, changes won’t be made permanent if you don’t append some changes to the fstab file.
If you leave it this way, your swap space will be erased at the next host reboot.
To make your swap space permanent, edit the /etc/fstab file and paste the following changes.
$ cd /etc/
$ sudo nano fstab

<path_to_file>/swapfile none swap defaults 0 0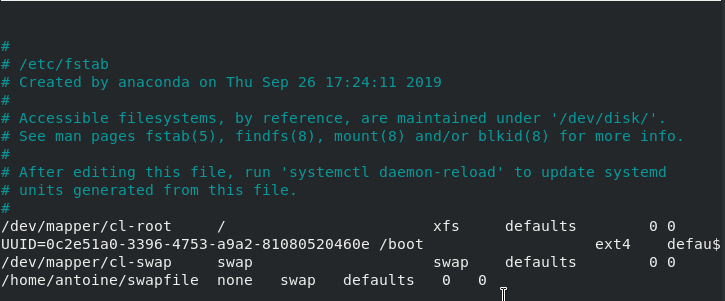
Save your file, and restart your changes to make sure that the changes are still effective.
$ sudo reboot
$ sudo swapon --show
Congratulations!
You have successfully added some swap space on your CentOS 8 host.
Add Swap Space on CentOS 8 with a swap partition
Another way to add swap space on Debian is to create a dedicated swap partition.
If you have followed the CentOS 8 server initial installation, you probably already have a swap partition.
However for this tutorial, we are going to start from scratch and create our own swap partition.
a – Create a swap space partition with fdisk
To have a look at the existing partitions on your host, run the following command
$ sudo fdisk -l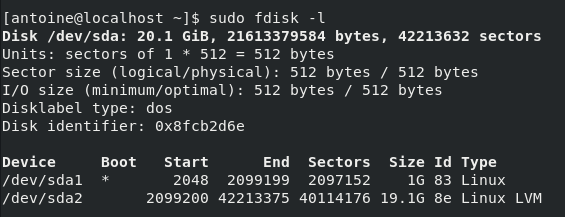
As you can see, I already own two partitions : one of size 1G and another one of size 19.1GB.
We are going to add a swap partition as an extended or logical partition on sda.
Run the fdisk utility, and create a new partition on the hard drive that you want (sda in my case)
$ sudo fdisk /dev/sda

Welcome to fdisk (util-linux 2.30.1).
Changes will remain in memory only, until you decide to write them.
Be careful before using the write command.

Command (m for help): n
Run the “n” command to add a new partition to your disk.
All space for primary partitions is in use
Adding logical partition 5
First sector (48291898-65062911, default 48291840):
You can leave the first sector option as default by just pressing Enter.
On the next prompt, specify the size of your swap partition.
In this case, we said that we are going to build a 1GB swap space, so enter “+1G”as a value for the prompt.
Last sector, +/-sectors or +/-size{K,M,G,T,P} : +1G

Created a new partition 5 of type 'Linux' and of size 1 GiB.
As you can see, partitions are created with the Linux partition type by default.
This is not what we want, since we want to have a swap partition on our drive.
To change the partition type, run the “t” command in fdisk.
Command (m for help): t
Partition number (1,2,5, default 5): 1
Hex code (type L to list all codes): 82
On Linux, swap partitions have the partition type ID 82 in fdisk.
Hit Enter, and make sure that your partition type was correctly changed.
Changed type of partition 'Linux' to 'Linux swap / Solaris'Don’t forget to write your changes to disk as fdisk does not directly write to disk unless you ask it do it.
To write on disk, run the “w” command in fdisk.
The partition table has been altered
Syncing disks.
Make sure that your swap partition was correctly added by running the fdisk command again.
b – Enabling your swap partition
First, make sure to run the mkswap for the swap headers to be correctly set on your partition.
$ sudo mkswap /dev/sda5Now that your headers are set, run the swapon command.
$ sudo swapon /dev/sda5Similarly to the other method, make sure that your swap space was correctly created.
$ sudo swapon --showc – Make your swap space permanent
In order to make your swap space permanent, it needs to be added to the fstab file.
First of all, get the UUID for your newly created partition.
$ sudo blkidCopy the UUID value, and edit your fstab to append the following changes.
$ sudo nano /etc/fstab

UUID=4c46c5af-3530-486b-aabe-abca2543edca   none   swap  defaults   0   0
Save your file, and restart your system to make sure that your changes are permanent.
$ sudo reboot
$ sudo swapon --show
Congratulations, you successfully added swap space on CentOS 8 by creating a swap partition.
Troubleshooting
When adding swap space on CentOS 8, you may run into the following error.
- swapon: /swapfile: read swap header failed.
This error is happening when you don’t run the mkswap command before running the swapon command.
As a reminder, mkswap sets the header for the file or the partition to be used as swap space.
If you forget to run the mkswap command, Linux won’t be able to assign it as swap space on your host.
Conclusion
In this tutorial, you learnt how you can add swap space on CentOS 8, either by creating a swap file or by creating a swap partition.
If you are interested in CentOS 8, we already have some tutorials in our dedicated section.
Until then, have fun, as always.