
When searching for tutorials on how to install InfluxDB on Windows, I could not find good and up to date articles about how to do it properly.
To be fair, that’s quite normal.
Such technologies are changing and improving all the time and educational resources need to adapt.
So how do you install InfluxDB on Windows in 2019?
The goal of this tutorial is to have an insightful and up to date article on how to do it.
In this tutorial, we are going to cover all the required steps for a clean InfluxDB installation.
In details, we are going to cover:
- How to download InfluxDB on Windows
- How to configure InfluxDB on your machine
- How to use the NSSM tool to create a customized Windows service
Ready?
I – Downloading InfluxDB
a – Downloading the archive
Downloading InfluxDB is very straightfoward.
Head over to InfluxDB downloads page. There, you will see the following four boxes.
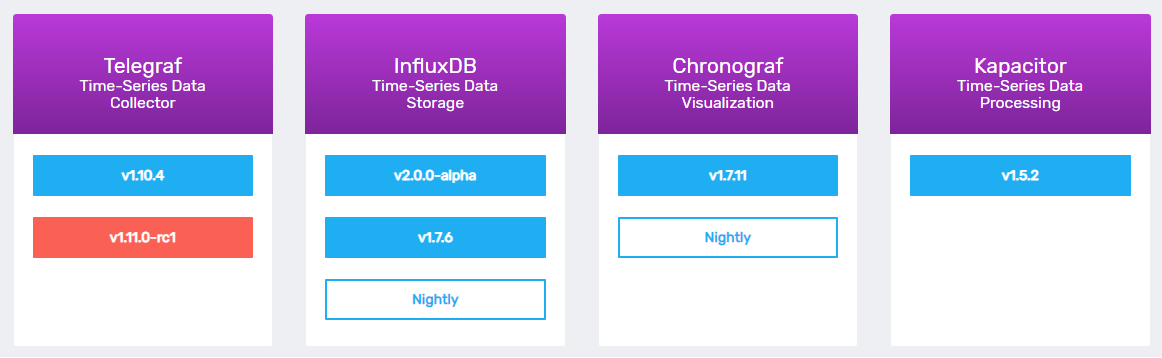
What are those four boxes for?
They are part of the TICK stack. (Telegraf, InfluxDB, Chronograf and Kapacitor).
Each of these tools have a very specific role: gathering metrics, storing data, visualizing time series or having post-processing defined functions on your data.
In this tutorial, we are going to focus on InfluxDB (the time series database component of TICK)
So should you download the v1.7.6 or v2.0.0 version?
In my previous articles, I answered the main difference between the two versions, but here’s the main difference you need to remember.
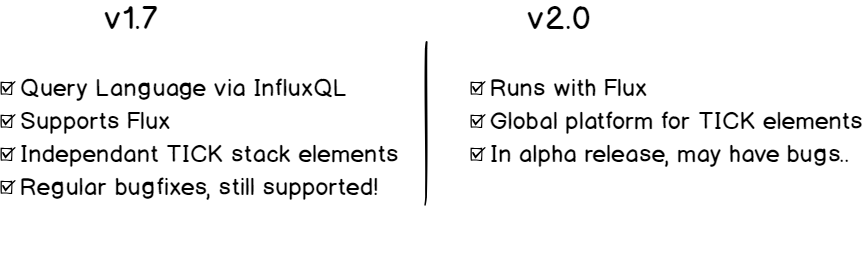
As the 2.0 version is still experimental, we are going to go for the 1.7.6 version.
Click on the v1.7.6 button.
Another window will open with all operating systems. Scroll until you see Windows Binaries (64-bit).

Simply click on the URL in the white box, and the download will automatically start in your browser.
Store it wherever you want, in my case it will be in the Program Files folder.
Unzip the archive using your favorite archive utility tool (7-Zip in my case) or run the following command in a powershell command line.
Expand-Archive -Force C:\path\to\archive.zip C:\where\to\extract\toGreat! Let’s take a look at what you have here.
b – Inspecting the archive
Inside your folder, you now have 5 binaries and 1 configuration file:
- influx.exe: a CLI used to execute IFQL commands and navigate into your databases.
- influx_inspect.exe : get some information about InfluxDB shards (in a multinode environment)
- influx_stress.exe : used to stress test your InfluxDB database
- influx_tsm.exe : InfluxDB time-structured merge tree utility (not relevant here)
- influxd.exe : used to launch your InfluxDB server
- influxdb.conf : used to configure your InfluxDB instance.
Relevant binaries were marked in bold.
II – Configuring your InfluxDB server
Before continuing, you have to configure your InfluxDB instance for Windows.
We are essentially interested in four sections in the configuration file.
a – Meta section
This is where your raft database will be stored. It stores metadata about your InfluxDB instance.
Create a meta folder in your InfluxDB directory (remember in my case it was Program Files).
Modify the following section in the configuration file.
[meta]
  # Where the metadata/raft database is stored
  dir = "C:\\Program Files\\InfluxDB\\meta"
b – Data section
InfluxDB stores TSM and WAL files as part of its internal storage. This is where your data is going to be stored on your computer.
Create a data and a wal folder in your folder. Again, modify the configuration file accordingly.
[data]
  # The directory where the TSM storage engine stores TSM files.
  dir = "C:\\Program Files\\InfluxDB\\data"

  # The directory where the TSM storage engine stores WAL files.
  wal-dir = "C:\\Program Files\\InfluxDB\\wal
Important : you need to put double quotes in the path!
c – HTTP section
There are many ways to insert data into an InfluxDB database.
You can use client librairies to use in your Python, Java or Javascript applications. Or you can use the HTTP endpoint directly.
InfluxDB exposes an endpoint that one can use to interact with the database. It is on port 8086. (here’s the full reference of the HTTP API)
Back to your configuration file. Configure the HTTP section as follows:
[http]
  # Determines whether HTTP endpoint is enabled.
  enabled = true

  # The bind address used by the HTTP service.
  bind-address = ":8086"

  # Determines whether HTTP request logging is enabled.
  log-enabled = true
Feel free to change the port as long as it is not interefing with ports already used on your Windows machine or server.
d – Logging section
The logging section is used to determine which levels of log will be stored for your InfluxDB server. The parameter by default is “info”, but feel free to change it if you want to be notified only for “error” messages for example.
[logging]
  # Determines which log encoder to use for logs. Available options
  # are auto, logfmt, and json. auto will use a more a more user-friendly
  # output format if the output terminal is a TTY, but the format is not as
  # easily machine-readable. When the output is a non-TTY, auto will use
  # logfmt.
  # format = "auto"

  # Determines which level of logs will be emitted. The available levels
  # are error, warn, info, and debug. Logs that are equal to or above the
  # specified level will be emitted.
  level = "error"
e – Quick test
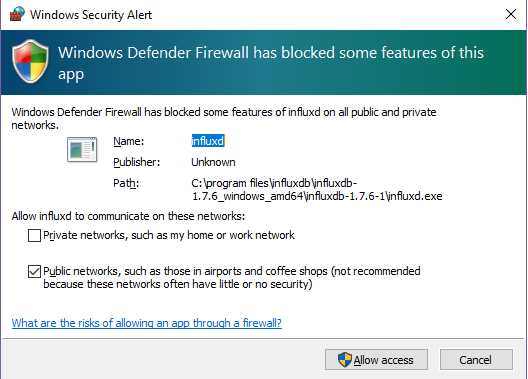
Before configuring InfluxDB as a service, let’s run a quick dry test to see if everything is okay.
In a command-line, execute the influxd executable. Accept the firewall permission if you are prompted to do it.
Now that your InfluxDB server has started, start a new command line utility and run the following command.
C:\Users\Antoine>curl -sl -I http://localhost:8086/ping
HTTP/1.1 204 No Content
Content-Type: application/json
Request-Id: 7dacef6d-8c2f-11e9-8018-d8cb8aa356bb
X-Influxdb-Build: OSS
X-Influxdb-Version: 1.7.6
X-Request-Id: 7dacef6d-8c2f-11e9-8018-d8cb8aa356bb
Date: Tue, 11 Jun 2019 09:58:41 GMT
The /ping endpoint is used to check if your server is running or not.
Are you getting a 204 No Content HTTP response?
Congratulations!
You now simply have to run it as a service, and you will be all done.
III – Run InfluxDB as a Windows service
As you guessed it, you are not going to run InfluxDB via the command line everytime you want to run it. That’s not very practical.
You are going to run it as a service, using the very popular NSSM tool on Windows.
You could use the SC tool that is natively available on Windows, but I just find it more complicated than NSSM.
To download NSSM, head over to https://nssm.cc/download.
Extract it in the folder that you want, for me it will be “C:\Program Files\NSSM”.
From there, in the current NSSM folder, run the following command (you need administrative rights to do it)
> nssm installYou will be prompted with the NSSM window.
Enter the following details in it (don’t forget the config section, otherwise our previous work is useless)
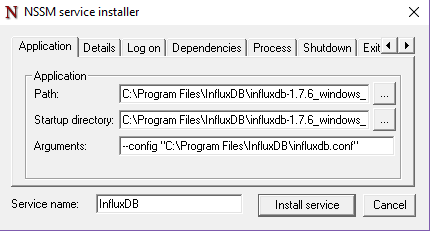
That’s it!
Now your service is installed.
Head over to the services in Windows 10. Find your service under the name and verify that its status is “Running” (if you specified an automatic start up type in NSSM of course)
Is it running? Let’s verify one more time with curl.
C:\Users\Antoine>curl -sL -I http://localhost:8086/ping
HTTP/1.1 204 No Content
Content-Type: application/json
Request-Id: ef473e13-8c38-11e9-8005-d8cb8aa356bb
X-Influxdb-Build: OSS
X-Influxdb-Version: 1.7.6
X-Request-Id: ef473e13-8c38-11e9-8005-d8cb8aa356bb
Date: Tue, 11 Jun 2019 11:06:17 GMT
Congratulations! You did it!
You installed InfluxDB on Windows as a service, and it is running on port 8086.
Bonus : Most Common Mistakes In The Process
- The service did not respond in a timely fashion.
I encountered this error when I tried to setup InfluxDB as a service using SC. As many solutions exist on Google and on Youtube, I solved it by using NSSM.
Tried tweaking the Windows registry but it wasn’t very useful at all.
- Only one usage of each socket address (protocol/network address/port) is normally permitted.
Simple, there is already a program or service listening on 8086. You should modify the default port in the configuration file and take one that is permitted and not used.
- I don’t have the same curl response
A 204 response to the curl command is the only sign that your InfluxDB is running correctly. If you don’t get the same output, you should go back and double check the steps before.
- I have a parsing error in my configuration file!
Remember that in Windows systems backslashs have to be escaped. It’s double backslashs in the paths of your InfluxDB configuration file.
If your path contains some spaces, like “Program Files”, make sure to put your path into quotes.
31 comments
Good work, Thank you very much👌
Great help! thank you very much
[…] Install your first datasource for Grafana : How To Install InfluxDB on Windows 8/10 […]
Grate article!
When I used nssm to create the service, I had to go to Services, start the service *and then* right-click + Resume for it to actually start running.
Thanks for the elaborate guide!
But I tried to start the service again this morning, it shows “There is an internal error”. I guess it’s because I shut the computer and restarted it. I can’t figure out why.
Mmh, I can definitely help if you provide me with a more detailed error. Where does this error line appear exactly?
I have this same error. its when trying to start the service through windows. The service stays paused and if you try to start the service a window with the message ” Windows could not start the InfluxDB service on Local Computer. The service did not return an error. This could be an internal windows error or an internal service error. If the problem persists, contact your system administrator.
where to run nssm install cause when i am running it on CMD i get
‘nssm’ is not recognized as an internal or external command,
operable program or batch file can anyone help with that.
Hi Antoine, Thanks for the clear guide! Could you elaborate on step III – Run InfluxDB as a Windows service – why is this needed?
Hello! You are very welcome.
It is needed in order for the service to run outside of a command line shell. This way, you can stop and restart your database whenever you want.
hello, I downloaded influxDb 1.7.8 versioon and extracted it in program files. As per your article i need to do configuration settings. but my configuration file is not getting opened. Am I doing right or going in wrong direction?? Please help
Thanks for this – Nice Work !
However :
a) this line in your article is missing the ” at the end
wal-dir = “C:\\Program Files\\InfluxDB\\wal
b) You should change nssm image to show that there actually is a ‘influxd.exe at the end of ‘Path’ line – your folder names are so long you cannot see that – and I had to redo that part. I left the exe off and the service actually started with nssm.exe
c) when I went to find my service it said ‘Access Denied’ – the fix for that is to go in the registry (run regedit) and edit the permissions for the service – look for whatever you named your service here : HKEY_LOCAL_MACHINE\SYSTEM\CurrentControlSet\services\InfluxDB-00
right click
permissions
give full control to yourself – I usually just add ‘Everyone’ as a user and give them full control.
Again thanks – I never would have gotten this done without your help – shame Influx doesn’t hire you to write docs for them 🙂
Hi Antoine,
Your guide was super helpful! Million miles better than the official documentation. I have a question though. Does each of these steps apply to kapacitor installation as well? Thanks in advance!
Hello,
Glad to hear that this tutorial could help you.
I have not installed Kapacitor on Windows recently, but I believe that the steps should be pretty much the same.
Best of luck,
SCHKN
thanks a lot
Thank you for the guide, especially for us Windows server admins who don’t have time to learn Linux with several server project deadlines!
You’re welcome! Glad to read that it helped someone 🙂
Are values for path and startup directory the same in the NSSM Service Installer?
Yes, pretty much the bin folder.
Hloo Matt,
I had same error like you for creating the service. I created the service without the influxd.exe. So, now I have error to run it as a service. And, I am unable to delete this service or create it new. Could you help me with this problem. I tried to delete the service from registry and also usind cmd and shell, but to no avail. Kindly need your assistance on this .
If you try to launch the influxd executable via a command line, what happens?
A very useful guide, but I have a question though: ✌
Before the folder changes, I saved the 1 day data under C: \ Users \ .., I moved the data there to the folder I just created, but I could not access the old data. Is there a way to access old data?
Mmh, I would make sure that the “data” folder is entirely copied and that the configuration file correctly points to this folder.
Make sure to leave another comment to let me know if it solved the issue 🙂
Or you could just `cinst influxdb` and run `c:\influxdata\influxdb-1.8.0-1\influxd.exe` 🙂
Thank you so much very easy to follow tutorial for the novice !
Thanks for this post!
It worked fine for me 🙂
Here is a solution for german users:
https://www.itnator.net/influxdb-installieren-auf-windows-so-gehts/
Sabine
Glad it helped 🙂
Hi, Thank a lot for the article. Its very clear and simple. But i am blocked at step 6 (quick test). Can you please help in resolving this issue?
I am getting below error while trying to ping using command you mentioned in the article.
InfluxDB shell version: 1.8.0
> curl -sl -I http://localhost:8086/ping
ERR: error parsing query: found curl, expected SELECT, DELETE, SHOW, CREATE, DROP, EXPLAIN, GRANT, REVOKE, ALTER, SET, KILL at line 1, char 1
Warning: It is possible this error is due to not setting a database.
Please set a database with the command “use “.
>
Are you sure that you are using the correct options for curl?
For the record, the ping examples come from this documentation : https://docs.influxdata.com/influxdb/v1.8/tools/api/#ping-http-endpoint
Let me know if you still have this problem.
How to uninstall influxdb 1.7.10 in windows 10
Great , it works !