
As a system administrator, creating partitions on Linux for your disks is a very common task.
You may want for example to add some extra space to some directories on your filesystem, or you simply want to extend your existing filesystems because you expect them to grow.
Luckily for us, there are many ways to create disk partitions on Linux using command line tools such as fdisk and parted or graphical tools like gparted.
This tutorial focuses on those two tools, providing detailed steps towards creating and extending your disk partitions on Linux.
Prerequisites
In order to create or delete partitions on Linux, you are going to need sudo privileges on your host.
To verify that you are sudo, run “sudo” with a “-l” option to list your current privileges
$ sudo -l

User <user> may run the following commands on <host>:
   (ALL : ALL) ALL
If you don’t have sudo privileges on your system, make sure to add yourself to sudoers on Debian or CentOS.
Whenever you are ready, you can jump to the next section.
Create Disk Partition on Linux using fdisk
Among all the partitioning tools available on Linux, fdisk is probably one of the most popular ones.
The fdisk command is a multipurpose command allowing system administrators to create, delete and list partitions on your system.
You can also change an existing partition type (if you want to switch to swap space for example), and you can also verify your existing partition tables for integrity.
In this section, we are going to focus on a subset of commands available for fdisk : create and delete options.
List Existing Partitions using fdisk
First of all, you have to perform an audit of the existing partitions available on your system.
To list existing partitions on Linux, use the “fdisk” command with a “-l” option.
$ sudo fdisk -l

Disk /dev/sda: 30 GiB, 32212254720 bytes, 62914560 sectors
Units: sectors of 1 * 512 = 512 bytes
Sector size (logical/physical): 512 bytes / 512 bytes
I/O size (minimum/optimal): 512 bytes / 512 bytes
Disk identifier: <disk id>

Device      Start       End   Sectors  Size   Type
/dev/sda1   2048   46483455   46481408 22.2G  Linux filesystem
As you can see, we currently own one disk named sda (for a SATA/SCSI hard drive) that currently has only one partition.
On Linux, partitions are named with the name of the hard drive followed by an index from 1 to the maximum number of partitions available on the disk.
In this case, we own one partition named “sda1” that is 22.2 GB in size and of type Linux.
As you probably guessed, we have a remaining space of 8GB on our disk in order to create additional partitions.
As a consequence, we are going to create two partitions : one in order to store our personal files (sda2 of size 3GB) and one in order to increase our swap space (of size 1GB)
Create Additional Primary Partition on Linux
To create a new Linux partition, run the “fdisk” with the name of the hard drive you want to create partitions on.
$ sudo fdisk /dev/sda

Welcome to fdisk (util-linux 2.31.1).
Changes will remain in memory only, until you decide to write them.
Be careful before using the write command.


Command (m for help):
To add a new partition, you are going to type the “n” command in fdisk.
Command (m for help): n
Partition type
   p   primary (1 primary, 0 extended, 3 free)
   e   extended (container for logical partitions)
Select (default p) :
So what is the difference between primary and extended partitions?
- Primary partitions : primary partitions are subdivisions of a hard drive designed in order to isolate space and not affect data on another part of the hard drive. You can only create up to four primary partitions because of the underlying layout of the partition table;
- Extended partitions : on the other hand, you can create extended partitions in order to bypass the four partition size limit and create what we call “logical” partitions.
In this case, we are interested in primary partitions, so we are going to select the “p” option.
Select (default p) : p
Partition number (2-4, default 2):
Then, you are asked for the partition index number for your new partition. You can stick to the default options and select the partition number 2.
Partition number (2-4, default 2): 2
First sector (46483456-62914559, default 46483456) :
On the next prompt, you are asked for the starting and ending sector of your hard drive.
From a hard drive design point of view, your hard drive is divided into multiple sectors of a given number of bytes. You already saw this information when you listed your current existing partitions on your drive.
Disk /dev/sda: 30 GiB, 32212254720 bytes, 62914560 sectors
Units: sectors of 1 * 512 = 512 bytes
Sector size (logical/physical): 512 bytes / 512 bytes
In the information presented above, you have 62914560 sectors of 512 bytes each.
You can stick with the defaults for this prompt as you don’t want to override existing sectors or have a disk partitioning that is inappropriately divided.
First sector (46483456-62914559, default 46483456) : 46483456
Last sector, +/- sectors or +/-size{K,M,G,T,P} (46483456-62914559, default 62914559):
This is a very important step as this is where you are going to decide the size of your hard drive partition.
You can either choose to have a number of sectors, or to have a size in megabytes or gigabytes defined.
We said in the previous section that we would choose a 3GB secondary partition, so let’s complete this information in the prompt.
Last sector, +/- sectors or +/-size{K,M,G,T,P} (46483456-62914559, default 62914559): +3G

Created a new partition 2 of type 'Linux' and of size 3GiB.

Command (m for help):
Congratulations, you created a new partition on your Linux system.
However, the changes are not written to disk, yet.
To write your changes to the disk, type the “w” option on the fdisk command line.
Command (m for help): w
The partition table has been altered.
Syncing disks.
In order to verify that your primary partition was correctly created, you will have to run the “fdisk -l” command again.
$ sudo fdisk -l

Disk /dev/sda: 30 GiB, 32212254720 bytes, 62914560 sectors
Units: sectors of 1 * 512 = 512 bytes
Sector size (logical/physical): 512 bytes / 512 bytes
I/O size (minimum/optimal): 512 bytes / 512 bytes
Disk identifier: <disk id>

Device      Start       End       Sectors  Size   Type
/dev/sda1   2048       46483455   46481408 22.2G  Linux filesystem
/dev/sda2   46483458   52774911   6291459  3G     Linux filesystem
Great! You have successfully created a new partition on your Linux system using fdisk.
Create Disk Partition on Linux using parted
Another way to create a partition on Linux is to use parted.
So what is the difference between parted and fdisk?
The difference between parted and fdisk resides in the fact that fdisk manipulates partition tables while parted is more of a high-level tool manipulating partitions but also filesystems (like ext3, ext4) on your system.
By default, parted should be installed on your system, but you can verify that it is installed by running “parted” with the “-v” option.
$ parted -v
parted (GNU parted) 3.2
Copyright (C) 2014 Free Software Foundation, Inc.
First of all, you want to have a listing of the existing partitions on your system.
List Existing Partitions using parted
To list existing partitions using parted, run parted with the “-l” flag.
$ sudo parted -l
Model: <Disk Model> (scsi)
Disk /dev/sda: 32.2GB
Sector size (logical/physical): 512B/512B
Partition Table: gpt
Disk Flags:

Number  Start   End     Size    Type      File system   Flags
1      1049kB  23.8GB  23.8GB   primary   ext4          boot
As you can see, we currently only have one partition on our hard drive, but we are going to create an additional one with parted.
Create Additional Primary Partition using parted
To create a new partition using parted, run parted with the name of your hard drive.
$ sudo parted /dev/sda

GNU Parted 3.2
Using /dev/vda
Welcome to GNU Parted! Type 'help' to view a list of commands.
(parted)
When you are in parted, you can type “help” to have a listing of all the available commands on the utility.
To create a new disk partition, run the “mkpart” option with the partition type that you want to create.
(parted) mkpart primaryOn the next prompt, you are asked for the filesystem you want to be written to the disk partition. By default, the tool suggests ext2 but we are going to have an ext4 filesystem type.
File system type?  [ext2]?  ext4
Start?
On the next prompt, you are asked where you want your disk partioning to start. The first partition ended at 23.8 GB on the disk, so let’s have a partition starting at 23.9 for the next partition.
The start and end options are expressed in megabytes.
Start? 23900

End? 27000

(parted)
To create a 3GB disk partition, we will decide to end the disk partition at 27000 megabytes.
Print your disk partitions again to make sure that your changes were already written to the disk partition.
(parted) print

Model: <Disk Model> (scsi)
Disk /dev/sda: 32.2GB
Sector size (logical/physical): 512B/512B
Partition Table: gpt
Disk Flags:

Number  Start   End     Size    Type      File system   Flags
1      1049kB  23.8GB  23.8GB   primary   ext4          boot
2 23.9GB 27.0GB 3100MB primary ext4 lbaAwesome!
You have created a disk partition on Linux using parted and you already have an ext4 filesystem on it.
Create Swap Partition using parted
In the previous section, we created a primary disk partition on Linux using parted, but sometimes you are interested in creating swap partitions.
To create a new swap partition using parted, you will need to specify a different filesystem type which is “linux-swap”.
Let’s have a complete step-by-step example ; first run parted again.
$ sudo parted /dev/sda

GNU Parted 3.2
Using /dev/vda
Welcome to GNU Parted! Type 'help' to view a list of commands.
(parted)
Create a new primary partition with mkpart.
$ (parted) mkpart primaryThis is where the instructions get special, specify “linux-swap” for the filesystem type.
$ File system type? [ext2]? linux-swapAgain, you are asked for start and end sectors on your hard drive. Make sure not to override current existing partitions on your system.
In this case, let’s have a 1GB swap partition on your system.
$ Start? 27100

$ End? 28100
Again, make sure that the changes were correctly written by running the print command in parted.
$ (parted) print

Model: <Disk Model> (scsi)
Disk /dev/sda: 32.2GB
Sector size (logical/physical): 512B/512B
Partition Table: gpt
Disk Flags:

Number  Start   End     Size    Type      File system     Flags
1      1049kB  23.8GB  23.8GB   primary   ext4            boot
2      23.9GB  27.0GB  3100MB   primary   ext4            lba
3      27.1GB  28.1GB  999MB    primary   linux-swap(v1)  lba
Great!
You have successfully created a swap partition on Linux using parted.
However, it does not mean that your swap partition is active.
To make your swap partition active, run the mkswap command with the name of your partition (sda3 here).
$ sudo mkswap /dev/sda3

Setting up swapspsace version 1, size = 953 MiB (x bytes)
no label, UUId=<uuid>
Finally, run the swapon command to activate your newly created swap space.
$ sudo swapon /dev/sda3You can run “lsblk” in order to see your effective changes.
$ lsblk

NAME    MAJ:MIN RM  SIZE RO TYPE MOUNTPOINT
sda     252:0    0   30G   0 disk
├─sda1  252:1    0  22.2G  0 part /
├─sda2 252:14    0   2.9G  0 part
└─sda3 252:15    0   953M  0 part [SWAP]
Awesome! You now have created and enabled your swap partitions on your host.
The last way to create disk partitions on Linux is to use the gparted tool.
Create disk partition on Linux using gparted
The last way to create partitions on Linux is to use the gparted tool.
The gparted tool is a GUI based partitioning utility design to perform partition creation, deletion and modifications in a user-friendly way.
Contrary to fdisk and parted, the gparted utility might not be installed on your system already so you may need to install it.
To install gparted on Linux, you can run the following commands
$ sudo apt-get install gparted    [Debian/Ubuntu]
$ sudo yum install gparted        [RHEL/CentOS]
Now that gparted is installed on your system, simply run “gparted” in order for the tool to start.
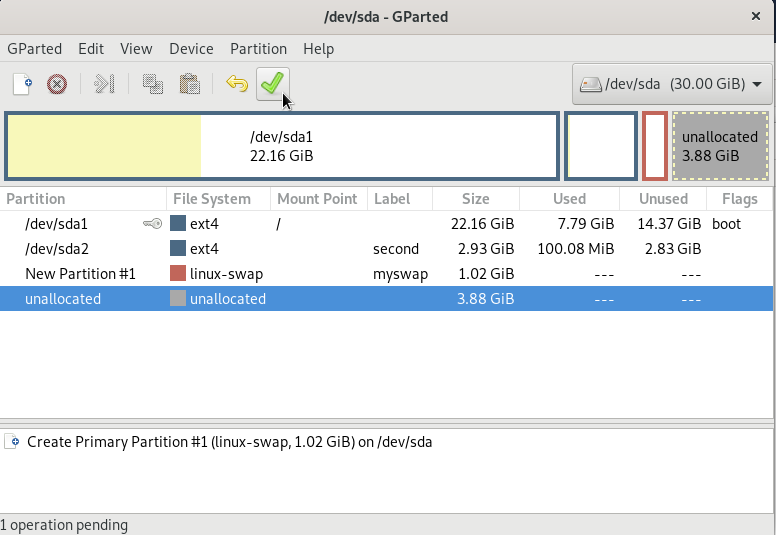
$ sudo gpartedWhen launching gparted, this is the default window that you should see on your screen.
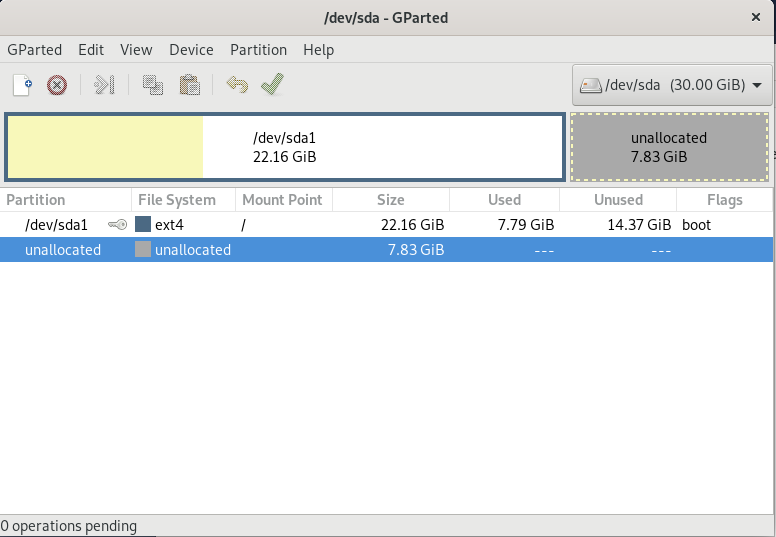
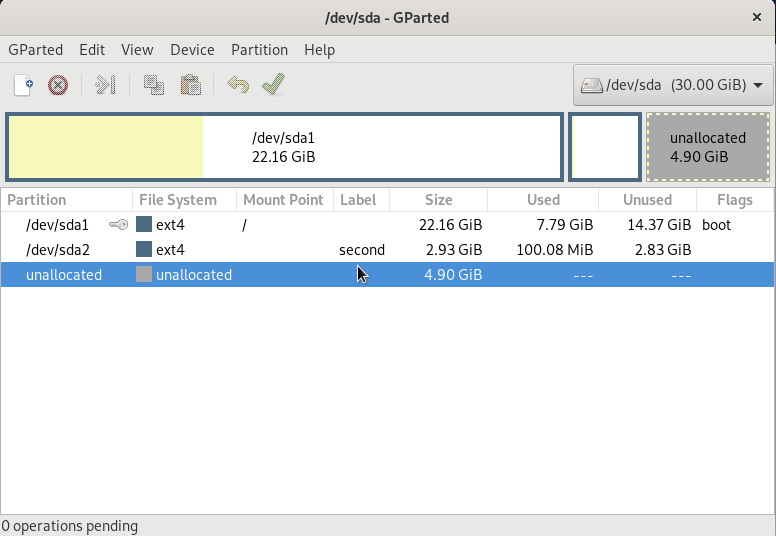
On the window, you are presented with all the disks that you may own the system as well as the way they are partitioned for now.
In the example shown above, you currently see one disk named “sda” with a total capacity of 30GB, with currently one partition of 22.16 GBs in size. You also see that we have 7.83 GB still available on the disk.
Create Additional Primary Partition using gparted
To create a partition using gparted, right-click on the unallocated space and select the “New” option.

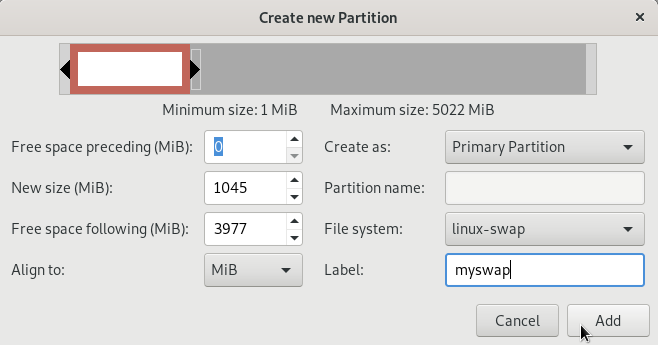
A new window named “Create new partition” should now appear on your screen. This is the utility that you are going to use in order to name and tweak your future partition.
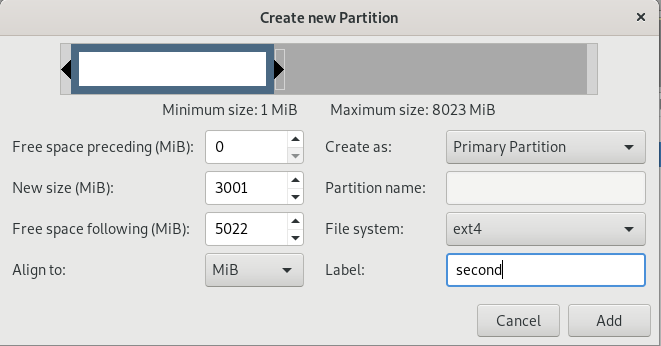
Here is the description of all the fields shown in this window :
- Free space preceding (MiB) : the space you may want to allocate before the partition for “free space”;
- New size : the actual size of your partition (here 3GB);
- Free space following (MiB) : the space you may want to allocate after for partition for “free space”;
- Align to : you can choose to define your size in MiB or in cylinders;
- Create as : if you want to create a primary or an extended partition;
- File system : the filesystem type you want gparted to create on your new partition (here ext4);
- Label : if you want use a label for your partition.
In case you may be wondering, why would someone allocate free space before or after a partition on Linux?
In some cases, for your primary partitions (especially the one mounted on root), you want to allocate free space in order to make sure that the kernel can run properly if all the space were to be filled.
Let’s say for example that you store your logs on your primary partition mounted on “/”. If a program fills the logs, you may not be able to run your system again because the kernel will need some space to run and create temporary files.
This concept is also known as “reserved blocks” on a hard drive.
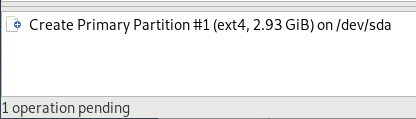
When you are done with disk partitioning, click on “Add” for the partition to be created.
Similarly to fdisk, your changes are not directly written to disk.
To write the changes to disk using gparted, click the “Apply All Operations” button in the gparted GUI.
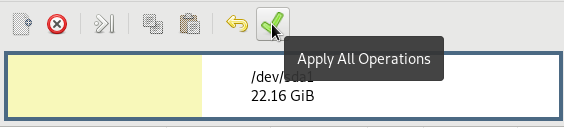
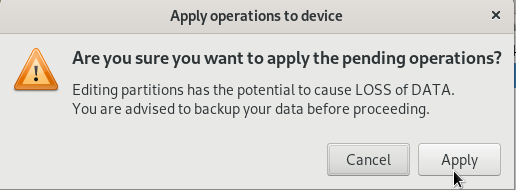
You are asked if you are sure that you want to write the changes to the disk, click on “Apply” one last time for the changes to be applied.
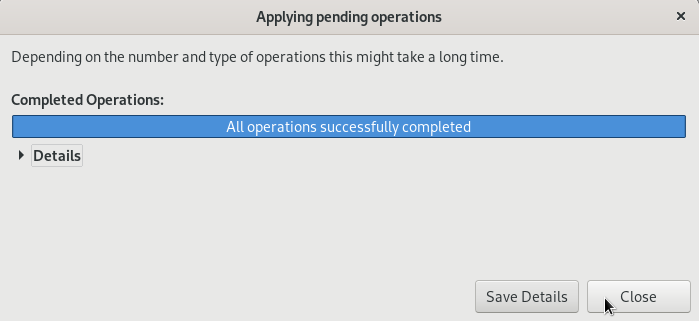
Finally, a box will be presented with the current changes done. If no errors were detected during the process, you should be good to go.
Finally, you should see your new partition in the general partitioning window of gparted.
Congratulations!
You successfully created a partition on Linux using gparted.
Now let’s see how you can create a swap partition using gparted on the same host.
Create Swap Partition using gparted
In order to create a swap partition, you will follow the same steps as the one described before.
Right click on the unallocated space and click “New“.
In the next window, make sure to select the “linux-swap” option in the filesystem type.
Click on “Add” to create the swap partition.
Again, hit the “Apply All Operations” in order for the pending operations to be applied.
Again, this will create a swap partition on your system but you will need to enable it, it is not active by default.
To make your swap partition active, run the mkswap command with the name of your partition (sda3 here).
$ sudo mkswap /dev/sda3

Setting up swapspsace version 1, size = 953 MiB (x bytes)
no label, UUId=<uuid>
Finally, run the swapon command to activate your newly created swap space.
$ sudo swapon /dev/sda3Congratulations, you have successfully created and enabled a swap partition on Linux.
Conclusion
In this tutorial, you learnt how you can easily create partition on a Linux system.
You learnt that you can choose between three utilities : fdisk, parted and gparted depending on the level of granularity that you want.
You also learnt more about swap partitions and how you can activate them on your system.
If you are interested about Linux System Administration, we have a complete section dedicated to it on the website.

2 comments
[…] To Clone a Git Repository How To Check Free Disk Space on Linux Docker Logs Complete Guide How To Create Disk Partitions on Linux How To Show Hidden Files on Linux How To Set and Unset Environment Variables on… How To Set […]
Nice article but one useful utility you omitted was ‘cfdisk’. It is essentially an ncurses version of ‘fdisk’ but allows you to easily change the type of disk you are intending to partition & format. I find this especially useful for preparing hard drives for UEFI Linux installs.
If I am starting off with a hard drive I want to alter, I first whack the partition table with dd:
dd if=/dev/zero of=/dev/sdX bs=512 count=1
Then I use ‘cfdisk’:
cfdisk /dev/sdX (where the X represents the letter of the drive)
This gives you the option of selecting a legacy DOS disk type or the newer GPT type necessary for a UEFI Linux install.
You can also create a sun or sgi disk, if you have any use for that. You can directly create your partitions with ‘cfdkisk’
but you can’t format them. I prefer to create one big Linux partition and do the fine tuning with ‘gparted’ or with the the distributions installer.