This tutorial focuses on setting up and configuring a SSH server on a CentOS 8 desktop environment.
SSH, for Secure Shell, is a network protocol that is used in order to operate remote logins to distant machines within a local network or over Internet.
In SSH architectures, you will typically find a SSH server that is used by SSH clients in order to perform remote commands or to manage distant machines.
As a power user, it is very likely that you may want to use SSH in order to connect to remote machines over your network.
As a consequence, when new hosts are onboarded to your infrastructure, you may have to configure them to install and enable SSH on them.
In this tutorial, we are going to see how you can install and enable SSH on CentOS 8 distributions.
We will also see how you can install OpenSSH to enable your SSH server on CentOS.
Prerequisites
In order to install a SSH server on CentOS 8, you will need to have sudo privileges on your server.
To check whether you have sudo privileges or not, run the following command
$ sudo -lIf you are seeing the following entries on your terminal, it means that you currently belong to the sudo group.
User user may run the following commands on server-centos:
    (ALL : ALL) ALL
By default, the ssh utility should be installed on your host, even on minimal configurations.
In order to check the version of your SSH utility, you can run the following command
$ ssh -V
As you can see, I am running OpenSSH v7.8 with OpenSSL v1.1.1.
Note that it does not mean that SSH servers are installed on my host, it just means that I may able to connect to remote machines as a client using the SSH utility.
It also mean that specific utilities related the SSH protocol (such as scp for example) or related to FTP servers (such as sftp) will be available on my host.
Handy!
Installing OpenSSH Server on CentOS 8
First of all, you have to make sure that your current packages are up to date for security purposes.
$ sudo yum updateIf you are prompted with updates, simply press “y” in order to accept the updates on your system.

In order to install a SSH server on CentOS 8, run the following command
$ sudo yum install openssh-serverThe command should run a complete installation process and it should set up all the necessary files for your SSH server.
If the installation was successful, you should now have a sshd service installed on your host.
To check your newly installed service, run the following command
$ sudo systemctl status sshd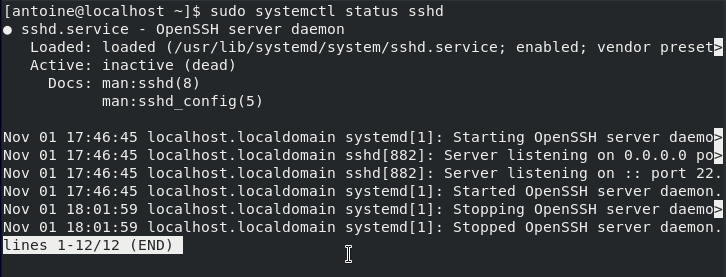
Note that by default, your SSH server might not be started or enabled, you will have to do it by yourself.
You can start your SSH server by running the following command (you will see how to enable your SSH server in the next chapters)
$ sudo systemctl start sshdBy default, your SSH server is going to run on port 22.
This is the default port assigned for SSH communications.
You can check if this is the case on your host by running the following netstat command
$ netstat -tulpn | grep :22
Great! Your SSH server is now up and running on your CentOS 8 server.
Enabling SSH traffic on your firewall settings
By default, your firewall might not allow SSH connections by default.
As a consequence, you will have to modify your firewall rules in order to accept SSH.
To enable SSH traffic on your SSH server, use the firewall-cmd command in the following way
$ sudo firewall-cmd --permanent --zone=public --add-service=ssh
$ sudo firewall-cmd --reload
Make sure that the services are correctly authorized by running the following command
$ sudo firewall-cmd --list-all | grep services

services : cockpit dhcpv6-client http https ssh
Enable SSH server on system boot
As you probably saw, your SSH server is now running as a service on your host.
It is also very likely that it is instructed to start at boot time.
To check whether your service is enable or not, you can run the following command
$ sudo systemctl list-unit-files | grep enabled | grep sshIf no results are shown on your terminal, enable the service and run the command again
$ sudo systemctl enable ssh
Configuring your SSH server on CentOS 8
Before giving access to users through SSH, it is important to have a set of secure settings to avoid being attacked, especially if your server is running as an online VPS.
SSH attacks are pretty common : as a consequence, you have to configure your SSH server properly if you don’t want to lose any very sensitive information.
By default, your SSH configuration files are located at /etc/ssh/

In this directory, you are going to find many different configuration files, but the most important ones are :
- ssh_config: defines SSH rules for clients. It means that it defines rules that are applied everytime you use SSH to connect to a remote host or to transfer files between hosts;
- sshd_config: defines SSH rules for your SSH server. It is used for example to define the reachable SSH port or to deny specific users from communicating with your server.
In this tutorial, we will modify the sshd_config file as we are interested in setting up a SSH server, not configuring the SSH clients.
Disabling Root Login on your SSH server
By default, root login is available on your SSH server.
It should obviously not be the case as it would be a complete disaster if hackers were to login as root on your server.
If by chance you disabled the root account in your CentOS 8 initial installation, you can still configure your SSH server to refuse root login, in case you choose to re-enable your root login one day.
To disable root login on your SSH server, modify the following line
#PermitRootLogin

PermitRootLogin no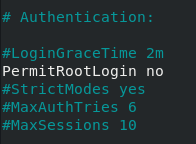
Changing SSH default port
The first step towards running a secure SSH server is to change the default assigned by the OpenSSH server.
Edit your sshd_config configuration file and look for the following line.
#Port 22Make sure to change your port to one that is not reserved for other protocols. I will choose 2222 in this case.
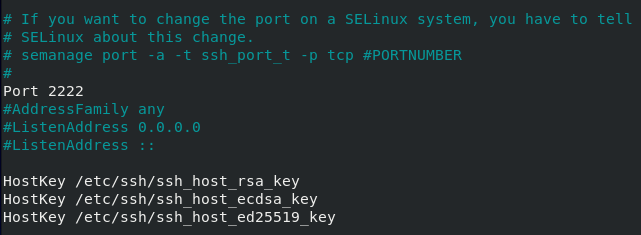
When connecting to your host, if it not running on the default port, you are going to specify the SSH port yourself.
Now that you have changed the default port, you will need to configure SELinux in order to change the default SSH port.
If you don’t do this step, you won’t be able to restart your SSH server.
$ sudo semanage port -a -t ssh_port_t -p tcp 2222

$ sudo systemctl restart sshd
Please refer to the ‘Connecting to your SSH server’ section for further information.
Configuring key-based SSH authentication
In SSH, there are two ways of connecting to your host : by using password authentication (what we are doing here), or having a set of SSH keys.
So why would you want to configure SSH authentication?
SSH authentication can be used in order to bypass password authentication and to authenticate without having to enter any sensitive information like a password.
Linux will simply take public keys that you already configured, send them to the server that will be responsible for verifying their integrity.
If you are looking for an example, there is a guide on how to setup SSH keys on Debian and the steps should be the same for CentOS distributions.
Restarting your SSH server to apply changes
In order for the changes to be applied, restart your SSH service and make sure that it is correctly restarted
$ sudo systemctl restart sshd
$ sudo systemctl status sshd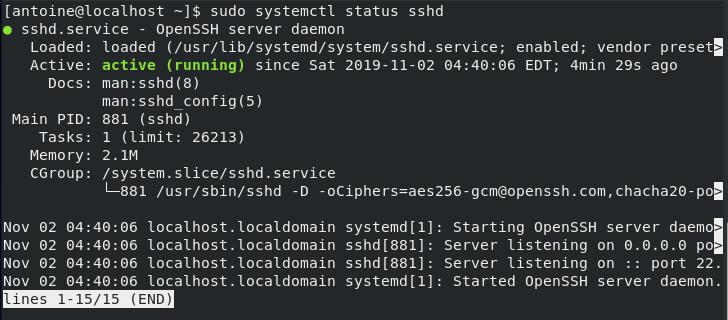
Connecting to your SSH server
In order to connect to your SSH server, you are going to use the ssh command with the following syntax
$ ssh -p <port> <username>@<ip_address>If you are connecting over a LAN network, make sure to get the local IP address of your machine with the following command
$ sudo ifconfigAlternatively, you can get your local IP address by using the hostnamectl command.
$ hostname -I | awk '{print $1}'
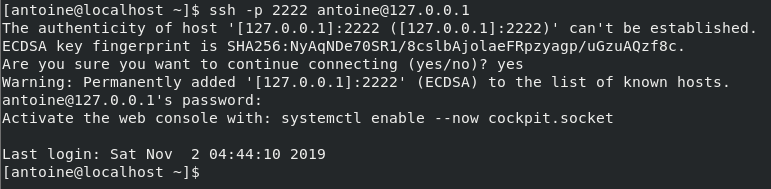
For example, in order to connect to my own instance located at 127.0.0.1, I would run the following command
$ ssh -p 2222 <user>@<ip_address>You will be asked to provide your password and to certify that the authenticity of the server is correct.
Disabling your SSH server
In order to disable your SSH server on CentOS 8, run the following command
$ sudo systemctl stop sshd
$ sudo systemctl status sshd
From there, your SSH server won’t be accessible anymore.

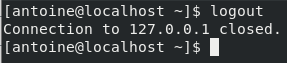
Exiting your SSH server
In order to exit from your SSH server on CentOS 8, you can hit Ctrl + D or type ‘logout’ and your connection will be terminated.
Conclusion
In this tutorial, you learnt how you can install, enable, configure and restart your SSH server on CentOS 8.
Note that this tutorial also works for RHEL 8 distributions in the exact same way.
With this tutorial, you also learnt how you can configure your SSH server in order for it to be robust enough for basic attacks.
If you are interested in Linux system administration, we encourage you to have a look at our other tutorials on the subject.